
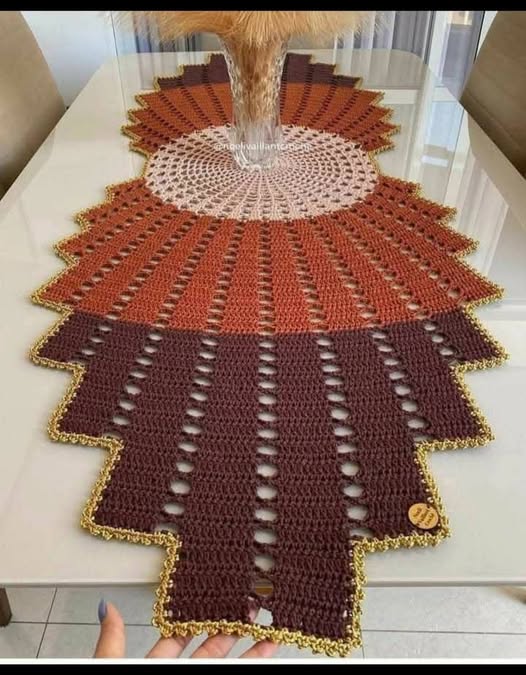
A Gradient Table Runner – Crochet Pattern is a stunning way to add a touch of elegance and personality to your dining or living space. This crochet project allows you to create a beautifully gradual color transition that brings warmth, style, and sophistication to your table décor.
With the Gradient Table Runner – Crochet Pattern, even beginner crocheters can achieve a professional-looking result while enjoying the creative process. Using this pattern, you can customize colors and textures to match your home aesthetics, making it a versatile and rewarding project.
Creating a Gradient Table Runner is more than just making a functional item—it’s about expressing creativity and artistry. The gradual color transitions allow for endless possibilities in design, and choosing the right combination of yarns can dramatically enhance the runner’s visual appeal.
Whether you are using soft pastels for a subtle look or vibrant hues for a bold statement, the Gradient Table Runner – Crochet Pattern provides step-by-step guidance to bring your vision to life.
This Gradient Table Runner – Crochet Pattern is suitable for a wide range of skill levels, from beginners to advanced crocheters. With careful attention to color transitions and stitch consistency, anyone can create a seamless and eye-catching table runner. In this article, we will walk you through the materials needed, step-by-step instructions, creative ideas, essential tips, a detailed FAQ, and a conclusion summarizing the main points to help you complete your project successfully.
Materials You’ll Need for the Gradient Table Runner
To make your Gradient Table Runner – Crochet Pattern a success, it’s important to gather all necessary materials before starting. Having everything ready ensures a smooth and enjoyable crafting experience.
- Yarn: Select yarns that are suitable for home décor. Cotton yarn is ideal due to its durability, soft texture, and ability to hold stitches well. Pick a gradient set or complementary colors to achieve the perfect color transition.
- Crochet Hook: Use a hook that matches the yarn weight. The pattern may recommend a size, but adjusting for your tension is key to getting a consistent texture.
- Scissors: A sharp pair of scissors will help you cut yarn neatly without fraying.
- Measuring Tape: Ensures your table runner reaches the desired length and width, keeping the proportions accurate.
- Tapestry Needle: For weaving in ends and sewing pieces together, a tapestry needle is essential.
- Blocking Supplies (Optional): Blocking mats and pins help shape the finished runner, especially if you want a polished and flat result.
Having these materials ready before starting your Gradient Table Runner – Crochet Pattern ensures a smoother workflow and better final results.
Step-by-Step Instructions for the Gradient Table Runner
The Gradient Table Runner – Crochet Pattern involves simple yet elegant steps. By following these instructions, you can create a stunning piece with smooth color transitions.
1. Choosing Your Gradient Colors
Select colors that transition naturally from light to dark or one hue to another. This is the most important step for achieving the desired gradient effect.
Tip: Place the yarns side by side to see how they blend together before starting your project.
2. Starting the Base Chain
Begin by creating a foundation chain that matches the desired width of your table runner. Keep your tension even for consistent stitch height.
Tip: Make a few extra chains to allow for edge adjustments during assembly.
3. First Rows of Crochet
Work your first few rows using basic stitches such as single crochet, half double crochet, or double crochet. Focus on maintaining straight edges and even tension.
Tip: Count stitches at the end of each row to avoid accidental increases or decreases.
4. Changing Colors Gradually
Switch yarns every few rows to create a gradient effect. You can use two methods: blending the ends by alternating stitches or joining a new color seamlessly at the end of a row.
Tip: Plan your color change points to ensure smooth transitions that enhance the runner’s visual appeal.
5. Continuing Until Desired Length
Keep repeating the stitch pattern and color changes until your runner reaches the desired length. Measure periodically to maintain uniformity.
Tip: Mark the midpoint or key sections with pins to help monitor progress and color alignment.
6. Finishing and Weaving in Ends
After reaching the desired length, finish with a clean border or edging of your choice. Weave in all loose ends using a tapestry needle to prevent unraveling.
Tip: Consider adding a decorative border to enhance the runner’s overall appearance.
Creative Ideas for Using the Gradient Table Runner
A Gradient Table Runner is versatile and can elevate any space with its charming design. Here are some ideas to maximize its use:
- Dining Table Décor: Place it across your dining table to create a stylish and cohesive look. Choose colors that complement your tableware.
- Sideboards and Consoles: Use the runner on side tables or consoles to highlight décor items like vases or picture frames.
- Layered Table Settings: Combine with placemats or tablecloths for a layered, dynamic look.
- Seasonal Themes: Customize the gradient colors to reflect seasonal décor, such as autumn tones for fall or pastels for spring.
- Gift Ideas: A handmade Gradient Table Runner – Crochet Pattern makes a thoughtful gift for housewarmings or special occasions.
- Wall Hanging or Shelf Decor: Fold and drape it as a decorative element on shelves or walls to showcase your crochet skills.
These creative applications ensure that your Gradient Table Runner becomes both functional and decorative, offering a unique touch to your home.
Tips for Perfecting Your Gradient Table Runner
To achieve a professional-looking Gradient Table Runner, consider these tips:
- Choose the Right Yarn: Yarn texture and weight affect color transitions and drape. Soft cotton or acrylic works best for durability.
- Maintain Even Tension: Uneven tension can distort the runner and affect the gradient effect.
- Plan Color Placement: Lay out all yarn colors before starting to visualize the gradient flow.
- Experiment with Stitch Patterns: Combine simple and textured stitches to add depth and visual interest.
- Block Your Runner: Blocking ensures edges are straight, stitches are even, and the runner lays flat.
- Be Patient: Gradual color transitions require time and careful planning, so take breaks to maintain accuracy.
Applying these tips ensures that your Gradient Table Runner – Crochet Pattern is both beautiful and long-lasting.
FAQ About Gradient Table Runner
Q1: Can beginners make a Gradient Table Runner?
Yes! This Gradient Table Runner – Crochet Pattern is beginner-friendly, especially when using simple stitches like single or double crochet.
Q2: How long should the table runner be?
Length varies depending on your table size. Standard runners are 60–72 inches long, but you can customize as needed.
Q3: What colors work best for gradients?
Choose colors that blend naturally. Pastels, neutral shades, or shades of the same hue create smooth gradients.
Q4: Can I wash the runner?
Yes, but follow yarn care instructions. Cotton yarn is machine washable on gentle cycles, while delicate fibers may require handwashing.
Q5: Can I use this pattern for gifts?
Absolutely. Handmade Gradient Table Runners make elegant and personal gifts for housewarmings or special occasions.
Q6: How do I prevent edges from curling?
Use a border stitch, maintain even tension, and block the finished runner to keep edges flat.
Conclusion
Creating a Gradient Table Runner – Crochet Pattern is a rewarding and creative project that enhances your home décor. By carefully selecting materials, following step-by-step instructions, and experimenting with colors and stitches, you can craft a beautiful runner that showcases your crochet skills. This versatile piece can be used for dining tables, consoles, shelves, or as a thoughtful handmade gift.
VIDEO TUTORIAL
Share your completed projects, provide honest feedback, and offer suggestions to inspire other crafters. Your creativity and insights help the crafting community continue to grow and innovate.