
Crocheted house-shaped cookie for Christmas tree

The Gnome Towel Topper Crochet – Tutorial is a delightful and practical project that allows you to add a whimsical and charming touch to your home décor.
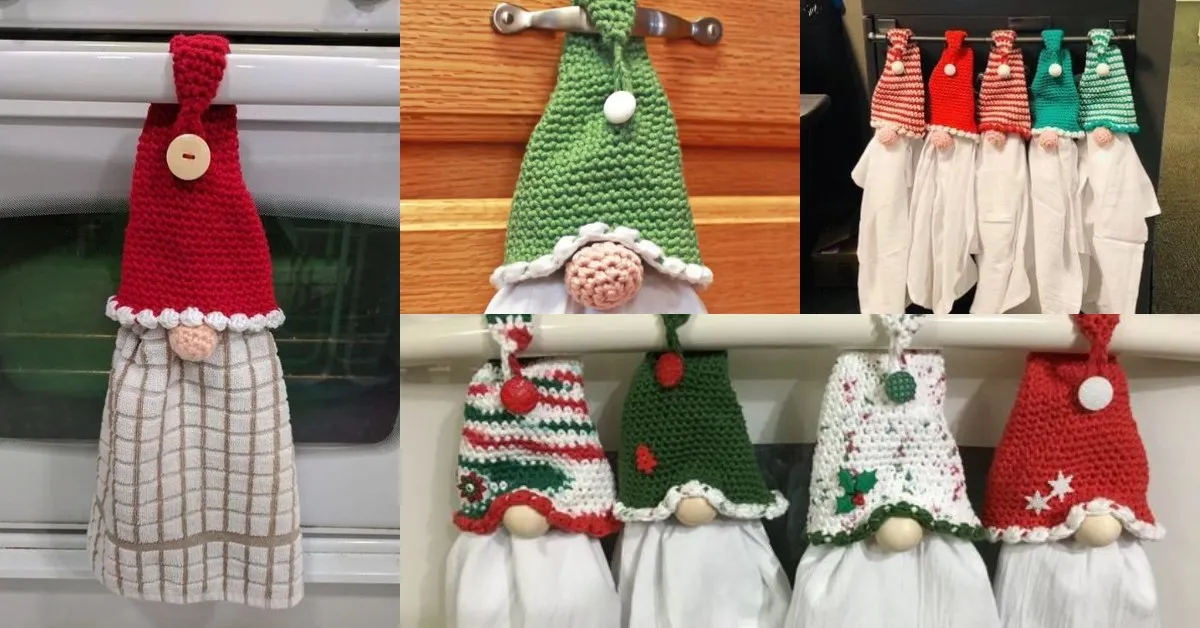
The Gnome Towel Topper Crochet is perfect for anyone who loves handmade decorations, whether for the kitchen, bathroom, or seasonal events.
Creating your own gnome towel topper is not only fun but also allows you to explore creative possibilities, from choosing different colors to adding accessories. These small projects are quick to complete yet make a noticeable difference in your home’s aesthetic.
This tutorial is suitable for beginners while also offering opportunities for advanced crocheters to experiment with design. By following the Gnome Towel Topper Crochet – Tutorial, you will learn essential crochet techniques such as working in the round, increasing, decreasing, and assembling small pieces.
The process of making a gnome towel topper is simple yet rewarding, providing a finished product that is both decorative and functional. You can also make multiple gnomes to create a themed collection for holidays or special occasions.
One of the highlights of the Gnome Towel Topper Crochet project is its versatility. You can create gnomes in different sizes and colors, making them suitable for any holiday or home décor style. The pattern encourages creativity, allowing you to customize hats, beards, and accessories. Each gnome can have its own personality, whether it’s cheerful, mischievous, or sleepy. This project transforms a simple towel into a unique decorative piece while giving you a sense of accomplishment as you complete a handmade item.
To follow the Gnome Towel Topper Crochet – Tutorial, you need a few basic materials and tools to ensure a smooth and enjoyable crafting experience.
Yarn: Use worsted-weight yarn in your preferred colors. A neutral or beige color works best for the body, while bright colors like red, green, or blue are ideal for the hat. White or gray yarn is recommended for the beard.
Hook: A 3.5 mm or 4.0 mm crochet hook is suitable for worsted-weight yarn. Smaller hooks create tight stitches, which help maintain the gnome’s shape.
Stuffing: Polyester fiberfill is used to stuff the gnome’s body and hat, giving it a plush and rounded appearance.
Notions: You will need a yarn needle for assembly, scissors, stitch markers, and optional safety eyes or embroidery thread for facial features.
Towel: A standard hand towel or kitchen towel works best. Make sure the towel is compatible with loops or sewn attachments.
Optional Accessories: Tiny pom-poms, buttons, bows, or mini crochet flowers can add charm and individuality to your gnome. These small details bring personality to your project and make each gnome unique.
Creating the Gnome Towel Topper Crochet involves a series of simple steps that combine basic crochet techniques to achieve a charming result.
Repeat these steps to make multiple gnomes, varying sizes, hat colors, and beard styles for a family of towel toppers or themed decorations.
The Gnome Towel Topper Crochet – Tutorial allows for numerous creative adaptations to make your project unique and personalized.
These creative choices enhance your project and provide opportunities to experiment with personal design ideas.
Following these tips ensures a visually appealing and functional gnome towel topper.
1. Is this pattern suitable for beginners?
Yes, the Gnome Towel Topper Crochet – Tutorial is beginner-friendly, focusing on basic stitches and assembly techniques.
2. How long does it take to make a gnome?
Each gnome takes approximately 2–4 hours depending on your crochet speed and experience.
3. Can I use different yarn types?
Yes, but the size and texture will vary depending on yarn thickness. Thicker yarn makes larger gnomes; thinner yarn makes smaller ones.
4. How do I attach the gnome to the towel?
You can crochet loops at the back to slip over the towel or sew the base securely onto the towel edge.
5. Is it safe for children?
Yes, as long as small parts like safety eyes are securely attached or replaced with embroidered details.
6. Can I sell gnome towel toppers?
Yes, you can sell finished items, especially as gifts or craft fair products. Make sure the work is your own.
In addition to being a charming decorative piece, the Gnome Towel Topper Crochet – Tutorial is also an excellent opportunity to develop patience and attention to detail. Every carefully made stitch contributes to the gnome’s final shape, making the project not only fun but also therapeutic. Working on small details, such as positioning the beard, adjusting the hat, or choosing color combinations, allows you to experiment creatively and fully personalize your gnome. This focus on detail ensures that each piece is unique, conveying care and creativity in every towel you decorate.
The Gnome Towel Topper Crochet – Tutorial is a charming, versatile, and practical project suitable for all skill levels. By following the step-by-step instructions, you can create a whimsical gnome that transforms a simple towel into a decorative accent.
This project encourages creativity, allowing you to customize colors, beard styles, hats, and accessories. Gnome towel toppers are not only decorative but functional, keeping towels neatly in place while adding personality to your home. Making multiple gnomes allows you to form a themed collection or family set, perfect for holidays or everyday charm.


