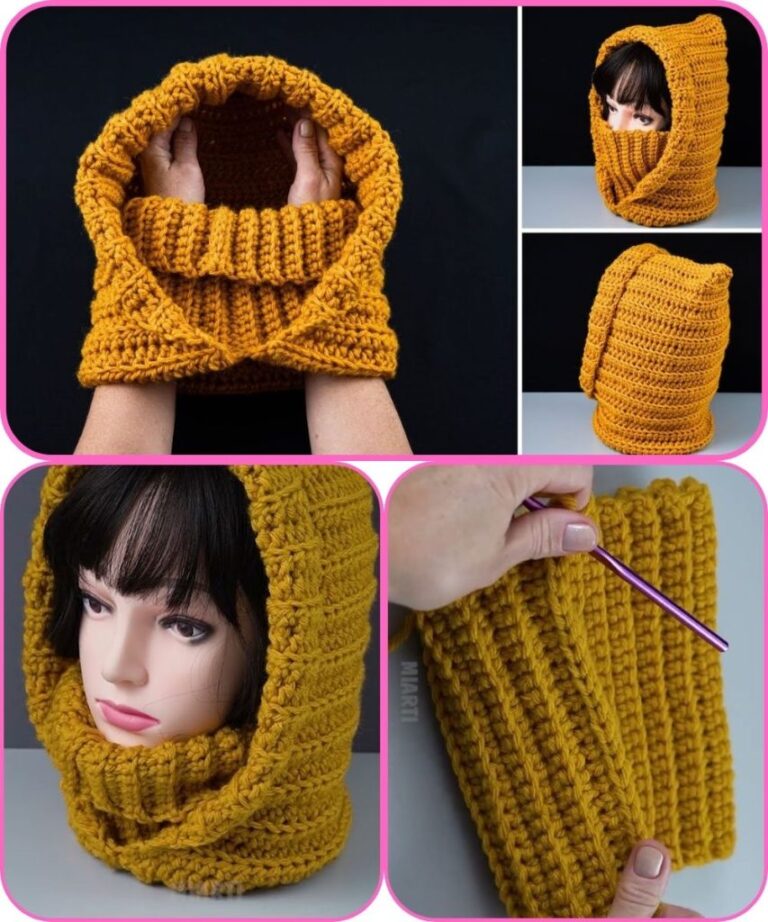
Simple Crochet Balaclava - Free Pattern

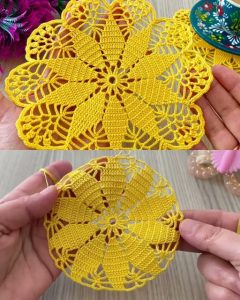
If you are looking for a creative and rewarding crochet project, Floral Granny Square – Step-by-Step Tutorial is the perfect guide for beginners and experienced crafters alike.
This project combines the timeless charm of granny squares with the delicate beauty of floral motifs, making it an excellent choice for blankets, pillow covers, bags, or decorative wall hangings.
By following this step-by-step tutorial, you will learn not only how to create a stunning floral granny square, but also valuable crochet techniques that can be applied to other projects.
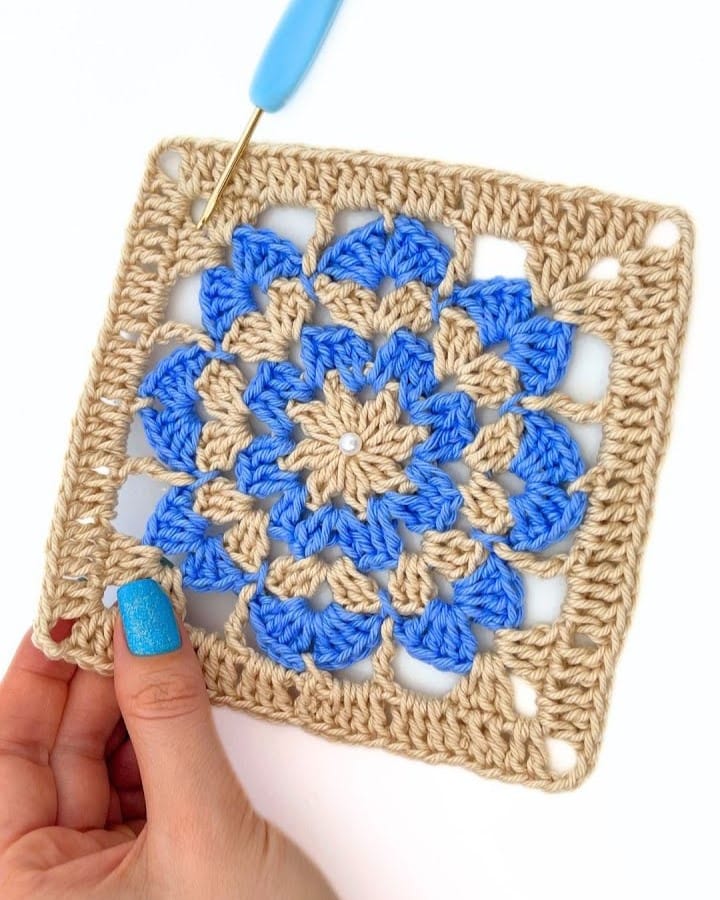
The beauty of a floral granny square lies in its versatility and vibrant patterns. Each square can be made using a variety of yarn colors, allowing you to personalize your project with unique color combinations.
Whether you prefer soft pastels for a calming look or bold colors for a statement piece, mastering the techniques in this step-by-step tutorial will give you the confidence to create your own custom designs. With clear instructions and practical tips, even beginners can achieve professional-looking results.
Crocheting a floral granny square is more than just a craft; it’s a relaxing and therapeutic activity. Many people find that dedicating time to crochet reduces stress, enhances focus, and boosts creativity. This tutorial will guide you through every detail, from choosing the right yarn and hook size to finishing touches that make your squares look polished and beautiful. By the end of this tutorial, you will not only have a collection of gorgeous floral granny squares, but also a deeper understanding of crochet techniques and color combinations.
To start your Floral Granny Square – Step-by-Step Tutorial, you need to gather all the necessary materials. The right tools and yarn make a huge difference in achieving a neat and professional look. You will need high-quality yarn in multiple colors, a suitable crochet hook, a yarn needle, and scissors. Choosing soft and durable yarn ensures that your final product feels great and lasts a long time.
Selecting the right crochet hook is crucial for maintaining consistent tension throughout your project. For most floral granny squares, a medium-sized hook works best, but feel free to adjust depending on your yarn thickness and personal comfort. Remember, using the correct hook size helps your stitches look even and makes assembling multiple squares easier.
In addition to yarn and hooks, you may consider using stitch markers. These small tools are incredibly helpful for keeping track of your rounds, especially when working with intricate floral patterns. With the right materials, you’ll find it easier to follow each step in this tutorial without interruptions or mistakes.
Another important consideration is the yarn color palette. Choosing complementary or contrasting colors for the petals, center, and borders of your floral granny square enhances the visual appeal. Planning your colors in advance ensures a harmonious final design and makes assembling multiple squares more cohesive.
Understanding basic crochet stitches is also necessary before starting your floral granny square. Familiarize yourself with chain stitch, slip stitch, single crochet, double crochet, and treble crochet. These fundamental stitches form the basis of your square and are essential for executing the floral motifs accurately.
Finally, ensure you have a comfortable workspace with good lighting. A well-lit, organized area reduces eye strain and makes the crocheting process more enjoyable. By preparing all your materials beforehand, you can focus entirely on the creative process as you follow this step-by-step tutorial.
Creating a floral granny square begins with forming the center flower. Start with a magic ring or chain circle and work the first round of petals. Pay attention to tension and stitch placement, as this affects the symmetry of the flower. Consistent practice will make your petals look even and delicate.
Once the flower center is complete, you move on to forming the square edges. Typically, you will alternate between double crochet clusters and chain spaces to create a traditional granny square shape. This combination of stitches not only defines the square but also highlights the flower in the center beautifully.
Adding color changes is a key step in making your floral granny square visually appealing. Change yarn colors at the beginning of a new round or petal, and weave in ends carefully to maintain a clean finish. Smooth color transitions enhance the floral design and give your square a professional look.
Crocheting multiple rounds allows the flower to expand and integrate with the square’s edges. Follow the tutorial’s instructions for the number of rounds and stitch counts. Adjust the size as needed for your specific project, whether you’re making small coasters or large blanket squares.
After completing the square, blocking is recommended to achieve a polished look. Gently stretch your square and pin it to shape on a flat surface, then steam or lightly wet it to set the stitches. Blocking ensures that your floral granny square lies flat and displays the flower motif beautifully.
Finally, repeat these steps to create as many squares as your project requires. Each square can have different color combinations, adding variety to your design. Once all squares are finished, you can join them using your preferred method, such as slip stitch join, whip stitch, or crochet join.
Even with clear instructions, beginners may encounter challenges when making floral granny squares. One common tip is to count your stitches at the end of each round to prevent mistakes. Accurate stitch counting helps maintain symmetry and ensures that your squares fit together seamlessly when assembled.
Choosing yarn that glides easily on your hook can significantly improve your crochet speed. Smooth yarn reduces friction and makes stitch formation effortless. Avoid yarns that split easily, as they can frustrate even experienced crocheters during intricate floral patterns.
Color planning is another essential trick. Pre-selecting your yarn palette before starting allows you to maintain consistency across multiple squares. Using a color wheel can help you identify complementary or contrasting colors that make your floral motifs pop.
If your edges curl, it may indicate uneven tension. Practice maintaining consistent tension throughout each round. Holding the yarn and hook comfortably can prevent tight or loose stitches, resulting in neat and professional-looking floral granny squares.
Learning to join squares seamlessly is crucial for larger projects. Experiment with different joining techniques to see which one works best for your style. Proper joining enhances the overall appearance and durability of your final piece, whether it’s a blanket, bag, or pillow.
Finally, patience and practice are key. Don’t rush your floral granny square projects. Each mistake is an opportunity to learn and improve your technique. With dedication, your skills will grow, and you’ll create beautiful, intricate squares that showcase your creativity.
Once you master your floral granny squares, the possibilities are endless. You can create blankets, throws, pillow covers, tote bags, or even wall art. Each square’s colorful floral motif adds charm and personality to your home décor or handmade gifts.
Mixing different color schemes can give each project a unique look. For example, soft pastels create a calming effect for a bedroom blanket, while bright, bold colors make a striking living room throw. Experiment with combinations to find the perfect aesthetic for your space.
In addition to home décor, floral granny squares can be used to craft wearable items. Scarves, shawls, cardigans, and vests made from granny squares are trendy and customizable. By using this tutorial’s techniques, you can make fashionable crochet items that stand out.
Seasonal and themed projects are also possible. For instance, using red and green yarn for holiday-themed squares or soft spring colors for Easter gifts. This flexibility makes floral granny squares a fun project year-round, adaptable to any occasion.
Combining floral squares with other shapes or motifs adds creativity to your projects. Triangles, hexagons, or star patterns can be integrated to create complex and visually interesting designs. This approach allows you to push your skills further and innovate beyond traditional squares.
Finally, gifting handmade floral granny squares items shows thoughtfulness and care. Personalized blankets, bags, or home accessories are meaningful presents that recipients treasure. Sharing your handmade creations spreads joy and showcases your crochet talent.
1. What yarn is best for floral granny squares?
Choose soft, durable yarn that is easy to work with. Cotton and acrylic blends are popular because they hold shape and color well. Avoid overly fuzzy yarns for intricate floral patterns.
2. Can beginners make floral granny squares?
Yes, with this step-by-step tutorial, even beginners can create beautiful squares. Start with simple colors and stitches, then progress to more complex patterns as you gain confidence.
3. How do I join multiple floral granny squares?
You can join squares using slip stitch, whip stitch, or a crochet join. Choose the method that suits your project’s look and durability needs.
4. How do I prevent squares from curling?
Curling usually results from uneven tension or stitch counts. Ensure consistent tension, count stitches carefully, and block your squares after completing them.
5. Can I wash completed floral granny squares?
Yes, most yarns are washable, but always check the yarn label. Gentle hand wash or machine wash on a delicate cycle is recommended for long-lasting results.
6. How do I customize the size of my granny squares?
Adjust the number of rounds and stitch height to achieve your desired square size. Larger projects may require additional rounds or bigger hooks.
In this Floral Granny Square – Step-by-Step Tutorial, we explored everything from essential materials and basic stitches to advanced tips for creating beautiful floral motifs. By following the step-by-step instructions, you can craft stunning squares for blankets, bags, home décor, and gifts. Remember, patience and practice are key to mastering these techniques, and experimenting with colors and patterns adds a personal touch to every project.
We hope you found this tutorial helpful and inspiring. Share your thoughts, leave a sincere opinion, and suggest any improvements or ideas for future crochet projects. Your feedback helps us continue providing valuable and creative guides for all crochet enthusiasts.


