
Crocheted house-shaped cookie for Christmas tree

The Fall For Granny Stitch Pumpkin – Free Crochet Pattern is a beautiful and cozy way to celebrate the fall season with handmade charm. Combining the classic granny stitch with the warm colors of autumn, this crochet pumpkin adds a touch of nostalgia and rustic style to your home décor.
Whether you’re decorating for Thanksgiving, creating a centerpiece, or simply embracing the cozy vibes of fall, this pattern is a perfect choice for both beginners and experienced crocheters. Each pumpkin brings a sense of warmth, comfort, and creativity that makes autumn even more special.
The Fall For Granny Stitch Pumpkin – Free Crochet Pattern offers the ideal balance of simplicity and versatility. Using basic stitches like double crochets and chain spaces, you can easily build a beautiful textured design that resembles the traditional granny square style.
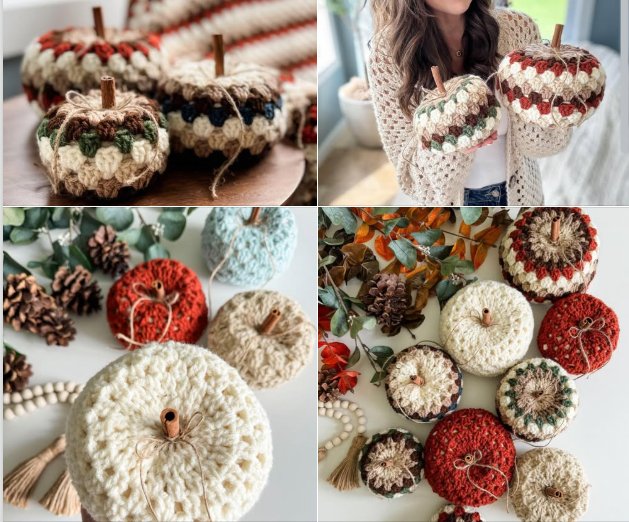
The finished pumpkin has a lovely handmade look that captures the charm of old-fashioned crochet while fitting perfectly into modern seasonal décor. You can make several in different sizes and colors to create a stunning fall display for your table, mantle, or windowsill.
What makes this project especially appealing is how quick and satisfying it is to complete. With minimal yarn and materials, you can crochet a pumpkin in under an hour, making it a great last-minute gift or decoration. The Fall For Granny Stitch Pumpkin – Free Crochet Pattern is not only fun to make but also an eco-friendly way to use up your leftover yarn scraps. Each pumpkin becomes a little work of art, reflecting your creativity and love for handmade crafts.
To make your own granny stitch pumpkin, gather the following supplies:
Yarn: Choose medium-weight (worsted) yarn in warm fall colors such as orange, mustard, rust, cream, or brown. You can mix multiple shades in one pumpkin for a beautiful gradient effect.
Hook: Use a 4.0 mm or 4.5 mm crochet hook for tighter stitches that give your pumpkin structure.
Stuffing: Polyester fiberfill or yarn scraps will work perfectly for shaping the pumpkin.
Stem: Use a small cinnamon stick, wooden dowel, or crocheted stem for a natural finish.
Notions: A yarn needle, scissors, and stitch marker to help with joining and finishing.
Adding a bit of twine, ribbon, or felt leaves gives your pumpkin a professional and festive look. The texture of the granny stitch adds depth and softness, making the project feel warm and inviting.
The Fall For Granny Stitch Pumpkin – Free Crochet Pattern is worked flat and then sewn together to form the classic pumpkin shape.
Your cozy pumpkin is now ready! You can adjust the size by changing the number of foundation chains or rows, and each one will have its own unique charm.
One of the most enjoyable aspects of the Fall For Granny Stitch Pumpkin – Free Crochet Pattern is personalization. Here are some creative ideas to make each pumpkin truly unique:
Every detail you add makes your pumpkin more personal and meaningful. This pattern invites creativity and helps turn a simple project into something you’ll be proud to display year after year.
Even though the pattern is beginner-friendly, a few expert tips can make your crochet pumpkins look even better:
These small details elevate your project from simple to stunning.
1. Is this pattern suitable for beginners?
Yes, the Fall For Granny Stitch Pumpkin – Free Crochet Pattern is perfect for beginners since it uses basic stitches and simple assembly.
2. How long does it take to make one pumpkin?
Most crocheters can complete one in 45 minutes to an hour, depending on the size.
3. Can I use different yarn types?
Absolutely! Cotton yarn gives a smooth finish, while acrylic or velvet yarn makes it extra soft and plush.
4. What can I use for the stem?
You can use a cinnamon stick, crochet a small tube, or even use a twig from your garden for a natural touch.
5. Can I wash the pumpkin?
It’s best to spot clean your crochet pumpkin to preserve its shape and stuffing.
6. Can I make these pumpkins for sale?
Yes! Handmade pumpkins are great for selling at fall markets or craft fairs. Just remember to photograph them beautifully to attract customers.
Creating the Fall For Granny Stitch Pumpkin is not only a relaxing and rewarding craft but also an opportunity to express your personal style through crochet. Each stitch contributes to the pumpkin’s unique texture, and the combination of colors, sizes, and embellishments allows you to design a display that perfectly matches your home décor or seasonal theme. This pattern is ideal for using leftover yarn, reducing waste while making something beautiful and functional. Whether placed on a table, mantel, or windowsill, your handmade pumpkin radiates warmth and charm, turning any space into a cozy, inviting fall haven that celebrates the joys of the season.
The Fall For Granny Stitch Pumpkin – Free Crochet Pattern combines creativity, comfort, and classic crochet style in one adorable project. With simple stitches, cozy yarn, and endless customization options, you can fill your home with handmade pumpkins that celebrate the beauty of autumn. Whether you make one or a dozen, each pumpkin will bring warmth and handmade love to your space.
Now that you’ve learned how to crochet these charming pumpkins, we’d love to hear your thoughts! Share your opinions, creative ideas, or unique variations in the comments—your feedback helps inspire more beautiful crochet patterns for everyone to enjoy.


