
Crocheted house-shaped cookie for Christmas tree

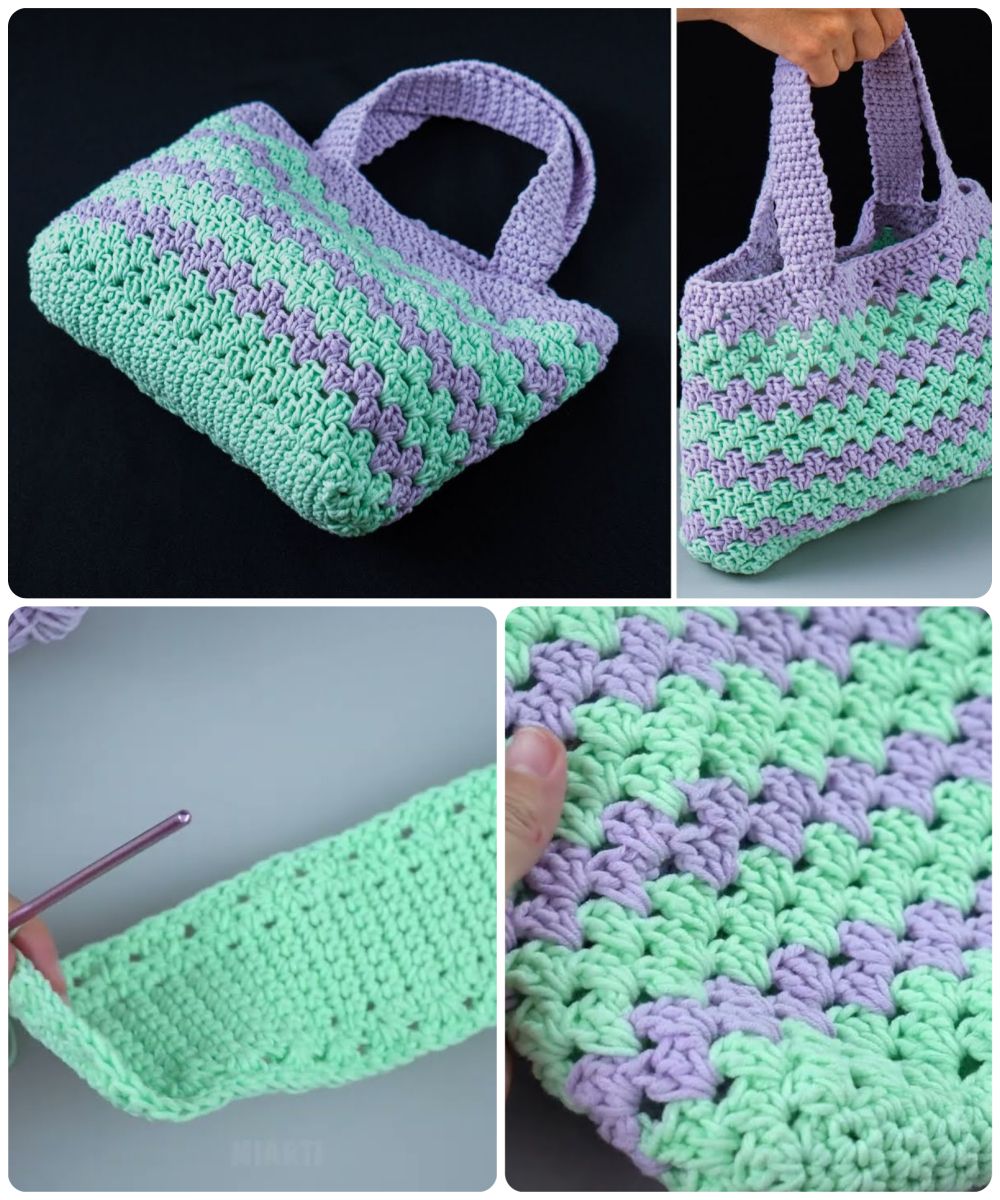
Easy model crochet tote bag – tutorial for beginners is a perfect project for anyone starting with crochet. A DIY crochet tote bag combines practicality with creativity, allowing you to make a functional accessory while honing your crochet skills.
The beauty of this project is that even beginners can achieve a professional-looking result by following the right steps and techniques. With the free crochet bag pattern, you can experiment with different yarns, textures, and colors, giving your tote bag a unique personality.
Whether for personal use, gifts, or even small-scale sales, a handmade crochet bag is both stylish and eco-friendly.
Making a crochet tote bag tutorial is also a fantastic way to learn new stitches, tension control, and finishing techniques. By working on a small, manageable project like a tote bag, you can practice without feeling overwhelmed, which builds confidence in your crochet abilities.
This easy model crochet tote bag project emphasizes simplicity while maintaining elegance, making it an ideal starting point for beginners. You can complete it in a few hours, creating a beautiful accessory that is as functional as it is charming.
A DIY crochet tote bag offers a sustainable alternative to store-bought bags. By crafting your own, you can choose durable yarns that last longer and avoid the environmental impact of mass-produced items. Moreover, a beginner crochet tote can be customized in size, color, and embellishments, allowing for total creative freedom. This makes your project not just a functional item, but a reflection of your personal style and skill. Following this tutorial guarantees that even novice crocheters can enjoy the satisfaction of completing a practical, handmade crochet bag.
Creating an easy model crochet tote bag starts with gathering the right materials. High-quality yarn is essential; cotton yarn is especially recommended for tote bags due to its durability and ease of maintenance. You can choose single-color yarn for a clean, modern look or combine multiple shades for a playful, eye-catching effect. Selecting the right yarn not only affects the bag’s appearance but also its strength and longevity.
A crochet hook suitable for your chosen yarn is necessary, typically ranging from 4mm to 5mm for most cotton yarns. Using a hook that is slightly smaller than the yarn label suggests will help produce tight stitches, ensuring that your DIY crochet tote bag maintains structure and durability. In addition to yarn and hook, scissors, stitch markers, and a yarn needle are essential tools for completing your bag. They help you manage your stitches, keep track of rounds, and finish your work cleanly.
Optional materials include a lining fabric to give extra strength to your tote bag, especially if you plan to carry heavier items. You may also want to add handles, buttons, or decorative elements for customization. Even a simple free crochet bag pattern can be enhanced with small embellishments, making your handmade crochet bag unique. Taking the time to assemble these materials before starting ensures a smooth, stress-free crafting experience, even for beginners following a crochet tote bag tutorial.
The first step in creating an easy model crochet tote bag is to start with the base. Most beginner patterns use a simple rectangular or oval shape to ensure stability. Begin by chaining the desired length, then work single crochet stitches across the row to form a sturdy foundation. Following the free crochet bag pattern, you can gradually build the walls of the tote, ensuring that the base remains flat and even.
Once the base is complete, continue building the sides of your beginner crochet tote by working in rounds or back-and-forth rows. Consistency in stitch tension is crucial at this stage; uneven tension can cause the bag to bulge or warp. This part of the DIY crochet tote bag is excellent for practicing even stitches and maintaining a neat edge, which is key to achieving a polished final result.
When your bag reaches the desired height, it’s time to create the handles. Many crochet tote bag tutorials suggest working reinforced straps using tight stitches or doubling the yarn for extra strength. The handles should be long enough to comfortably fit over your shoulder but strong enough to support weight. Securely sew the ends to the top edges of the bag to ensure durability.
For added style, consider embellishments such as crochet flowers, buttons, or even a small pocket sewn inside your handmade crochet bag. These details are optional but can transform a simple tote into a unique accessory. Finally, weave in all loose yarn ends using a yarn needle to complete the project neatly. Following these step-by-step instructions guarantees that even beginners can create a functional and attractive easy model crochet tote bag.
Customization is one of the most enjoyable aspects of a DIY crochet tote bag. You can experiment with yarn colors, patterns, and stitch variations to create a truly unique bag. Using variegated yarn or combining contrasting shades adds visual interest to a simple design, making your tote bag stand out.
The size of your tote can also be adjusted depending on your needs. For example, a smaller beginner crochet tote works perfectly as a casual handbag, while a larger version can serve as a reusable shopping bag or beach tote. Adjust the number of starting chains and rows to achieve the ideal size for your purposes.
Experimenting with stitches can give your handmade crochet bag a creative flair. Patterns like shell stitch, bobble stitch, or half-double crochet create textured designs that elevate a simple bag into a stylish accessory. You can even combine multiple stitch patterns for a modern, artistic look.
Adding pockets, zippers, or lining is another way to personalize your easy model crochet tote bag. A fabric lining not only strengthens the bag but also prevents small items from slipping through the stitches. Decorative elements like buttons, beads, or crochet flowers can add personality and charm.
Handles are another customization option. You can make them long or short, thick or thin, and even braid or twist the yarn for added durability. Reinforcing the handle attachment points is important, especially if you plan to carry heavier items.
Finally, consider seasonal or themed designs. Bright colors for summer, muted tones for winter, or themed motifs for holidays can make your free crochet bag pattern even more fun and personalized. By applying these tips, your crochet tote bag tutorial can produce a beautiful, functional, and uniquely your own accessory.
Even a simple easy model crochet tote bag can present challenges for beginners. One common mistake is inconsistent tension, which can cause the bag to have uneven sides or saggy sections. Practicing regular tension ensures the bag remains stable and professional-looking.
Miscounting chains or stitches is another frequent error. Always double-check the starting chain length and stitch count in each row, especially when following a crochet tote bag tutorial. Using stitch markers helps prevent mistakes and keeps your rows aligned.
Handles are often incorrectly sized or insecurely attached. Ensure that straps are reinforced and long enough for comfortable use, particularly if the bag will carry heavier items. This helps prevent stretching or breakage in the future.
Choosing the wrong yarn can also impact your bag’s functionality. Yarn that is too thin or flimsy can cause the tote to stretch or sag, while yarn that is too thick may be difficult to work with and create a stiff bag. Selecting medium-weight, durable yarn is key for a functional handmade crochet bag.
Neglecting finishing touches, such as weaving in ends or properly securing stitches, can make your bag look unfinished or fall apart over time. Take the time to tidy up all loose threads and double-check the seams.
Finally, rushing through the project can result in uneven edges, misaligned patterns, or weak handles. Taking your time ensures that your easy model crochet tote bag is durable, beautiful, and fully functional.
Q1: Is this tutorial suitable for beginners?
Yes! The crochet tote bag tutorial is designed for beginners and provides clear step-by-step instructions.
Q2: What type of yarn is recommended?
Medium-weight cotton yarn is ideal for durability and ease of use.
Q3: How long does it take to complete a tote bag?
Depending on skill level, a simple DIY crochet tote bag can take 4–6 hours.
Q4: Can I customize the size?
Yes, you can adjust the starting chain and number of rows for a larger or smaller bag.
Q5: How do I make the handles stronger?
Double the yarn or use tighter stitches for reinforcement, and sew securely to the top edges.
Q6: Can I add pockets or lining?
Absolutely! Adding fabric lining or small pockets increases functionality and prevents items from slipping.
Creating an easy model crochet tote bag – tutorial for beginners is a fun and rewarding project. This DIY crochet tote bag combines practicality with creativity, allowing you to produce a functional, stylish, and personalized accessory. By following this crochet tote bag tutorial, beginners can gain confidence, learn new stitches, and create a handmade crochet bag that is both durable and charming.
We hope this guide inspires you to craft your own easy model crochet tote bag. Share your experience, leave a sincere opinion, and suggest new designs you’d like to see.
Your feedback helps build a supportive, creative community where crafters of all levels can learn, share, and enjoy their passion for free crochet bag patterns.


