
Crocheted house-shaped cookie for Christmas tree

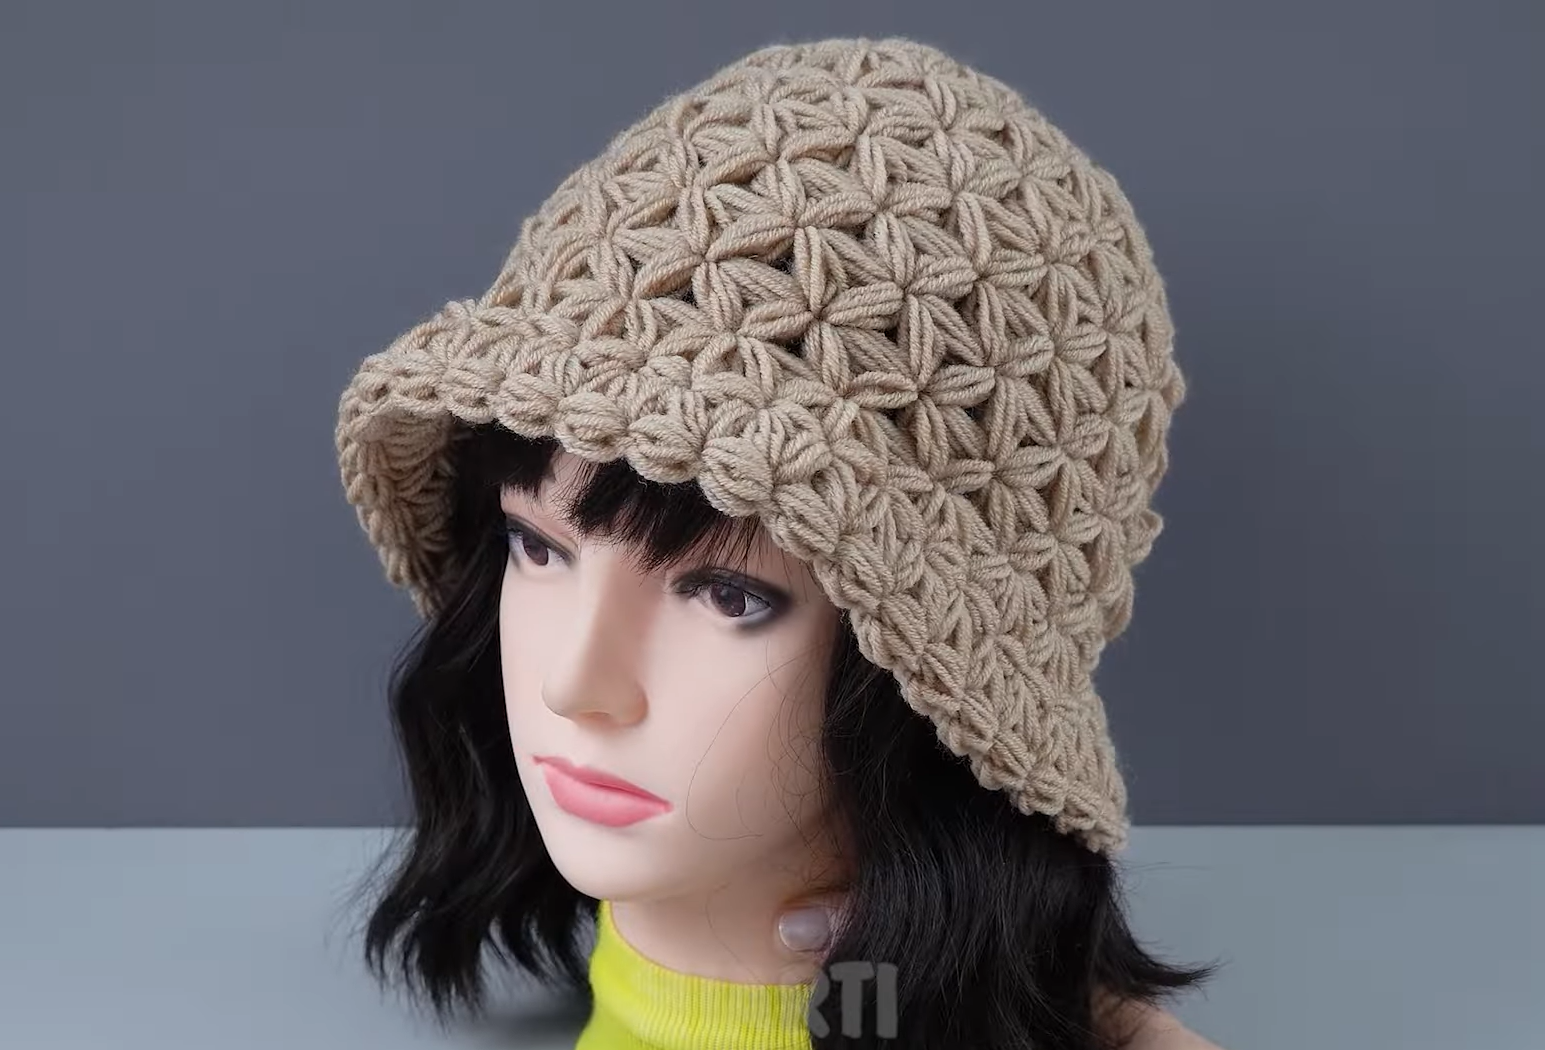
If you’re looking for a fun and creative project, the Easy Crochet Bucket Hat – Free Pattern is the perfect way to get started. Crochet has been a beloved craft for decades, offering endless opportunities for self-expression and handmade fashion.
Whether you’re a beginner or an experienced crocheter, this easy crochet bucket hat pattern will allow you to create a stylish accessory that you can wear yourself or gift to a friend.
In this article, we’ll explore everything you need to know about making a bucket hat, including materials, techniques, and step-by-step instructions.
Crochet is more than just a hobby—it’s a skill that can be both relaxing and rewarding. With the Easy Crochet Bucket Hat – Free Pattern, you can experiment with different yarns, colors, and textures to create a hat that is uniquely yours.
This project is not only enjoyable, but it also teaches fundamental crochet techniques that are useful for many other projects. Plus, handmade hats are always a hit in any wardrobe, making this a project that combines both practicality and style.
One of the best things about the Easy Crochet Bucket Hat – Free Pattern is that it’s designed to be beginner-friendly. You don’t need complex stitches or advanced skills to complete this project. By following this guide, you will gain confidence in your crochet abilities while creating a beautiful and functional hat. Whether you’re looking to make a simple everyday accessory or a fashionable statement piece, this pattern has you covered.
Creating an Easy Crochet Bucket Hat – Free Pattern requires only a few basic materials, making it accessible for everyone. The essential items include yarn, a crochet hook, scissors, and a yarn needle. Choosing the right yarn is crucial because it determines the hat’s texture, warmth, and overall appearance. For beginners, medium-weight yarn is highly recommended because it is easy to handle and provides good stitch definition.
The crochet hook size should match the yarn you choose, and most patterns will recommend a hook size on the yarn label. Using the correct hook ensures your hat has the right fit and drape. In addition, scissors are needed for cutting yarn, and a yarn needle is useful for weaving in ends. Having these materials on hand before you start will make the project smoother and more enjoyable.
Many crafters also like to personalize their Easy Crochet Bucket Hat – Free Pattern with embellishments such as buttons, ribbons, or patches. These details add a unique touch and allow you to showcase your creativity. By selecting different colors and accessories, you can create multiple hats with completely different looks.
Choosing the right yarn color is another important step. Soft pastels, bold primary colors, or even multicolored yarns can all work beautifully for a bucket hat. You can even combine different yarn textures to give your hat a unique feel. Experimenting with color and texture is one of the joys of following an Easy Crochet Bucket Hat – Free Pattern.
Finally, make sure you have a comfortable workspace with good lighting. Crochet requires focus and attention to detail, so being in a well-lit and organized area will make the process more enjoyable. Setting up your materials beforehand ensures you can focus on the creative process without interruptions.
The Easy Crochet Bucket Hat – Free Pattern begins with creating a simple circular base, which forms the top of the hat. Start by making a magic ring and work several stitches into it, gradually increasing in each round. This method ensures a smooth, rounded crown, which is essential for a well-fitting hat. By following the increase pattern carefully, your hat will grow evenly without puckering or gaps.
Once the crown reaches the desired size, you will continue by working the sides of the hat. This step involves crocheting in the round without increasing, which allows the hat to develop height. Maintaining an even tension during this stage is important to prevent the hat from becoming too tight or too loose. The sides define the overall shape, so take your time to keep stitches consistent.
Next, you will shape the brim of your Easy Crochet Bucket Hat – Free Pattern. The brim adds style and functionality, providing some sun protection while giving the hat its signature look. To create the brim, you will gradually increase stitches in each round while maintaining an even tension. The amount of increase depends on how wide you want the brim to be.
After finishing the brim, the next step is to check the fit. If adjustments are needed, you can add or remove rounds on the crown or brim to achieve the perfect size. This flexibility is one of the reasons why this Easy Crochet Bucket Hat – Free Pattern is great for beginners—you can easily customize it to fit different head sizes.
Finally, weave in all yarn ends neatly using a yarn needle. This ensures your hat looks polished and professional. If desired, you can also block the hat to shape it perfectly, smoothing out any uneven stitches. With all these steps completed, your hat is ready to wear or gift.
One of the best aspects of the Easy Crochet Bucket Hat – Free Pattern is the ability to customize it. You can experiment with different stitch patterns to create unique textures. For example, incorporating half-double crochet or shell stitches adds visual interest and can make your hat look more intricate than it actually is.
Another way to customize your hat is by using multiple yarn colors. Stripes, color blocks, or gradient transitions can make the hat stand out and reflect your personal style. Combining colors thoughtfully enhances the aesthetic appeal while still following the basic pattern.
Adding embellishments is also a fun option. Buttons, appliqués, or even small crocheted flowers can give your hat a charming touch. This allows your Easy Crochet Bucket Hat – Free Pattern to be both functional and fashionable, serving as a statement accessory for any outfit.
You can also adjust the hat’s size easily. By adding extra rounds to the crown or brim, you can create larger hats, while removing rounds will make smaller versions. This makes it simple to customize the hat for adults, teens, or children.
Experimenting with yarn textures can also elevate your project. Combining smooth and fuzzy yarns or using yarns with metallic threads can create interesting visual effects and tactile sensations. Each hat can be entirely unique, even if you follow the same basic pattern.
Finally, consider adding functional features such as a drawstring or lining for warmth. These additions are practical while maintaining the stylish look of your crochet bucket hat. By customizing your hat thoughtfully, you can make it both fashionable and functional.
Even with an Easy Crochet Bucket Hat – Free Pattern, beginners may encounter common mistakes. One of the most frequent issues is inconsistent tension, which can cause uneven stitches and a distorted shape. Practicing even tension before starting the project can prevent this problem.
Another mistake is miscounting stitches during increases. Skipping or adding stitches inadvertently can result in a lopsided hat. Carefully counting stitches in each round ensures your hat grows evenly and maintains a symmetrical shape.
Choosing the wrong yarn or hook size can also affect the final outcome. Too thin a yarn with a large hook may result in a floppy hat, while a bulky yarn with a small hook can make the hat too tight. Matching the yarn and hook is essential for achieving the desired texture and fit.
Not measuring the head size before starting is another common error. Even an easy crochet bucket hat pattern can turn out too big or too small if proper measurements are not taken. Always check your measurements to ensure a comfortable fit.
Skipping the finishing steps, such as weaving in ends or blocking the hat, can make your project look unfinished. These small steps are essential for a polished and professional look.
Finally, rushing through the pattern can lead to mistakes. Taking your time to follow each step carefully ensures your hat turns out perfectly. Patience is key to any crochet project, especially for beginners.
Q: Is this hat suitable for beginners?
A: Yes, the Easy Crochet Bucket Hat – Free Pattern is designed for beginners. It uses basic stitches and includes detailed instructions.
Q: What type of yarn should I use?
A: Medium-weight yarn is recommended for beginners. You can choose acrylic, cotton, or a blend, depending on your preference.
Q: Can I adjust the size of the hat?
A: Absolutely! You can add or remove rounds on the crown or brim to customize the size for different head measurements.
Q: How do I maintain my crochet bucket hat?
A: Hand wash in cold water and lay flat to dry. Avoid wringing or twisting to preserve the shape.
Q: Can I add decorations to my hat?
A: Yes! You can add buttons, ribbons, or crochet appliqués to make your hat unique.
Q: How long does it take to make this hat?
A: Depending on your skill level, it can take 3–5 hours for a beginner. More experienced crocheters may finish faster.
The Easy Crochet Bucket Hat – Free Pattern is a fun and accessible project that anyone can enjoy. By following this guide, you’ve learned how to select materials, create a hat step-by-step, customize it with colors and textures, and avoid common mistakes. Crochet is not only a practical skill but also a creative outlet that allows you to make unique, handmade accessories. We hope this guide has inspired you to start your own crochet bucket hat project.
Don’t forget to share your experience, leave your honest opinion, and offer suggestions for future patterns—you might even inspire someone else to start crocheting!


