
Learning how to make an easy crochet bag can be one of the most rewarding and enjoyable projects for beginners. The beauty of crochet is that it allows you to create stylish and functional accessories using only yarn and a hook.
In this tutorial for beginners, we’ll walk through every step you need to make a beautiful, durable, and practical bag that you can use daily or give as a handmade gift. Whether you’ve just started crocheting or you’re looking for a quick and relaxing project, this guide is perfect for you.
The easy crochet bag we’ll create in this tutorial is simple enough for beginners but still offers the satisfaction of completing something truly useful.
The techniques in this tutorial will also help you improve your tension, stitch consistency, and overall confidence with crochet. By the end, you’ll have a handmade bag that reflects your creativity and personal touch.
This project uses only basic stitches like the chain, single crochet, and half double crochet, making it beginner-friendly while producing a strong and stylish result. You can experiment with colors, yarn textures, and patterns to customize your bag however you like. With just a few hours of work, your easy crochet bag will be ready to show off. Let’s dive in and explore how to make this simple yet stunning project step-by-step.
Choosing the Right Yarn and Hook
When creating an easy crochet bag, the first step is to choose the right materials. For beginners, it’s best to use medium-weight cotton yarn. Cotton is durable, holds its shape well, and is easy to clean — all ideal qualities for a bag. You can pick any color you love, but solid or lightly variegated yarns help show off your stitches clearly as you work.
Next, you’ll need a crochet hook that matches the yarn weight. For most medium-weight yarns, a 4mm to 5.5mm hook works perfectly. The key is to keep your tension consistent. If your stitches are too loose, the bag might stretch out of shape; if they’re too tight, it can become stiff and hard to work with. Beginners should practice a few rows to find a comfortable rhythm.
A few additional materials will make your bag sturdier and more functional. Consider adding a fabric lining inside to prevent small items from slipping through and to give the bag more structure. You’ll also need a yarn needle for weaving in ends and possibly a button or zipper if you want to close the top securely. Having all these supplies ready before you begin will make the process smoother and more enjoyable.
Lastly, remember to have good lighting and a comfortable workspace. Crocheting for long periods can strain your hands and eyes, so take breaks and stretch your fingers occasionally. With the right preparation, your first crochet bag project will be a fun and relaxing experience from start to finish.
Step-by-Step Instructions
Now that you have your materials ready, let’s start the easy crochet bag. Begin by making a foundation chain that determines the width of your bag. For a medium-sized tote, you can chain around 40 to 50 stitches. This can be adjusted depending on your desired size. Once your chain is ready, add one extra stitch and begin working single crochet stitches across the row.
Continue working in rows of single crochet until your piece reaches the desired height. For most tote bags, 25 to 30 rows will give a good shape. This rectangular panel will form one side of your bag. Repeat this process to create a second identical panel for the other side.
Once both panels are complete, it’s time to join them together. Place them with the right sides facing outward and use slip stitches or single crochet along the sides and bottom to seam them. Leave the top open — this is where your bag will be accessed. Make sure your seams are tight and even for a neat finish.
Now let’s add the handles. You can crochet two separate strips of 40–50 chains, then work a few rows of single crochet to make them thicker. Sew or crochet these handles securely to the top of your bag. Alternatively, you can buy pre-made leather or wooden handles for a more professional look.
After finishing the main structure, weave in all yarn ends using a yarn needle. This step ensures your bag looks clean and the stitches don’t unravel with use. Give your bag a gentle stretch and shape it with your hands to even out any uneven areas. If desired, lightly steam-block it to set the shape perfectly.
Customizing Your Crochet Bag
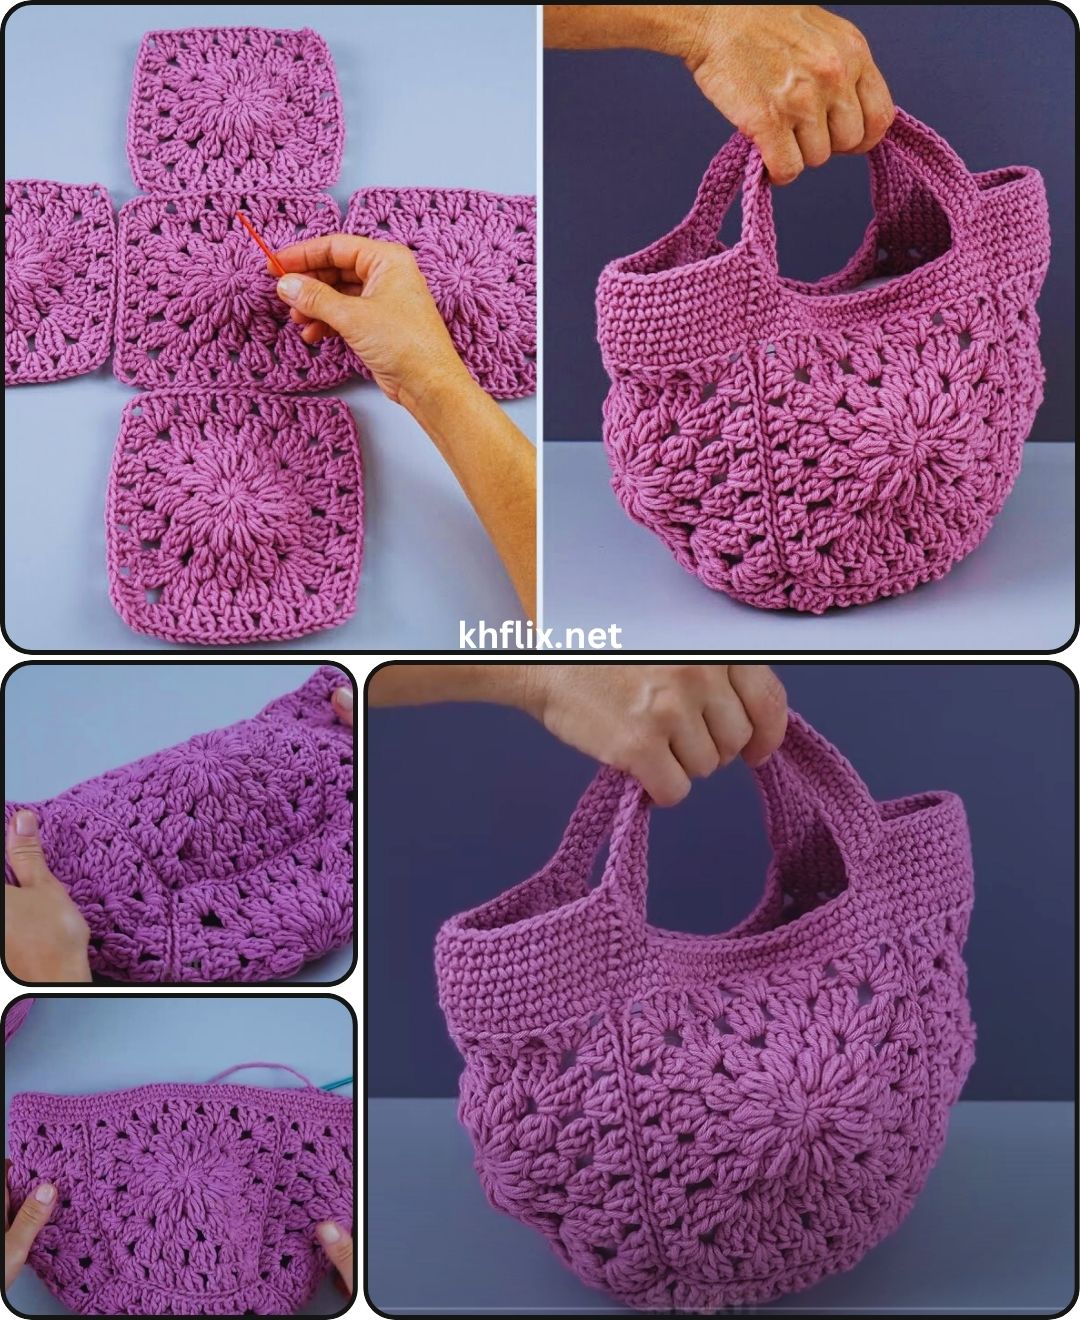
One of the best parts of making an easy crochet bag is how customizable it is. Once you master the basic structure, you can experiment with different designs, colors, and stitch patterns to make each bag unique. For example, you could alternate rows of half double crochet and single crochet for texture or use granny squares for a fun patchwork style.
Adding color changes is another great way to personalize your bag. Stripes, color blocking, or ombre effects can make your design stand out. If you’re a beginner, practice changing colors at the end of a row for a seamless transition. Remember to weave in the loose ends carefully for a tidy finish.
You can also incorporate decorative elements such as tassels, pom-poms, or buttons. A simple crochet flower or heart appliqué can instantly elevate your bag’s appearance and give it a handmade charm. If you prefer a minimalist look, neutral colors and clean lines create a modern, elegant aesthetic.
For added functionality, consider adding a lining or inner pockets. Sew a simple fabric lining slightly smaller than your bag and stitch it inside using a needle and thread. This will make your bag sturdier and prevent stretching. A magnetic clasp or zipper can also help keep your belongings safe inside.
Lastly, don’t be afraid to experiment with different yarn types. While cotton is perfect for structure, using soft acrylic or jute yarn can create a totally different look and feel. Each yarn type offers a new texture and personality to your handmade creation, allowing endless creativity and expression.
Tips for Beginners and Common Mistakes to Avoid
Every beginner faces a few challenges while making their first easy crochet bag. The most common mistake is having uneven tension. If your stitches vary in tightness, your bag may become lopsided. To fix this, practice a few swatches before starting and try to maintain a steady hand throughout your work.
Another frequent issue is forgetting to count stitches. Missing or adding extra stitches can change the shape of your panels. Use stitch markers at the beginning and end of each row to help keep your work consistent. It’s a simple trick that saves time and frustration.
Sometimes, beginners struggle with joining the panels neatly. To avoid bulky seams, ensure both pieces have the same stitch count before joining. Use slip stitches for a flatter seam or single crochet for a more decorative edge. Take your time here—finishing details make a big difference in the final result.
If your bag feels too soft, it might be due to using the wrong yarn or hook size. A smaller hook will make tighter stitches, giving your bag more structure. Conversely, a larger hook will make it more flexible but less sturdy. Experiment to find the perfect balance for your design.
Finally, remember that crocheting should be fun and relaxing, not stressful. Take breaks, don’t rush, and enjoy watching your creation come to life. Every mistake teaches you something new, and with each project, you’ll see noticeable improvement. Before you know it, you’ll be making beautiful crochet bags with confidence.
FAQ About Easy Crochet Bags
1. What is the best yarn for a crochet bag?
Cotton yarn is ideal for crochet bags because it’s strong, washable, and holds its shape well. Acrylic can also work but may stretch more over time.
2. How long does it take to make an easy crochet bag?
For beginners, it usually takes about 4–6 hours, depending on your speed and the bag size. More experienced crocheters can finish it faster.
3. Can I make this bag without lining it?
Yes, you can, but a fabric lining adds strength and prevents stretching. It’s especially recommended if you plan to carry heavier items.
4. How do I wash my crochet bag?
Hand wash gently in cool water and let it air dry flat. Avoid twisting or wringing it to prevent misshaping.
5. Can I sell bags made from this pattern?
Absolutely! Handmade crochet bags are popular at craft fairs and online shops. Just ensure your quality is consistent and your finishing neat.
6. What size should I make for a beginner project?
A medium tote bag (about 12 inches wide and 10 inches tall) is perfect for beginners—it’s easy to manage and practical for everyday use.
Conclusion
Making an easy crochet bag is a simple yet deeply satisfying project for beginners. This tutorial teaches you how to select the right materials, crochet the panels, assemble the bag, and personalize it with unique details. With patience and creativity, you can turn basic stitches into a stylish accessory that reflects your own style.
VIDEO TUTORIAL
Crocheting your first bag also builds essential skills that will prepare you for more advanced projects. Remember to take your time, enjoy the process, and celebrate your progress along the way. Now that you’ve learned how to make your own easy crochet bag, share your results, leave a sincere opinion, and suggest what kind of crochet tutorial you’d like to see next!