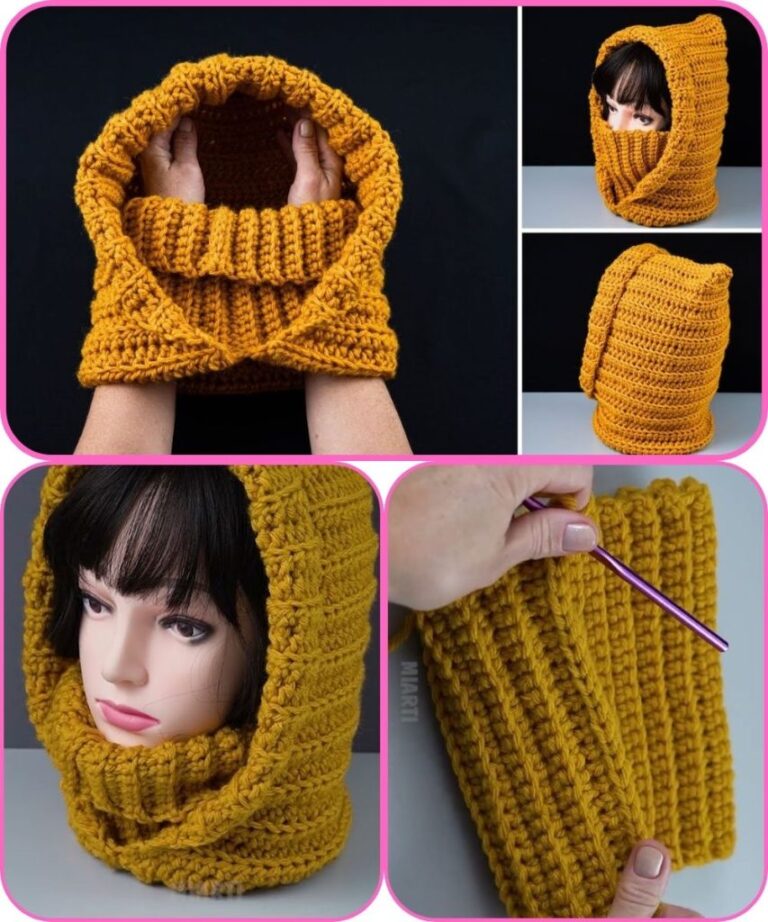
Simple Crochet Balaclava - Free Pattern

The Dumpster Raccoon Crochet Pattern is a fun, quirky, and creative project perfect for amigurumi lovers and crochet enthusiasts. This adorable raccoon design captures the mischievous charm of one of nature’s most curious creatures — the raccoon!
Whether you’re a beginner or an experienced crocheter, making a dumpster raccoon offers the perfect mix of challenge and enjoyment. With its cute face, tiny paws, and signature mask markings, this crochet raccoon will become an instant favorite in your handmade collection.
Using this free crochet pattern, you can create a playful raccoon that looks like it just climbed out of its favorite dumpster looking for a snack.
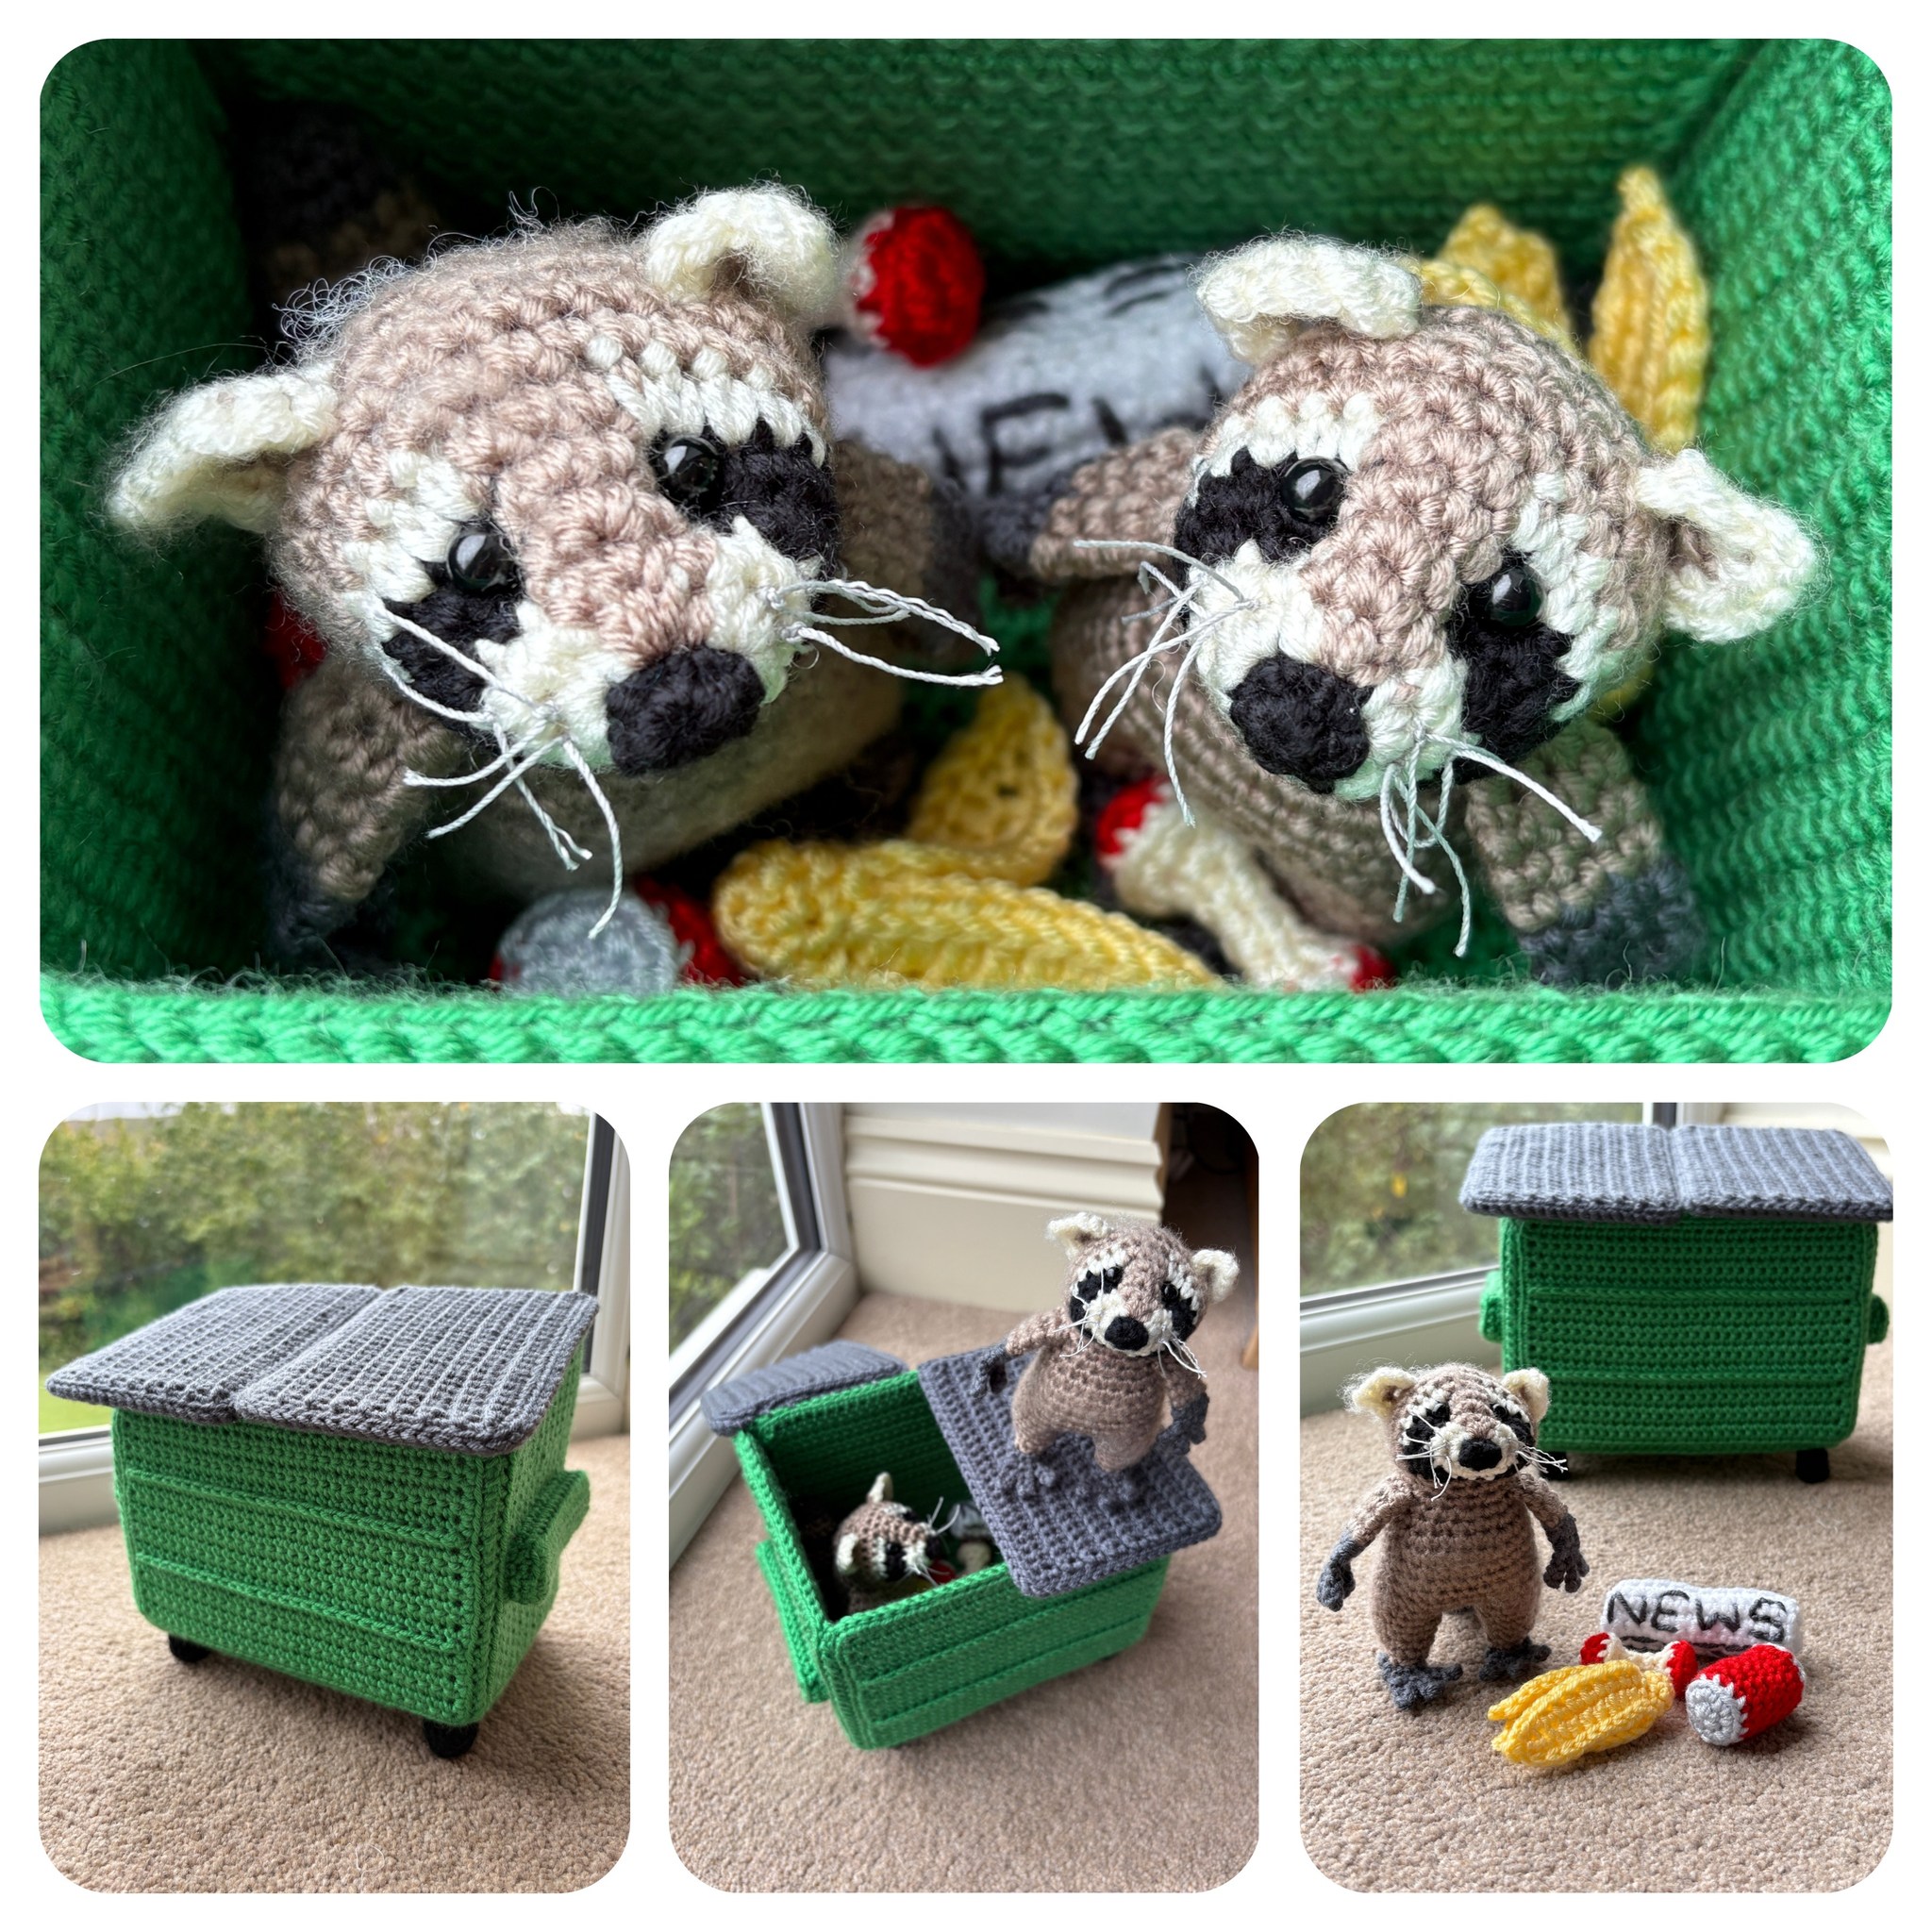
Crocheting a dumpster raccoon is more than just a fun project; it’s a way to express creativity and humor through yarn. Raccoons are often called “trash pandas” for their clever, sneaky antics, and this pattern captures that playful energy perfectly.
The finished raccoon makes a great gift for animal lovers, collectors of cute plushies, or anyone who appreciates a good laugh. Plus, it’s an eco-friendly craft that uses small amounts of yarn, making it a great way to use leftovers from previous projects.
One of the best things about the Dumpster Raccoon Crochet Pattern is how customizable it is. You can make your raccoon realistic with classic gray and black yarns or go wild with rainbow colors for a fantasy look. You can also add little accessories like a mini dumpster, a banana peel, or even a crocheted slice of pizza for extra fun. In this complete guide, we’ll cover everything from the materials you need to step-by-step instructions, creative variations, and expert tips to help you make your own adorable crochet raccoon.
Before you begin your Dumpster Raccoon Crochet Pattern, make sure you have all the essential materials ready.
You’ll need worsted weight yarn in the following colors: gray for the body, black for the mask and paws, white for facial details, and a small amount of pink for the nose and inner ears. For a realistic look, choose yarn with a soft, smooth texture.
A 3.5 mm or 4 mm crochet hook is ideal for amigurumi projects. It creates tight stitches that keep the stuffing from showing through. Make sure your tension is consistent so the raccoon’s shape stays firm and neat.
You’ll also need polyester fiberfill stuffing to make your raccoon plush and squishy. Safety eyes (8–10 mm) or black embroidery thread can be used for the eyes, depending on your preference.
Additional tools include scissors, a yarn needle for sewing parts together, and optional stitch markers to keep track of your rounds.
If you want to make the dumpster accessory, grab extra green and silver yarn for the dumpster body and lid. A small piece of cardboard can also be used to keep the dumpster’s shape.
Once you have everything ready, find a comfortable spot with good lighting and get ready to bring your mischievous raccoon to life!
The Dumpster Raccoon Crochet Pattern is worked in parts: the head, body, arms, legs, ears, tail, and optional dumpster. Each piece is crocheted separately and then sewn together.
Step 1 – The Head:
Start with gray yarn. Create a magic ring and make 6 single crochets into it. Increase each round evenly until you have about 36 stitches in total. Continue crocheting without increasing for several rounds to form the head shape. Begin decreasing to close the head, leaving a small opening for stuffing. Add safety eyes between rounds 8–10 and stuff firmly before closing.
Step 2 – The Body:
Start with gray yarn and repeat the same process, but make the body slightly longer. Increase until you reach 42 stitches and crochet several rounds straight. Decrease at the top and bottom to form an oval body. Stuff firmly.
Step 3 – Ears and Face Mask:
For the ears, use black yarn and crochet two small triangles. For the face mask, chain 8 and work single crochets back and forth for 3 rows. Stitch the mask onto the head and add white or gray accents for realism.
Step 4 – Arms and Legs:
Use black yarn for the hands and feet, and gray for the upper limbs. Start with a magic ring of 6 single crochets and increase to 12 stitches. Continue until you have the desired length, then stuff lightly before attaching to the body.
Step 5 – Tail:
The tail is iconic for raccoons. Alternate stripes of gray and black yarn as you crochet in the round. Make it long and fluffy by slightly stuffing it as you go.
Step 6 – Dumpster (Optional):
To make the dumpster, crochet a rectangular box shape using green yarn. Work in rows for the base and sides, then stitch them together. Add black yarn or gray details for a metallic effect. You can even crochet small trash accessories like a can, apple core, or soda bottle for extra charm.
Once all parts are complete, sew them together carefully. Adjust the ears, eyes, and limbs until your dumpster raccoon has the perfect expression of mischief!
The Dumpster Raccoon Crochet Pattern is a fun opportunity to play with design and imagination.
Try using variegated yarn to give the raccoon a natural fur-like texture. Blended tones of gray and white make it look more realistic.
For a whimsical style, use bright colors like blue, pink, or purple instead of gray. This creates a fantasy raccoon or a “galaxy raccoon” that kids will adore.
Add miniature accessories — a tiny pizza slice, soda can, or even a crocheted trash bag — to tell a story. These details bring your raccoon scene to life.
You can also make different facial expressions by changing the placement of the eyes and mouth. A smirk, a surprised look, or sleepy eyes all add personality.
If you love themed projects, make a holiday version. Add a Santa hat for Christmas, bunny ears for Easter, or a heart accessory for Valentine’s Day.
Finally, don’t forget to create a matching set. Make a family of raccoons — a parent, baby, and even a raccoon friend — to complete your collection.
To make your Dumpster Raccoon Crochet Pattern look professional and adorable, keep these important tips in mind.
Maintain tight tension throughout your project so the stuffing doesn’t show. Amigurumi should have firm, even stitches.
Always count your rounds carefully. Using a stitch marker helps prevent errors, especially when increasing or decreasing.
Use high-quality stuffing to give your raccoon a smooth shape without lumps. Add small amounts at a time as you fill.
When attaching limbs, pin them in place first before sewing to ensure symmetry and balance.
Weave in all yarn ends securely to avoid unraveling, especially if your raccoon will be handled often.
If you’re adding accessories, make sure they’re sewn tightly so they stay in place. Safety eyes should always be attached before stuffing for extra security.
Finally, don’t rush — enjoy the process! Each stitch brings your playful dumpster raccoon closer to life.
Q1: Is this pattern suitable for beginners?
A: Yes! The Dumpster Raccoon Crochet Pattern uses basic stitches, so even beginners can follow it with patience and attention to detail.
Q2: What kind of yarn works best for this pattern?
A: Soft cotton or acrylic yarn works best. Choose worsted weight for durability and ease of handling.
Q3: Can I customize the raccoon’s colors?
A: Absolutely. Traditional gray and black look great, but feel free to use any color combination for a creative twist.
Q4: How long does it take to make a dumpster raccoon?
A: Depending on your skill level, it can take between 4 to 6 hours. The optional dumpster adds about 2 extra hours.
Q5: Can I make this raccoon without the dumpster?
A: Yes, the dumpster is optional. The raccoon alone makes a cute plush toy or decorative piece.
Q6: Is the dumpster pattern included?
A: Yes! You can follow the optional section in this guide to make a mini dumpster or create your own custom design.
The Dumpster Raccoon Crochet Pattern is a delightful and humorous project that turns yarn into a playful piece of art. From its charming face to its cheeky personality, this handmade raccoon is sure to win hearts and spark laughter. Whether you make it as a gift, a personal keepsake, or just for fun, this project lets you practice essential amigurumi techniques while creating something truly unique.
Now that you’ve learned how to crochet your own dumpster raccoon, it’s time to grab your hook and get started! Experiment with colors, accessories, and expressions to make your raccoon one of a kind.
When you finish, share your results and let us know your honest thoughts and suggestions — your feedback might inspire other crochet lovers to join the fun! 🧶🦝


