
Crocheted house-shaped cookie for Christmas tree

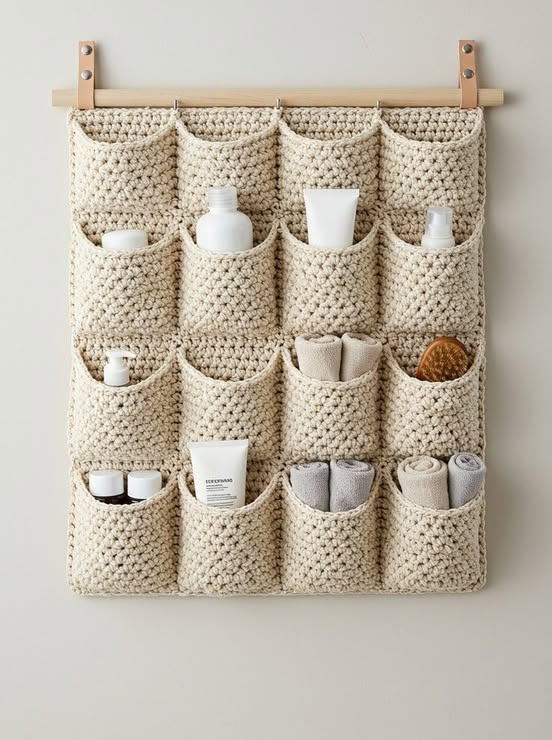
Creating a Crochet Wall Hanging Organizer – Free Pattern is an exciting way to add both functionality and style to your home decor. Whether you are a beginner or an experienced crocheter, this project allows you to combine creativity with practicality.
Crochet wall hanging organizers are perfect for storing small items, displaying decorative pieces, or keeping your space organized while showcasing your handmade skills. In this article, we will guide you through the materials, techniques, and steps needed to create your own unique wall hanging organizer.
Crochet has gained immense popularity as a hobby that is not only relaxing but also incredibly rewarding. A Crochet Wall Hanging Organizer can be a statement piece in any room, adding texture, color, and charm.
The versatility of crochet allows you to customize your organizer to fit your personal style, whether you prefer minimalist designs or intricate patterns. By following this free pattern, you can craft a piece that perfectly suits your needs and complements your interior decor.
One of the main benefits of creating a Crochet Wall Hanging Organizer is the opportunity to improve your crochet skills while producing something useful. This project incorporates basic techniques, such as chains, single crochet, and double crochet, making it accessible to beginners. At the same time, experienced crocheters can experiment with stitches, textures, and colors to make their organizer truly unique. By the end of this guide, you will have a beautiful, handmade organizer that not only organizes your space but also highlights your creativity.
Before starting your Crochet Wall Hanging Organizer – Free Pattern, gathering the right materials is essential for a smooth crafting experience. The materials you choose can affect both the appearance and durability of your final product. Here are the essentials:
Understanding these materials is crucial to ensure your project turns out beautifully. Using quality yarn and tools makes the crocheting process more enjoyable and ensures your organizer remains durable and long-lasting.
Creating a Crochet Wall Hanging Organizer might seem daunting at first, but by following this free pattern, the process becomes straightforward. Each step is designed to help you achieve a polished, functional piece.
By carefully following these steps, you will craft a beautiful crochet wall hanging organizer that is both functional and decorative. The process encourages creativity and allows you to practice new crochet techniques while producing a tangible, useful item.
To ensure your Crochet Wall Hanging Organizer – Free Pattern looks polished and professional, keep these tips in mind. They can make a significant difference in the final result and make your crafting experience smoother.
Following these tricks can help even beginners create an organizer that looks professional and lasts longer. Small adjustments along the way can have a significant impact on the overall look and usability of your wall hanging organizer.
A Crochet Wall Hanging Organizer is versatile and can serve multiple purposes around your home. Here are some creative ways to make the most of your handmade piece:
By thinking creatively, your Crochet Wall Hanging Organizer can serve many practical purposes while enhancing your home’s aesthetic. It’s an excellent example of how handmade crafts can combine utility with beauty.
Q1: Can beginners make a crochet wall hanging organizer?
Yes! This free pattern uses basic stitches and step-by-step instructions, making it suitable for beginners. You can start with simple pockets and gradually explore more intricate designs.
Q2: What type of yarn is best for a wall hanging organizer?
Medium-weight cotton yarn is recommended for its durability and ability to hold shape. Acrylic yarn works well too, offering softness and a wide range of colors.
Q3: How do I hang my crochet organizer securely?
A wooden dowel or rod works best. Fold the top edge of your organizer over the dowel and stitch it in place. Use sturdy wall hooks to hang it securely.
Q4: Can I customize the number of pockets?
Absolutely! Adjust the size of the foundation chain and the height of each pocket to create as many sections as needed for your items.
Q5: How do I maintain and clean my crochet wall hanging?
Hand wash gently with mild detergent and reshape while damp. Avoid wringing or twisting the crochet to maintain its shape and texture.
Q6: Can I add decorative elements like beads or tassels?
Yes! Adding tassels, beads, or fringe is a great way to personalize your wall hanging organizer and make it unique.
Creating a Crochet Wall Hanging Organizer – Free Pattern is a rewarding and practical project that combines creativity with functionality. Throughout this guide, we explored the materials, step-by-step instructions, tips for perfection, and creative uses for your organizer. By following this pattern, you can create a piece that organizes your space, enhances your home decor, and showcases your crochet skills. Handmade organizers are not only useful but also a reflection of your personal style.
We hope you enjoyed this guide and feel inspired to start your own crochet wall hanging organizer. Share your experience, leave your honest opinion, and suggest ideas for future projects. Your feedback helps us continue providing free, detailed, and practical patterns for all crochet enthusiasts.


