
If you are a fan of fun and creative crochet projects, the CROCHET TURTLE!! Switch out his shells – Step by step guide is perfect for your next amigurumi adventure.
This project allows you to crochet an adorable turtle with interchangeable shells, making it a playful and customizable toy.
Not only is this project enjoyable, but it also enhances your crochet skills, helping you practice stitches, shaping, and assembly techniques. Whether you are a beginner or an experienced crocheter, following this step-by-step pattern ensures a professional-looking and charming result.
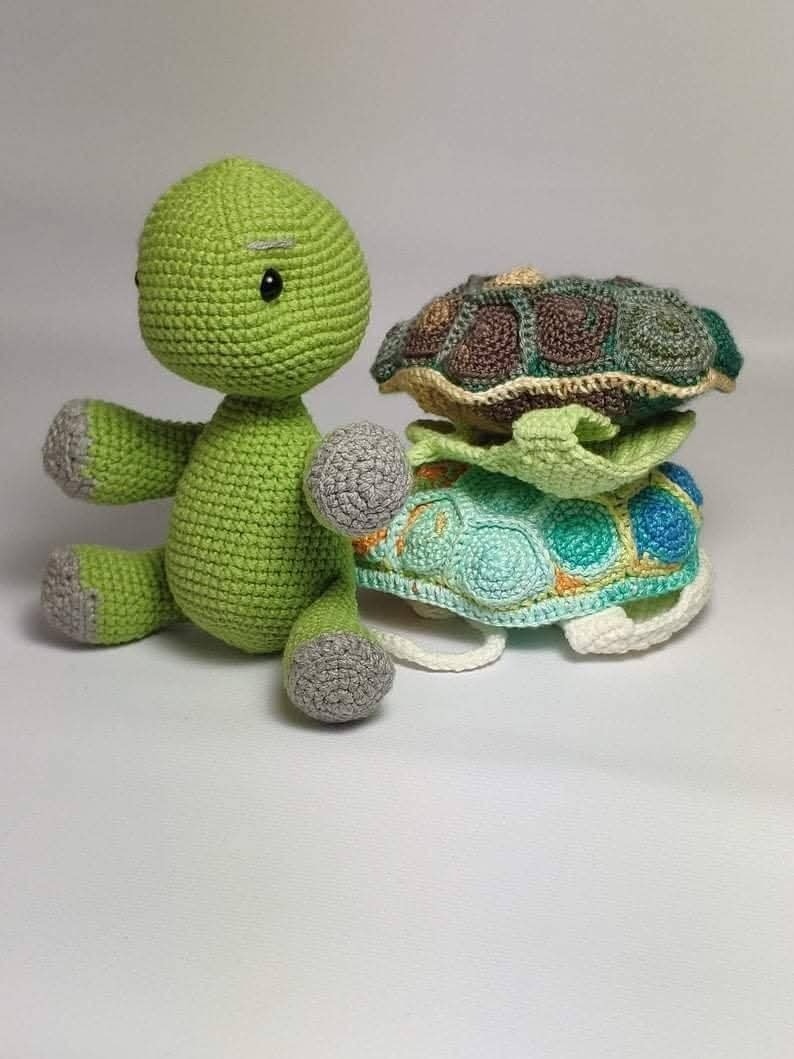
The appeal of a CROCHET TURTLE!! Switch out his shells – Step by step lies in its unique feature: interchangeable shells.
This allows you to customize your turtle’s look according to your mood, seasons, or favorite colors. You can make multiple shells in various colors, patterns, or textures, giving endless creative possibilities. Additionally, crocheting a turtle is a relaxing activity that improves hand-eye coordination, focus, and patience.
Crocheting with this pattern is also eco-friendly and budget-conscious. You can repurpose leftover yarn to create new shells or the turtle’s body. Each completed turtle becomes a unique handmade piece, perfect for gifts, decoration, or playtime. With the CROCHET TURTLE!! Switch out his shells – Step by step, you will not only make a delightful toy but also a functional piece that encourages creativity and imagination.
Choosing the Right Yarn and Hook
The first step in the CROCHET TURTLE!! Switch out his shells – Step by step is selecting the right yarn and crochet hook. The type of yarn you use determines the texture, durability, and overall appearance of your turtle. Soft acrylic yarn is ideal for beginners as it is easy to handle and maintains shape well. Cotton yarn gives a slightly firmer and polished finish, while wool blends add a unique texture.
Your crochet hook should match the yarn weight for even stitches and a neat result. Beginners may find slightly larger hooks easier to handle, while experienced crocheters can use smaller hooks for tighter, more detailed stitching. Check the yarn label for recommended hook sizes, as this helps maintain the correct tension and ensures your turtle fits together perfectly.
Color choice is essential for your CROCHET TURTLE!! Switch out his shells – Step by step. The body is typically a natural green or brown, but you can experiment with pastel shades or vibrant colors for a playful effect. The interchangeable shells can be in contrasting or matching colors to add variety and personality.
Additional materials include stuffing, stitch markers, safety eyes, or embroidery thread for facial features. Using quality stuffing ensures your turtle maintains its shape, while safety eyes or embroidered eyes give it character and charm. Having all materials ready before starting makes the project smoother and more enjoyable.
Creating the Turtle Body
The next stage in the CROCHET TURTLE!! Switch out his shells – Step by step is constructing the turtle’s body. Begin with a magic ring and work single crochet stitches in continuous rounds to create a rounded and sturdy base. Increasing and decreasing stitches as indicated in the pattern ensures a smooth, symmetrical shape.
After completing the body, crochet the head and attach it securely. Reinforce the connection with extra stitches to prevent detachment, especially if the turtle will be handled frequently. Next, work on the legs and tail, attaching them symmetrically to create a balanced look. This foundational step is essential for the turtle to sit and appear realistic.
Once the body is complete, add facial features using either safety eyes or embroidery thread. A small smile or nostrils can give your CROCHET TURTLE!! Switch out his shells – Step by step personality and charm. Proper placement of eyes and facial features ensures a friendly, appealing appearance.
Finally, check the body for any loose stitches or gaps. Reinforce any weak areas before moving on to the interchangeable shells. A sturdy body is critical for supporting multiple shell attachments and ensures the turtle remains durable for play or display.
Making Interchangeable Shells
The signature feature of this pattern is creating interchangeable shells. Start by choosing yarn colors for each shell. You can make shells in natural tones, bright patterns, or even seasonal designs to switch out for fun. This flexibility makes your CROCHET TURTLE!! Switch out his shells – Step by step highly versatile.
Work each shell in rounds, increasing and decreasing stitches as needed to form a dome shape. You can add textures like puff stitches or bobble stitches to mimic a turtle’s natural shell pattern. Decorative elements like stripes, spots, or small appliqués can enhance the design and personalize each shell.
Attach loops or buttons at the bottom of the shells if you want them to stay in place, or simply let them rest on the turtle’s body for easy swapping. Testing each shell on the turtle ensures a snug fit while remaining simple to switch out.
Repeat this process to make multiple shells, allowing for creative rotation. Each new shell offers a fresh look, making your crochet turtle a dynamic and engaging toy. The interchangeable feature also encourages imaginative play, especially for children.
Finally, press the shells lightly to smooth stitches and shape them properly. Ensure all edges are finished neatly to prevent fraying or stretching, maintaining the CROCHET TURTLE!! Switch out his shells – Step by step’s polished and professional appearance.
Customizing Your Crochet Turtle
Customization is a key part of the CROCHET TURTLE!! Switch out his shells – Step by step experience. You can vary colors, textures, and patterns to suit your style. Adding small embellishments like flowers, stripes, or stitched details creates a unique look for each shell.
Consider the size of your turtle and shells. Adjusting the number of stitches or rounds can create larger or smaller turtles for keychains, desk ornaments, or playtime companions. This flexibility ensures the project is suitable for multiple purposes.
Experimenting with yarn texture adds dimension. Fuzzy yarn or boucle creates a plush, tactile feel, while smooth cotton yarn gives a clean and polished look. Each choice affects both the appearance and handling of your CROCHET TURTLE!! Switch out his shells – Step by step.
Safety is important if making the turtle for children. Use securely attached eyes and avoid small embellishments that could pose a hazard. All shells should fit snugly on the body to prevent slipping during play.
Finally, gifting options are endless. A handmade crochet turtle with multiple shells makes a charming gift for birthdays, holidays, or baby showers. Personal touches like color choices or themed shells enhance the special appeal of this project.
FAQ – CROCHET TURTLE!! Switch out his shells – Step by step
Q1: Is this pattern suitable for beginners?
Yes, the CROCHET TURTLE!! Switch out his shells – Step by step pattern includes clear instructions suitable for all skill levels.
Q2: Can I use any yarn?
Soft acrylic or cotton yarn works best for durability and ease of handling. Avoid extremely fuzzy or thin yarns for body and shells.
Q3: How do I make the shells interchangeable?
Create shells slightly larger than the body dome or add loops/buttons at the bottom to secure them for easy switching.
Q4: Can I customize the shell patterns?
Absolutely! You can add stripes, spots, appliqués, or textures like puff stitches to make each shell unique.
Q5: How do I attach the turtle’s limbs securely?
Use a yarn needle and extra stitching at connection points to reinforce legs, tail, and head.
Q6: Can this turtle be a gift for children?
Yes, ensure eyes and embellishments are securely attached and shells are safe for play.
Conclusion
The CROCHET TURTLE!! Switch out his shells – Step by step is a delightful, creative, and educational crochet project. From building the body to crafting multiple interchangeable shells, every step encourages creativity and skill development. This amigurumi turtle is not only charming but also interactive, offering endless play and customization options.
We hope this guide inspires you to try your own CROCHET TURTLE!! Switch out his shells – Step by step. Don’t forget to leave a sincere opinion and suggestions in the comments—your feedback encourages others and helps improve future crochet guides. With patience and imagination, you can bring a cute, customizable turtle to life that will be cherished for years.