
Creating a crochet turtle is a delightful and rewarding project for both beginners and experienced crafters. Whether you are looking for a charming addition to your home decor, a handmade gift, or simply a relaxing hobby, this turtle pattern provides a step-by-step guide to bring your creation to life.
In this article, we will explore everything you need to know about making a crochet turtle, including materials, techniques, and helpful tips to ensure your project is successful and enjoyable. By following this guide, you’ll soon have your very own DIY crochet turtle to cherish.
Crocheting a turtle allows you to combine creativity with skill, producing a soft and cuddly toy that can be personalized with colors and textures.
The beauty of using a crochet pattern is that it offers structure while still allowing room for your own design choices. From selecting the right yarn to choosing the perfect hook size, each detail contributes to the overall charm of your amigurumi turtle.
Understanding the fundamentals of crochet stitches, along with the pattern instructions, will ensure your turtle looks professional and adorable.
Many crafters enjoy making a DIY crochet turtle because it is both a relaxing and practical activity. This project is perfect for gifting, decorating nurseries, or even selling as part of a handmade collection. Using a well-structured turtle pattern guarantees consistency and helps avoid mistakes that can occur when working freehand. Throughout this article, we will explore various tips and techniques to help you master the art of crocheting your very own turtle while keeping the experience fun and stress-free.
Choosing the Right Materials for Your Crochet Turtle
Selecting the right materials is crucial for creating a beautiful and durable crochet turtle. Yarn type, hook size, and stuffing all play a vital role in determining the final appearance and texture of your project. When choosing yarn, consider soft acrylic or cotton blends, which are both easy to work with and gentle to the touch. Opt for colors that reflect natural turtle shades, or get creative with vibrant and playful hues.
The hook size recommended in your turtle pattern ensures the stitches are tight enough to hold the stuffing securely. Using a hook that is too large can result in gaps, while a hook that is too small can make the project more difficult and dense. Always check the gauge if the pattern specifies one, as it guarantees the turtle will turn out as intended.
Stuffing is another essential element. Polyester fiberfill is commonly used for DIY crochet turtles because it is soft, lightweight, and easy to shape. Some crafters also like to use small plastic pellets to add weight to the turtle’s body, making it feel more substantial. Proper stuffing ensures the turtle maintains its shape and remains huggable.
Accessories like safety eyes or embroidery thread can add personality to your amigurumi turtle, but always consider safety, especially if the toy is intended for young children. In addition, stitch markers, scissors, and a yarn needle are indispensable tools for assembling the final pieces neatly. By carefully choosing your materials, you are setting yourself up for a successful and enjoyable project.
Paying attention to these details not only improves the look of your finished crochet turtle but also makes the process smoother and more satisfying. With the right combination of yarn, hook, and stuffing, your turtle will be soft, sturdy, and perfect for display or play. This step is often underestimated but is crucial for beginners who want their first attempt to be a success.
Remember that every turtle pattern may have slight variations in recommended materials, so always read the instructions thoroughly before beginning. This ensures you have everything prepared and avoids interruptions midway through your project.
Understanding the Crochet Turtle Pattern
A turtle pattern is more than just a set of instructions; it’s a roadmap to creating a lifelike and charming crochet turtle. Patterns typically include a list of materials, stitch abbreviations, step-by-step instructions, and sometimes diagrams to guide you through the assembly. Familiarizing yourself with the pattern before starting helps prevent mistakes and saves time.
Begin by reviewing the abbreviations and symbols used in the crochet pattern. Terms like sc (single crochet), inc (increase), and dec (decrease) are common and understanding them is essential. If you are new to amigurumi, it may help to practice these stitches on a small swatch before starting your turtle.
Many patterns break the turtle into separate parts: the shell, head, limbs, and tail. Working on each piece individually before assembly allows for better control over shape and size. Pay attention to stitch counts, as they are crucial for maintaining symmetry in your DIY crochet turtle.
Following the turtle pattern instructions carefully ensures your project progresses smoothly. Skip steps or miscount stitches, and the proportions may be off, affecting the final appearance. For beginners, it can be helpful to use stitch markers or a row counter to track progress accurately.
Diagrams included in some crochet patterns are valuable tools for visual learners. They provide a clear representation of how pieces fit together and can clarify written instructions that may seem confusing at first. Use these diagrams to guide your assembly process and check your work against them.
By understanding the pattern thoroughly, you will feel more confident and enjoy the creative process. A clear grasp of the instructions allows you to focus on the fun aspects of designing and personalizing your amigurumi turtle without getting stuck.
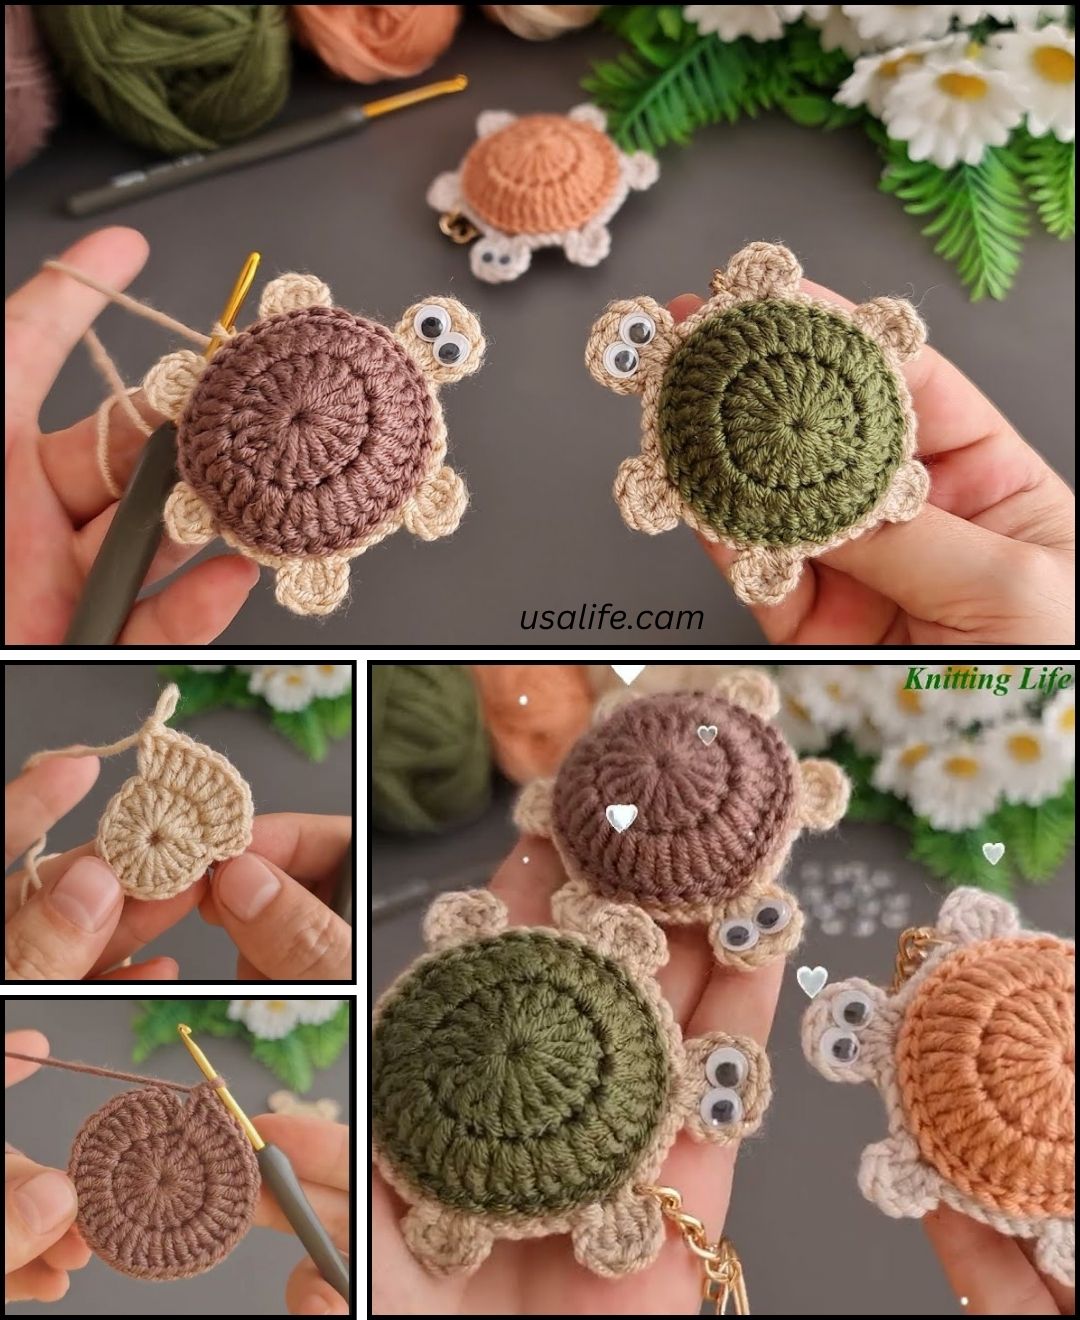
Step-by-Step Guide to Crocheting Your Turtle
Starting with the shell is the most common approach when making a crochet turtle. Usually worked in rounds, the shell requires careful counting and consistent tension. Gradually increase stitches to create a rounded shape, following your turtle pattern instructions precisely.
Next, crochet the head and limbs separately. These pieces often involve simple stitches but may include increases or decreases to shape the features accurately. Working slowly and checking your stitch count frequently helps maintain symmetry and avoids frustration.
Stuffing the pieces properly is crucial. Gently fill the head, limbs, and shell with fiberfill, taking care not to overstuff, which can distort the shape. Ensure the stuffing is evenly distributed for a smooth and natural look in your DIY crochet turtle.
Assembling the turtle requires joining each piece securely. Use a yarn needle and the whip stitch or mattress stitch to attach the head, limbs, and tail to the shell. Check the alignment carefully before stitching completely, as repositioning afterward can be difficult.
Adding facial features and shell patterns brings your amigurumi turtle to life. Safety eyes or embroidered eyes work well, and you can use different yarn colors to create a unique pattern on the shell. These finishing touches personalize your turtle and make it extra charming.
Finally, inspect your work for loose ends or uneven stitches. Weave in all yarn tails neatly and trim any excess. With attention to detail, your crochet turtle will look polished, professional, and ready to enjoy.
Tips for Personalizing Your Crochet Turtle
Personalization is what makes your DIY crochet turtle truly special. Consider experimenting with yarn colors, patterns, and textures to create a turtle that reflects your style or the personality of the person receiving it as a gift. Bright, playful colors appeal to children, while natural tones suit decorative purposes.
Adding accessories like a tiny scarf, hat, or flower enhances the charm of your amigurumi turtle. These small details make your creation unique and showcase your creativity. You can even create themed turtles for holidays or special occasions.
Experimenting with different yarn textures can produce interesting effects. For example, using a fuzzy or boucle yarn gives your turtle a soft and whimsical look, while smooth cotton creates a neat, clean appearance. Your choice of yarn can significantly affect the overall feel and style.
Adjusting the size of your turtle is another personalization option. By using a larger or smaller hook and yarn combination, you can make a tiny keychain turtle or a larger plush toy. Size variation is perfect for creating a set of turtles for display or gifts.
Incorporating embroidery or applique techniques on the shell allows for even more customization. Hearts, stars, or initials can be added, making your crochet turtle uniquely yours. These details are especially meaningful for gifts.
Finally, don’t be afraid to mix patterns or create hybrid designs. Combining elements from different turtle patterns or inventing new features encourages creativity and results in a one-of-a-kind piece you’ll be proud of.
FAQ – Crochet Turtle – Pattern
Q1: Can beginners make a crochet turtle?
A1: Yes! Most turtle patterns are suitable for beginners, especially those labeled as easy or simple. Start with basic stitches like single crochet and gradually progress to more complex rounds.
Q2: What materials are best for a crochet turtle?
A2: Soft acrylic or cotton yarn is ideal. Polyester fiberfill is commonly used for stuffing. Safety eyes or embroidery thread can be used for facial features.
Q3: How long does it take to make a crochet turtle?
A3: Depending on size and experience, it can take anywhere from a few hours to a couple of days. Small turtles are quicker, while larger or detailed ones take longer.
Q4: Can I sell my crochet turtles?
A4: Yes! Handmade DIY crochet turtles are popular on marketplaces. Make sure to follow any copyright rules if using a published pattern.
Q5: How can I personalize my turtle?
A5: Use different yarn colors, add accessories, embroidery, or applique designs on the shell. Adjust size by changing hook and yarn thickness.
Q6: Can I wash my crochet turtle?
A6: Most yarns can be hand-washed gently. Avoid hot water and wringing. Always check the yarn label for care instructions.
Conclusion
Creating a crochet turtle is a fun, creative, and rewarding project that can be enjoyed by crafters of all skill levels. By understanding the materials, following a detailed turtle pattern, and incorporating personal touches, you can produce a charming and unique DIY crochet turtle. From choosing the right yarn to stuffing and assembling each piece carefully, every step contributes to a polished final result.
We hope this guide has provided the knowledge, inspiration, and confidence to start your own crochet turtle project. Don’t hesitate to experiment with colors, textures, and accessories to make your turtle uniquely yours.
Share your experiences, offer suggestions, and leave an honest opinion on what worked best for you. Your feedback helps the crafting community grow and inspires others to explore the delightful world of crochet.