
Crocheted house-shaped cookie for Christmas tree

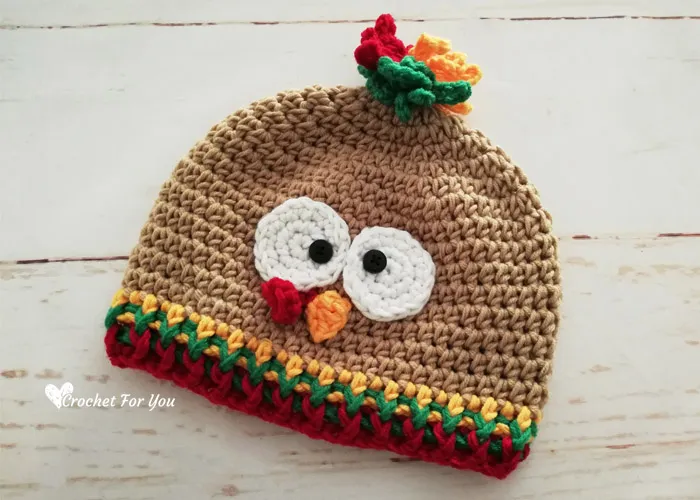
The Crochet Turkey Hat – Free Pattern is a fun, festive, and cozy accessory perfect for Thanksgiving celebrations, autumn gatherings, or playful seasonal outfits.
This whimsical hat combines creativity, practicality, and holiday spirit in a single project. With this free pattern, both beginners and experienced crocheters can create a charming turkey hat complete with a colorful tail, wattle, beak, and eyes. It’s a delightful way to add personality and warmth to your wardrobe while showcasing your crochet skills.
Starting the Crochet Turkey Hat – Free Pattern is exciting because it allows you to craft something both functional and decorative.
Unlike more complex crochet projects, this hat can be completed in a few hours, making it ideal for last-minute holiday gifts or fun DIY projects for family and friends. Its playful design ensures it stands out at parties, school events, or casual autumn outings.
This tutorial provides detailed instructions, guidance on fabric and yarn choices, and tips for customization. Following the Crochet Turkey Hat – Free Pattern ensures that each hat is durable, comfortable, and visually appealing. Whether you are gifting the hat to a child, a friend, or making one for yourself, this pattern offers endless creative possibilities.
Before starting your Crochet Turkey Hat – Free Pattern, it’s essential to gather the right materials. For the main body of the hat, medium-weight yarn in brown is recommended, as it provides structure and warmth. Additional colors like orange, red, and yellow are ideal for crafting the beak, wattle, and feathers. Cotton or acrylic yarns work best due to their durability, softness, and ease of care.
A crochet hook suitable for your yarn, typically between 4 mm and 5 mm, is necessary for consistent stitches. Other essential tools include stitch markers to track rounds, scissors, a yarn needle for weaving ends, and optional safety eyes for adding character to your turkey.
Pre-washing your yarn prevents shrinkage after the project is complete and ensures vibrant colors remain intact. Choosing high-quality yarn enhances the hat’s comfort and durability, especially if it will be worn frequently. You can also experiment with variegated yarns to create unique feather patterns and visual texture.
The Crochet Turkey Hat – Free Pattern uses standard crochet stitches suitable for both beginners and intermediate crafters. Key techniques include:
For beginners, practicing these stitches before starting the pattern ensures smoother results. Maintaining consistent tension is crucial to avoid uneven stitches and gaps, particularly in smaller, detailed sections like the wattle and beak.
Using stitch markers helps you track rounds and identify increases or decreases. Properly executed stitches make the hat look professional and help maintain the shape and structure of the Crochet Turkey Hat – Free Pattern.
The Crochet Turkey Hat – Free Pattern allows endless customization options. You can make hats for adults or children by adjusting the crown size and body height. Using different yarn textures, such as fluffy or novelty yarns, can add a playful, textured effect to feathers or the hat body.
Adding embellishments like tiny pompoms, embroidery patterns, or metallic thread can further personalize your turkey hat. Consider creating matching accessories like mittens or scarves in coordinating colors for a complete holiday set.
You can also create themed variations by adjusting colors—for instance, using pastel tones for a spring-themed turkey or darker shades for a more realistic autumn look. The flexibility of the Crochet Turkey Hat – Free Pattern encourages creativity and experimentation.
Following these tips ensures your Crochet Turkey Hat – Free Pattern is comfortable, durable, and visually appealing.
1. Can beginners follow this pattern?
Yes, the pattern is beginner-friendly, with clear step-by-step instructions and basic crochet techniques.
2. What yarn works best?
Medium-weight cotton or acrylic yarn is ideal, offering warmth, softness, and durability.
3. How do I adjust the size?
Increase or decrease stitches at the crown and body to fit different head sizes.
4. Can I machine wash the hat?
Yes, use a gentle cycle with cold water. Lay flat to dry to maintain shape.
5. How many feathers should I add?
Typically, 4–6 feathers create a balanced, full tail. You can adjust based on hat size.
6. Can I make a matching scarf or mittens?
Absolutely! Coordinating accessories enhance the holiday theme and make great gifts.
7. Are safety eyes necessary?
Not necessarily—embroidery works as a safer alternative, especially for children.
The Crochet Turkey Hat – Free Pattern is a charming, festive, and cozy accessory perfect for celebrating Thanksgiving or autumn. Its playful design, combined with practical warmth, makes it ideal for children, adults, and gift-giving alike. By following this free pattern, crocheters of all skill levels can craft a hat that is both functional and visually delightful.
With the ability to customize colors, features, and size, the Crochet Turkey Hat – Free Pattern encourages creativity and experimentation.
Whether for family gatherings, holiday events, or personal enjoyment, this hat brings fun and festive flair to any occasion. Share your finished creations, leave honest feedback, and suggest new variations to inspire others in the crochet community.


