
Crocheted house-shaped cookie for Christmas tree

Creating a Crochet Star Rug can be a fun and rewarding project for anyone interested in home décor and DIY crafts. Whether you are a beginner or an experienced crocheter, making a star-shaped rug adds a unique and personal touch to any room.
This guide will walk you through each step, ensuring that you understand the process and achieve a beautiful final result. By following these instructions, you can enjoy the satisfaction of creating a stylish and practical piece for your home.
Making a Crochet Star Rug is not just about crafting; it’s also about creativity and customization. You can choose your favorite colors, textures, and yarn types to match your interior design perfectly.
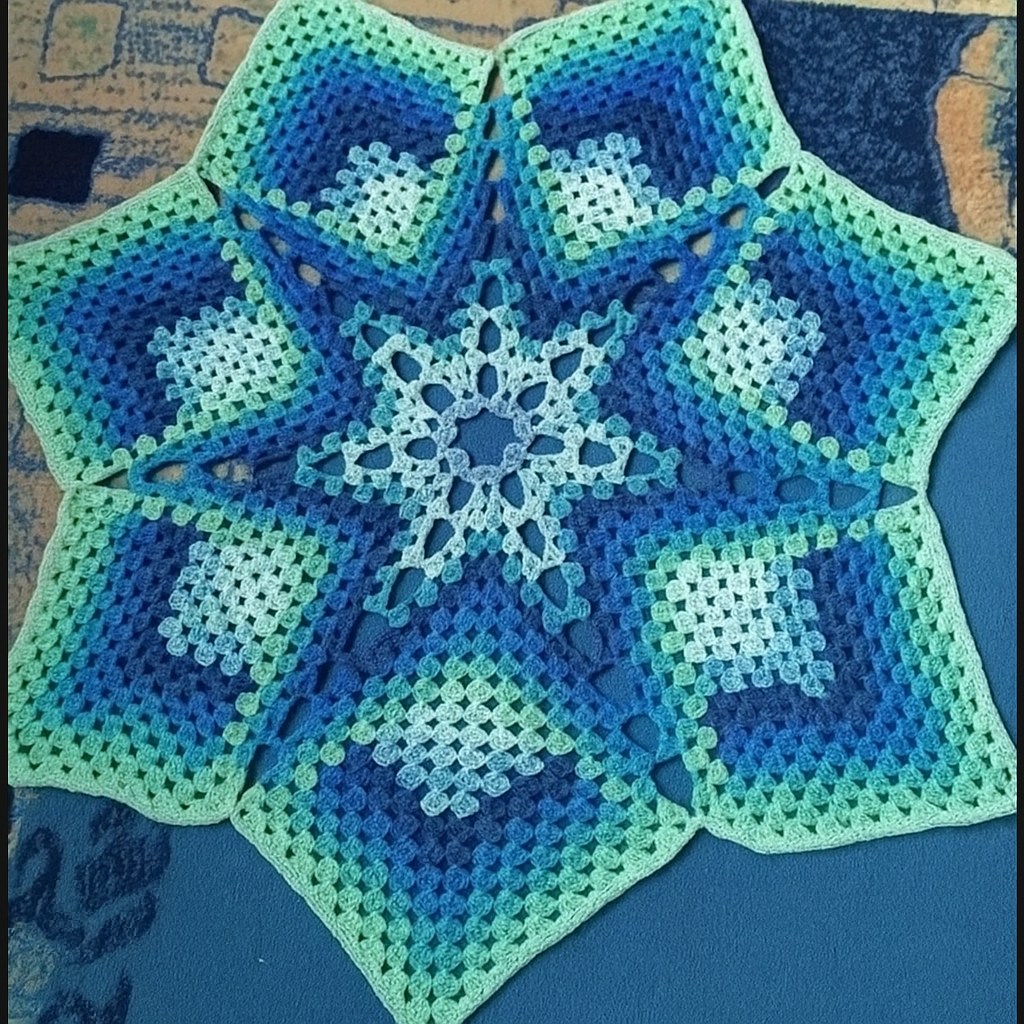
Unlike regular circular or rectangular rugs, a star-shaped design offers a playful and eye-catching element, making it perfect for kids’ rooms, nurseries, or even living areas.
Each section of this guide will help you understand the techniques involved, from basic crochet stitches to assembling the final piece.
Another important aspect of a Crochet Star Rug is its durability and functionality. By using high-quality yarn and proper stitching techniques, your rug can last for years while maintaining its shape and softness. This guide emphasizes both aesthetic appeal and practical tips, ensuring your DIY project is successful from start to finish. By learning how to make a crochet star rug, you also gain valuable skills that can be applied to other projects, such as cushions, blankets, and decorative wall pieces.
Before starting your Crochet Star Rug, it’s essential to gather all the necessary materials and tools. Having everything ready ensures a smooth crafting process and prevents interruptions. The main materials include yarn, crochet hooks, scissors, and a yarn needle for finishing touches.
Choose a yarn that is both soft and durable. Cotton yarn is ideal because it’s easy to clean and maintains its shape, but you can also experiment with wool or acrylic blends. Make sure to pick multiple colors if you want a multi-colored star design, as it can add dimension and vibrancy to your rug.
Selecting the right crochet hook is equally important. The size of the hook should correspond to the thickness of your yarn, ensuring your stitches are even and tight. Using the correct hook helps maintain the structural integrity of your Crochet Star Rug, preventing stretching or warping over time.
Scissors are needed for cutting the yarn, and a yarn needle is essential for weaving in loose ends. Properly finishing your rug not only improves its appearance but also increases its durability, making your creation last longer in high-traffic areas.
Additional accessories like stitch markers can be helpful, especially if you are following a complex star pattern. Markers allow you to keep track of stitch counts and sections, making the crocheting process more organized and less stressful.
Finally, having a comfortable workspace with good lighting can significantly improve your crafting experience. Spend some time preparing your area, and you’ll find that making a Crochet Star Rug becomes a relaxing and enjoyable activity rather than a frustrating task.
Creating your Crochet Star Rug involves following a series of steps to ensure each point of the star is evenly shaped and secure. Understanding the pattern and stitch techniques is key to achieving a professional-looking result.
Start by making a magic ring, which will form the center of your star. This method allows you to pull the ring tight, eliminating any holes in the middle. The magic ring is the foundation of your rug, so take your time to ensure it is secure.
Next, begin crocheting the first round of stitches. Typically, double crochet stitches are recommended because they provide a solid yet flexible structure. Follow the pattern carefully, counting your stitches to make sure each arm of the star is symmetrical.
As you progress, increase stitches gradually to shape each point of the star. This step requires patience and attention to detail, as uneven increases can result in a lopsided rug. Use stitch markers to mark the beginning of each point for accuracy.
After completing the star points, work on connecting the sections with single or half-double crochet stitches. This step strengthens the rug and ensures all points are evenly joined. It’s also the stage where you can add color changes if desired, enhancing the visual appeal.
Finally, finish your Crochet Star Rug by weaving in all loose ends with a yarn needle. Trim excess yarn and make sure all stitches are secure. Your rug is now ready to be placed in your chosen space, adding a charming and personalized touch to your home décor.
One of the joys of making a Crochet Star Rug is the ability to customize it according to your preferences. From color choices to size adjustments, personalization ensures that your rug is truly one-of-a-kind.
Experiment with yarn textures to create unique visual effects. Combining smooth cotton with fluffy wool or chenille yarn can make your star rug more tactile and interesting. Texture variation also adds depth to the design, enhancing its overall aesthetic.
Adjusting the size of your rug is simple. By increasing or decreasing the number of rounds or the size of your stitches, you can create anything from a small accent piece to a large centerpiece for a living room or bedroom.
Color patterns can also be customized. You can alternate colors for each star point or create a gradient effect for a modern look. Even subtle changes in shade can dramatically affect the final appearance of your Crochet Star Rug.
Adding borders or edging is another way to personalize your rug. A simple scalloped edge or a contrasting color border can give the rug a professional finish. Edging also helps maintain the rug’s shape over time, preventing curling or fraying.
Finally, consider combining multiple star rugs in a coordinated color scheme for a larger decorative impact. Layering or placing them strategically in a room can create a visually stunning display, showcasing your creativity and craftsmanship.
Proper maintenance is essential to ensure your Crochet Star Rug remains beautiful and functional for years. Regular cleaning and care prevent damage and preserve the texture and color of the yarn.
For routine cleaning, gently vacuum or shake out the rug to remove dust and debris. Avoid using harsh cleaning chemicals, as they can damage the fibers and fade the colors.
Hand washing is the safest method for cleaning a crochet rug. Use lukewarm water with a mild detergent, and gently squeeze the rug without wringing. Lay it flat to dry to maintain its shape, especially if your rug features delicate star points.
Spot cleaning is useful for small stains or spills. Dab the affected area with a mild soap solution and a soft cloth, then rinse and dry. Prompt attention prevents stains from setting, keeping your Crochet Star Rug looking fresh.
Rotate your rug periodically to prevent uneven wear, especially in high-traffic areas. This simple step prolongs the life of your rug and ensures all sections remain vibrant and intact.
Store your rug properly when not in use. Avoid folding it tightly or placing heavy objects on top. Instead, roll it gently and keep it in a dry, cool space to prevent damage from moisture or pressure.
Q1: How long does it take to make a Crochet Star Rug?
A1: The time depends on your skill level and the size of the rug. Beginners may take several days, while experienced crocheters can complete a medium-sized rug in a few hours.
Q2: Can I use any type of yarn?
A2: Yes, but cotton or acrylic yarn is recommended for durability and ease of cleaning. Avoid very delicate yarns that may fray or lose shape.
Q3: How do I prevent my rug from curling at the edges?
A3: Make sure your stitches are even and tight. Adding a border or edging can also help maintain the rug’s shape.
Q4: Can I make a larger rug using the same pattern?
A4: Absolutely! Simply increase the number of rounds and adjust the stitch counts accordingly to expand the size.
Q5: How do I wash a Crochet Star Rug?
A5: Hand wash with mild detergent in lukewarm water and lay flat to dry. Spot clean small stains as needed.
Q6: Is this rug suitable for high-traffic areas?
A6: Yes, if you use durable yarn and maintain it properly. Avoid overly delicate yarns in areas with heavy foot traffic.
Making a Crochet Star Rug is a rewarding and creative project that combines skill, design, and personalization. By following this step-by-step guide, you can craft a rug that is not only beautiful but also functional and long-lasting. From selecting the right materials to customizing colors and maintaining your rug, each step contributes to a successful DIY project.
Share your experience and let us know how your Crochet Star Rug turned out, along with any suggestions or tips for fellow crocheters. Your feedback helps build a supportive and inspiring crafting community.


