
Crocheted house-shaped cookie for Christmas tree

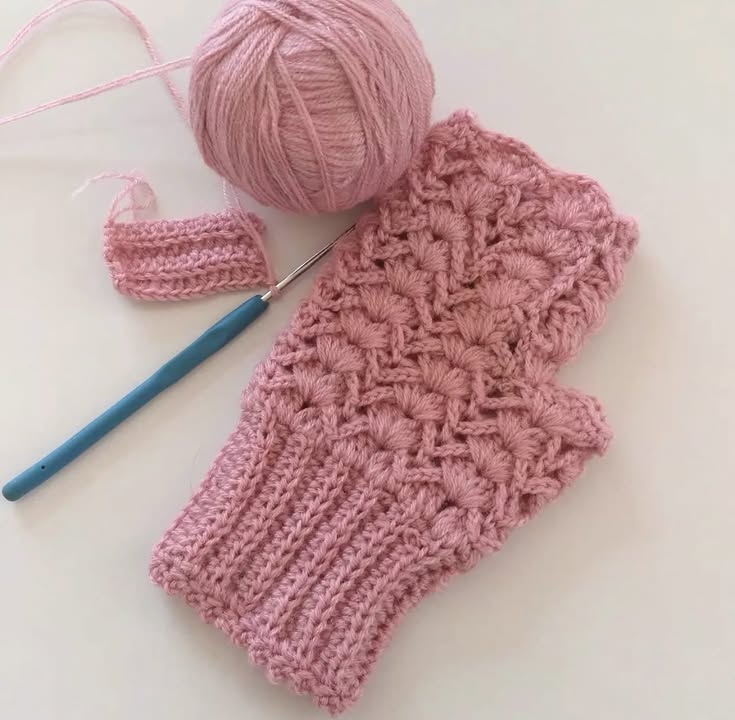
The Crochet Fingerless Gloves with Shell Stitch – Free Pattern is one of the most elegant and practical crochet accessories you can make.
These gloves not only add a touch of handmade charm to your outfit but also provide warmth and comfort while keeping your fingers free for daily tasks.
Whether you’re an experienced crocheter or a complete beginner, this pattern is easy to follow and highly rewarding. Throughout this article, you’ll learn how to create your own pair of crochet fingerless gloves using the beautiful shell stitch, one of the most classic and textured stitches in crochet design.
Crocheting fingerless gloves is the perfect project for those who love quick, functional, and stylish handmade accessories. The shell stitch pattern gives the gloves a feminine and delicate look while maintaining enough thickness to provide warmth.
You can customize the gloves with your favorite yarn colors and adjust the size to fit your hands perfectly. The best part? This free crochet pattern requires minimal yarn and time, making it ideal for gift-giving or craft market sales.
What makes the Crochet Fingerless Gloves with Shell Stitch – Free Pattern so popular is its combination of simplicity and beauty. The gloves work up quickly, use basic crochet stitches, and can be completed in just a few hours. Plus, the shell stitch provides a lovely scalloped texture that looks intricate but is surprisingly easy to make. In the next sections, we’ll explore the materials you’ll need, how to crochet the shell stitch, and how to assemble your gloves step by step.
To begin your crochet fingerless gloves with shell stitch, you’ll need a few essential supplies. Having the right materials ensures your project turns out soft, comfortable, and durable.
First, choose a soft acrylic or wool blend yarn that feels gentle against the skin. Medium-weight yarn (category 4) works best for this project because it provides enough warmth without making the gloves bulky. You can experiment with color gradients or solid shades depending on your personal style.
Next, you’ll need a crochet hook that matches your yarn weight—usually a 4.0 mm (G/6) or 4.5 mm (7) hook works well. Always check your gauge before starting to ensure your gloves fit comfortably. A tight gauge can make the gloves stiff, while a loose one can make them too floppy.
You’ll also need a yarn needle for weaving in ends and a pair of scissors for trimming excess yarn. Optional tools include stitch markers to help keep track of rounds and a measuring tape to ensure both gloves are the same length.
Remember that the quality of your yarn plays a big role in the final look. A soft, slightly stretchy yarn enhances the texture of the shell stitch, giving your gloves a neat, polished appearance. Don’t be afraid to experiment with colors like pastel pink, deep burgundy, or neutral gray—each gives a different personality to your handmade gloves.
Finally, before you start crocheting, wash your hands and work in a comfortable, well-lit area. Crocheting is not just about crafting—it’s also about relaxation and mindfulness.
The shell stitch is the star of this project. It’s an easy yet stunning stitch pattern that creates a scalloped or fan-like texture, giving your crochet fingerless gloves a unique charm. The basic idea behind the shell stitch is to work several double crochets into one stitch or space, forming a rounded shape that resembles a shell.
To start, chain a multiple of six plus one (for turning). In the second row, work five double crochets into the same stitch, skip two stitches, and then single crochet into the next stitch. This creates your first shell. Repeat this pattern across the row. When you move to the next row, you’ll alternate where you place the shells so they stack neatly in between the previous ones.
The shell stitch works beautifully in solid colors but also looks amazing when made with variegated yarns. The texture enhances the natural color flow, creating a stunning effect without any extra effort.
If you’re new to crochet, take your time practicing the shell stitch on a small swatch before starting your gloves. Consistent tension is key to achieving uniform shells and smooth edges.
Another tip: count your stitches at the end of each row to make sure you haven’t accidentally added or missed any. Consistency will ensure that both gloves match perfectly in size and shape.
With a bit of practice, you’ll quickly master this stitch and fall in love with how versatile it is. You can use the same technique to make scarves, blankets, or even hats.
Now that you’ve mastered the shell stitch, it’s time to create your crochet fingerless gloves. Begin by measuring your hand around the widest part of your palm. This measurement will determine how many stitches you’ll chain at the beginning. For most adult sizes, chaining between 30–36 stitches works well, depending on your tension and yarn thickness.
Work your shell stitch rows until the rectangle wraps comfortably around your hand. Leave a small gap for your thumb by skipping a few stitches when joining the sides together. You can use slip stitches or single crochet to seam the edges, depending on your preferred finish.
Once your glove base is done, crochet a few additional rounds at the top and bottom edges to form a neat border. Ribbed or single crochet edging helps the gloves stay snug and adds a professional touch.
Repeat the same process for the second glove, ensuring both are identical in length and stitch count.
To give your crochet fingerless gloves extra personality, consider adding embellishments like small crochet flowers, buttons, or ribbons. These details transform a simple pair of gloves into a unique handmade gift.
If you prefer a looser or longer fit, you can easily adjust the pattern by adding more shell rows or extending the wrist area. The beauty of this free pattern lies in its flexibility—you can tailor it to your exact preferences.
Getting your Crochet Fingerless Gloves with Shell Stitch – Free Pattern to look perfect involves a few helpful tips. One of the most important is maintaining consistent tension throughout the project. Uneven tension can make one glove tighter or looser than the other.
Another tip is blocking your gloves after finishing. Lightly spray them with water and shape them flat on a towel. Let them dry completely to set the stitches and make them look even more polished.
You can also experiment with different yarn types. Cotton yarns make lightweight gloves ideal for spring, while wool blends are warmer and perfect for winter. Each material gives the shell stitch a different texture and drape.
Color is another way to personalize your gloves. Try alternating yarn colors every few rows for a striped effect, or use ombre yarn for a soft gradient look.
If you’re making these gloves as a gift, consider the recipient’s style—neutral tones for a minimalist look, or bright shades for a more playful feel.
Finally, keep practicing and exploring new variations of the shell stitch pattern. Once you get comfortable, you can apply it to other crochet projects like headbands, shawls, or even sweaters.
1. What level of crochet skill is needed for this pattern?
This pattern is suitable for beginners with basic crochet knowledge. If you know how to make chain, single crochet, and double crochet stitches, you’ll be able to complete this project easily.
2. How long does it take to make these gloves?
On average, it takes between 2 to 4 hours to complete one pair, depending on your crochet speed and experience.
3. Can I adjust the size of the gloves?
Yes! You can make the gloves larger or smaller by adjusting your starting chain length or using a different hook size.
4. What type of yarn is best for this project?
Medium-weight acrylic or wool blend yarns are ideal because they provide warmth, flexibility, and a beautiful stitch definition.
5. How do I wash my crochet fingerless gloves?
Hand wash gently in cool water and lay flat to dry. Avoid wringing to maintain the shape and elasticity of your gloves.
6. Can I sell gloves made from this pattern?
Absolutely! Since this is a free pattern, you’re welcome to sell finished items. Just remember to mention that it’s handmade using a shell stitch design.
Creating your own Crochet Fingerless Gloves with Shell Stitch – Free Pattern is both relaxing and rewarding. You’ve learned how to choose the right materials, master the shell stitch, and assemble stylish and comfortable gloves that showcase your creativity. Whether for personal use, as a thoughtful handmade gift, or to sell at craft fairs, these gloves are a wonderful way to express your passion for crochet.
We hope this guide helped you feel confident and inspired to start your next crochet project. If you enjoyed this tutorial, please leave your honest opinion and suggestions below—your feedback helps us improve and continue sharing beautiful, free crochet patterns with you!


