
Crocheted house-shaped cookie for Christmas tree

The Crochet Chick in Egg – Pattern is one of the most delightful and heartwarming projects for any crochet enthusiast. From beginners to experienced crafters, this pattern brings joy, creativity, and a touch of seasonal charm to your handmade collection.
Whether you are making it for Easter decorations, gifts, or simply for the love of crochet, this pattern offers an engaging and satisfying experience.
The process of creating a crochet chick in an egg allows you to explore different techniques while resulting in an adorable, eye-catching piece that everyone will admire.
Crocheting has become an increasingly popular hobby, combining relaxation with creativity. The Crochet Chick in Egg – Pattern perfectly embodies this trend by providing an accessible yet rewarding project.
Unlike more complex patterns, this design is approachable for those who are just beginning, while still offering subtle challenges to keep experienced crocheters engaged. The pattern emphasizes attention to detail, proper stitch placement, and color choices, resulting in a beautiful finished product that is both playful and aesthetically pleasing.
Moreover, making a crochet chick in an egg is more than just a crafting project; it is an opportunity to practice mindfulness and patience. Each stitch contributes to the overall charm, and the sense of accomplishment upon finishing is unmatched. From selecting yarn to assembling the pieces, every step is a chance to express creativity and craftsmanship. This project is also versatile—perfect for personal use, gifting, or even selling at craft fairs, making the Crochet Chick in Egg – Pattern not only a fun activity but also a potentially rewarding endeavor.
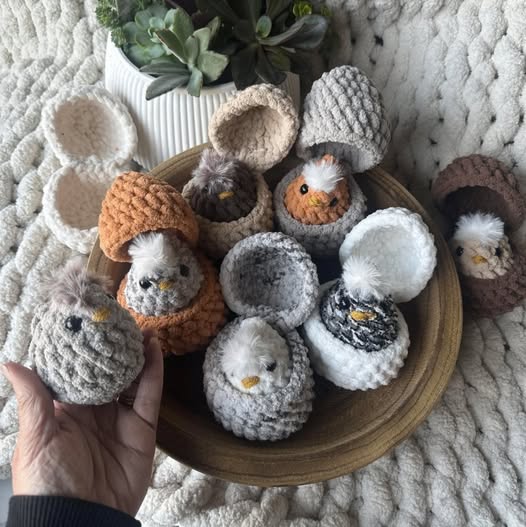
Creating a crochet chick in an egg begins with understanding the basic components of the pattern. The design typically includes a small chick, a half or fully opened egg, and optional embellishments. Each element requires attention to detail, but the pattern is structured in a way that makes it manageable for crafters of all skill levels. Learning the terminology used in crochet patterns, such as single crochet (sc), increase (inc), and slip stitch (sl st), is essential for following the instructions correctly.
The first step is usually to crochet the chick itself. This part of the pattern focuses on shaping the body, wings, and head using simple stitches. Color selection is crucial here, as the chick is often represented in bright yellow tones. By carefully following the Crochet Chick in Egg – Pattern, crafters can achieve a charming, lifelike appearance. The chick’s small size makes it perfect for gifts, keychains, or table decorations, adding a playful element to any setting.
Next comes the egg, which acts as a protective and decorative casing for the chick. Many patterns suggest using white or pastel colors to contrast with the yellow of the chick. Shaping the egg correctly requires attention to stitch count and tension. The egg can be made in different styles, such as cracked open at the top or fully encasing the chick. Following these instructions ensures that your crochet chick in an egg maintains the intended structure and appeal.
Assembly is the final step, bringing together the chick and the egg. This step requires patience and precision, as aligning the pieces correctly enhances the overall presentation. Additional details, such as embroidered eyes or a tiny beak, add personality to the project. Once assembled, the finished crochet chick in egg becomes a delightful decorative piece, showcasing your skill and dedication to the craft.
The success of the Crochet Chick in Egg – Pattern largely depends on selecting appropriate materials and tools. Yarn choice is crucial, as it affects texture, color vibrancy, and overall appearance. Many crafters prefer acrylic or cotton yarns due to their durability and ease of handling. Choosing soft yarn ensures the chick looks cuddly and inviting. For the egg, a slightly stiffer yarn may be used to maintain shape and stability.
Hooks are another essential consideration. A hook size that matches the yarn weight ensures proper stitch formation and prevents uneven tension. Most patterns recommend a smaller hook for fine details and a larger one for the body of the chick or egg. Using the right hook not only makes crocheting more comfortable but also enhances the finished product’s appearance. Investing in quality tools can make the process smoother and more enjoyable.
Additional accessories, such as stitch markers, scissors, and yarn needles, are helpful when creating a crochet chick in an egg. Stitch markers allow you to keep track of rounds, while yarn needles are perfect for sewing pieces together. Choosing safety eyes or embroidery thread for facial features adds character and personality. Having all necessary materials ready before starting ensures a smoother crafting experience and prevents interruptions.
Experimenting with colors is also an exciting part of the process. While traditional yellow for the chick and white for the egg are popular choices, pastel or vibrant colors can make your project unique. Combining different textures, such as soft and fluffy yarns, can enhance the tactile appeal. By thoughtfully selecting materials, you can create a crochet chick in egg that is both visually stunning and delightful to touch.
To achieve the best results with the Crochet Chick in Egg – Pattern, following certain tips and techniques is essential. Consistent stitch tension ensures that your chick and egg have smooth, even surfaces. Irregular tension can result in a lopsided or misshapen project. Practicing with sample swatches before starting the final project can help maintain uniformity.
Paying attention to the pattern instructions is crucial. Many beginners tend to skip steps or misread abbreviations, leading to errors. Take your time to carefully interpret each step, especially when shaping the chick’s head or wings. Using stitch markers can help keep track of rounds, making it easier to follow the pattern precisely.
Assembly is where patience truly pays off. Properly aligning the chick within the egg ensures that the finished piece looks polished. Sewing pieces securely without visible seams enhances the overall aesthetic. Embroidering facial features adds expression, giving your crochet chick in egg a charming personality that will delight anyone who sees it.
Experimenting with variations can also make the project more enjoyable. You can create different chick sizes, add decorative elements such as tiny bows, or use glittery yarn for festive occasions. These personal touches make your project unique and memorable. By applying these tips, crafters can ensure that their Crochet Chick in Egg – Pattern results in a professional-looking and endearing creation.
Once completed, a crochet chick in egg can be displayed and used in a variety of creative ways. Many crafters use it as part of seasonal decorations, especially for Easter. Placing it on a mantel, tabletop, or as part of a centerpiece adds a playful touch to home décor. The project can also serve as a charming gift for friends, family, or fellow craft enthusiasts.
This pattern is also suitable for educational purposes, such as teaching children about animals, seasons, and crafting. The Crochet Chick in Egg – Pattern can be incorporated into storytelling, sensory play, or classroom projects. Its small, manageable size makes it perfect for little hands, fostering creativity and fine motor skills.
For those interested in selling handmade crafts, this pattern has potential commercial value. Its popularity and visual appeal make it a desirable item for craft fairs, online shops, or local markets. Packaging it with care and creativity can enhance its perceived value. Using the crochet chick in egg as part of a product line also encourages customization, allowing for variations in color, size, and design.
The project is highly versatile. You can create multiple chicks and eggs to form a set, use them as keychains, or incorporate them into larger crochet scenes. Their compact size makes them ideal for decorations in baskets, jars, or hanging ornaments. By exploring different display options, you can maximize the charm and usefulness of your Crochet Chick in Egg – Pattern.
Q1: Is the Crochet Chick in Egg pattern suitable for beginners?
Yes, the pattern is designed to be approachable for beginners while offering subtle challenges to practice techniques like shaping and assembly.
Q2: What yarn is best for this project?
Soft acrylic or cotton yarn is recommended for the chick, while a slightly stiffer yarn works well for the egg to maintain shape.
Q3: Can I customize the colors?
Absolutely! While yellow and white are traditional, pastel or bright colors can be used to create a unique look.
Q4: How long does it take to complete?
Depending on skill level, it can take anywhere from a few hours to a couple of days to finish the project.
Q5: Are safety eyes necessary?
No, you can also embroider the eyes with thread, which is safer for gifts intended for children.
Q6: Can I sell the finished Crochet Chick in Egg?
Yes, handmade creations from this pattern can be sold, making it a great option for craft fairs or online shops.
The Crochet Chick in Egg – Pattern is a delightful, engaging, and versatile project for crafters of all levels. From selecting materials to assembling the final piece, each step encourages creativity, patience, and skill development.
Whether you are making it for decoration, gifting, or selling, the pattern results in a charming and memorable creation. We hope this guide has provided clear instructions, helpful tips, and inspiration for your next crochet project.
Share your experience, leave your honest opinion, and suggest any improvements—you never know who might be inspired by your feedback!


