
Crocheted house-shaped cookie for Christmas tree

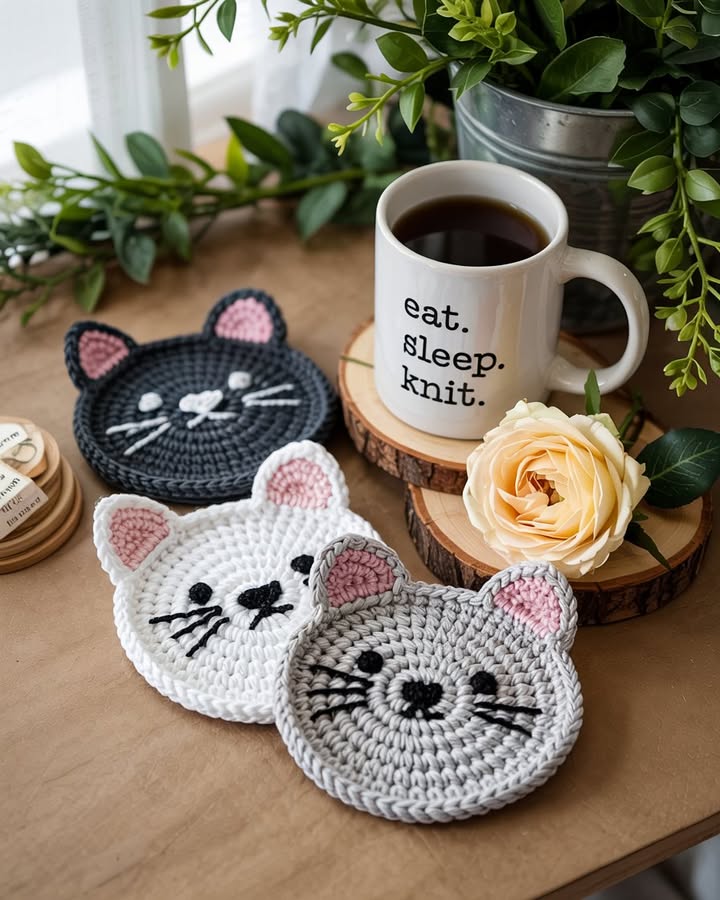
Crochet Cat Coasters – Tutorial is the perfect project for anyone who loves handmade crafts, cute designs, and functional home décor. Whether you’re a beginner or an experienced crocheter, creating crochet cat coasters allows you to combine creativity with practicality.
These adorable coasters not only protect your tables from stains and heat but also bring a playful charm to any space. In this tutorial, you’ll learn how to make your own crochet cat coasters from start to finish, using simple materials and easy-to-follow steps.
Crocheting cat-themed coasters is a relaxing and rewarding experience. The beauty of this project lies in its simplicity—you only need basic crochet stitches and a small amount of yarn.
Plus, it’s a fantastic way to use leftover yarn scraps from other projects. Handmade cat coasters make wonderful gifts for friends, family, or anyone who loves cats and cozy décor. They’re also an excellent addition to craft fairs or online shops because they’re quick to make and have universal appeal.
In this article, we’ll explore every step of the process, from selecting the right materials to finishing your final product. We’ll also share some helpful tips to ensure your coasters are durable, stylish, and perfectly shaped. So, grab your crochet hook, choose your favorite yarn colors, and get ready to create something beautiful. This Crochet Cat Coasters Tutorial will guide you through each step with clarity and inspiration.
Before you begin your Crochet Cat Coasters – Tutorial, it’s essential to gather all the materials and tools. Having everything prepared in advance will make your crocheting session smoother and more enjoyable. The good news is that this project doesn’t require anything fancy—just the basics you likely already have in your crochet kit.
You will need cotton yarn, which is the best choice for coasters because it absorbs moisture well and keeps its shape after washing. Acrylic yarn can also be used, but cotton gives a more natural, sturdy finish. Choose your favorite color combinations—neutral tones for a minimalist look or bright shades for a cheerful vibe.
Next, you’ll need a crochet hook that matches your yarn weight. Typically, a 3.5 mm to 4 mm hook works perfectly for this type of project. Make sure to check the yarn label for the recommended hook size. Other essential tools include scissors, a yarn needle for weaving in the ends, and stitch markers if you want to keep track of your rounds.
It’s also helpful to have a flat surface where you can block your coasters after finishing them. Blocking helps maintain the coaster’s shape and gives it a professional finish. You might also want to keep a small notebook nearby to jot down any changes or personal notes about your pattern.
Once your materials are ready, you’re all set to move to the exciting part—crocheting your cute cat coasters. Preparing ahead of time will save you from interruptions and help you stay focused on the fun part of this Crochet Cat Coasters Tutorial.
Now it’s time to bring your crochet cat coasters to life. This section will take you through every step, ensuring you understand each stitch and technique clearly. Even if you’re new to crochet, don’t worry—these instructions are designed to be beginner-friendly and easy to follow.
Start by creating a magic ring (or adjustable ring). This will serve as the center of your coaster. Crochet six single crochets (sc) into the ring, then pull it tight to close the circle. Join with a slip stitch to the first stitch. This forms the base of your cat coaster.
In the next round, increase in each stitch around by crocheting two single crochets in every stitch from the previous round. This step will expand the circle evenly. As you move to the third and fourth rounds, continue increasing at regular intervals to keep the coaster flat. Use stitch markers if needed to mark the beginning of each round.
Once the base circle reaches your desired size—usually about 4 inches in diameter—it’s time to create the cat ears. To form the ears, skip two stitches, then crochet three double crochets (dc) in the next stitch, chain one, and slip stitch in the same stitch. This creates one ear. Repeat the process on the opposite side of the coaster for the second ear.
After finishing the ears, fasten off your yarn and weave in any loose ends with a yarn needle. You now have the basic shape of your cat coaster complete! Feel free to experiment with different colors or add stripes to mimic various cat fur patterns.
This is where your creativity can shine. The Crochet Cat Coasters – Tutorial encourages you to personalize each coaster to reflect your style or the personality of your favorite cat. With a few simple additions, you can transform a basic coaster into a charming and unique piece.
One fun idea is to embroider facial features like eyes, a nose, and whiskers using black or pink yarn. Use small stitches to give your coaster an expressive, cat-like look. If you want to make your coasters even cuter, consider sewing on tiny buttons for eyes or using felt pieces for a textured effect.
You can also add a border to your coaster to make it look more finished. A round of single crochet in a contrasting color can frame the coaster beautifully. Another option is to use a decorative edge stitch, such as a scallop or picot edge, for an elegant touch.
Experimenting with different yarn textures can also create unique results. For example, using variegated yarn will give your coasters a multi-tonal effect, while soft velvet yarn can add a luxurious feel. Each variation makes your set of crochet cat coasters distinct and personal.
These coasters also make excellent handmade gifts. You can bundle a set of four or six coasters with a ribbon and a small tag for birthdays, housewarmings, or holidays. They’re practical, affordable, and show genuine thoughtfulness.
Lastly, don’t forget to block your coasters to keep them flat and even. Lightly wet them, shape them carefully, and let them dry completely. This final touch ensures your finished project looks neat and professional, just like a store-bought item.
To keep your crochet cat coasters in great condition for a long time, proper care and maintenance are essential. Since coasters often come into contact with moisture, spills, and heat, choosing the right yarn and cleaning them correctly will make all the difference.
If you used cotton yarn, your coasters are machine washable. Wash them in cold or lukewarm water using a gentle cycle, then lay them flat to dry. Avoid using hot water or a dryer, as it can cause shrinking or misshaping. For acrylic yarn, hand washing is usually the safest option.
Regular cleaning prevents stains from setting in, especially if you use your coasters daily. If a coaster gets coffee or tea stains, try soaking it in a mild detergent solution before washing. Avoid bleach or strong chemicals, as they may damage the fibers or fade the colors.
To maintain the shape of your coasters, store them flat in a dry place. Stacking them neatly helps prevent bending or curling edges. You can also re-block them occasionally to refresh their form.
If you plan to sell or gift your crochet cat coasters, consider including a small care label or card. It’s a thoughtful addition that adds value and professionalism to your handmade creations.
Taking care of your coasters ensures they remain as beautiful as the day you made them. With minimal effort, these charming accessories can last for years, adding warmth and character to your home.
1. Can beginners make crochet cat coasters?
Absolutely! This project is perfect for beginners because it uses basic stitches like single crochet, double crochet, and slip stitch. With patience and practice, anyone can create beautiful results.
2. What yarn is best for crochet coasters?
Cotton yarn is the best option because it’s durable, absorbent, and heat-resistant. It also holds its shape well after washing.
3. How long does it take to make one cat coaster?
Most people can complete one coaster in 30–45 minutes, depending on their skill level and the complexity of the design.
4. Can I sell the coasters I make from this tutorial?
Yes, definitely! Handmade cat coasters are popular at craft fairs and online marketplaces. Just be sure to price them fairly for your time and materials.
5. How do I keep my crochet coasters flat?
Blocking your coasters after finishing is key. Wet them lightly, shape them properly, and let them dry flat. This helps them stay even and professional-looking.
6. Can I use leftover yarn for this project?
Of course! Crochet cat coasters are an excellent way to use up small yarn scraps while creating something practical and cute.
In this Crochet Cat Coasters – Tutorial, you learned how to create adorable and functional coasters step by step. From gathering materials and mastering simple crochet techniques to decorating and maintaining your finished pieces, this guide covered everything you need to know. Crochet cat coasters are not only a delightful craft project but also a wonderful way to express creativity and make personalized gifts.
Now it’s your turn to put this tutorial into action. Choose your favorite yarn colors, grab your hook, and start crocheting your own collection of cute cat coasters today.
If you found this guide helpful, please share your honest opinion and suggestions below. Your feedback helps improve future tutorials and inspires others to join the fun world of crochet!


