
Crocheted house-shaped cookie for Christmas tree

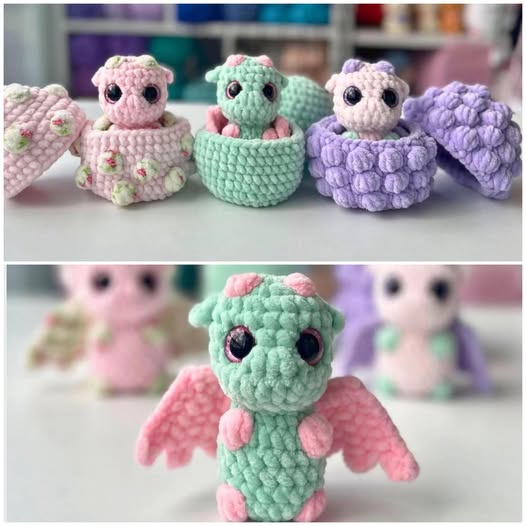
The Crochet Baby Hatching Dragon – Pattern is one of the most magical and creative amigurumi projects you can make. Combining imagination and craftsmanship, this free crochet pattern allows you to bring to life a tiny baby dragon emerging from its shell.
It’s a project that blends cuteness and fantasy, perfect for both beginners and experienced crocheters who want to challenge themselves with something unique.
The baby dragon crochet design symbolizes creativity, warmth, and a touch of mythological wonder, making it an ideal handmade gift for children or fantasy lovers alike.
Creating your own crochet baby hatching dragon is more than just a craft—it’s an experience. Each stitch brings your baby dragon closer to life, from its delicate wings to its charming expression as it peeks out of its egg.
You’ll enjoy every step of this DIY crochet toy, especially when you realize how customizable it is. You can experiment with different yarn colors, textures, and facial details to make every dragon truly one-of-a-kind. Whether you prefer bright greens, mystical purples, or pastel tones, your finished dragon will capture hearts instantly.
This amigurumi dragon pattern offers both a fun challenge and a rewarding result. The detailed instructions are easy to follow, and the design is versatile enough to let you add your own touches. You can display your finished baby dragon crochet on a shelf, give it as a gift, or even turn it into a collectible series with different egg and dragon color variations. By following this free crochet pattern, you’ll not only craft an adorable creature but also develop your crocheting skills, patience, and creativity in the process.
Before you start your crochet baby hatching dragon, gather all the materials you’ll need to make the process smooth and enjoyable. The first essential is yarn. Soft cotton or high-quality acrylic yarn is recommended because it holds shape well while remaining gentle to the touch. You can choose colors like mint green, soft pink, or light blue for baby dragons, or opt for metallic or gradient tones to create a more mystical appearance. Don’t forget a neutral color like cream or white for the eggshell.
You’ll also need a crochet hook suited to your yarn thickness—typically a 2mm to 3mm hook works best for amigurumi projects. Using a slightly smaller hook than suggested helps create tighter stitches so that the stuffing doesn’t show through. Speaking of stuffing, polyester fiberfill is ideal for giving your DIY crochet toy a firm but squishy feel. It allows the dragon to hold its shape while still feeling soft and cuddly.
Additional tools include a stitch marker, yarn needle, and scissors. The stitch marker helps track your rounds, preventing you from losing count, which is crucial in circular projects like the amigurumi dragon pattern. Safety eyes or small black beads are perfect for giving your baby dragon a lively look, but if you’re making the toy for small children, embroidered eyes are a safer alternative. You’ll also need a bit of contrasting yarn to embroider features like nostrils, eyebrows, or scales.
Finally, having the right mindset and patience is key. Amigurumi projects, especially those with detailed parts like wings, claws, and eggshells, require attention and care. Prepare your workspace with good lighting and all materials within reach before starting your free crochet pattern journey. With everything ready, you’re all set to create your magical baby dragon crochet masterpiece.
The process of making a crochet baby hatching dragon starts with creating the body. Begin with a magic ring, then work in continuous rounds to form the head and torso. The increases and decreases define the shape, giving your dragon its cute, rounded body. Tight, even stitches will make your DIY crochet toy look neat and professional. Take your time, especially when working with small parts, as precision is key.
Once the body is complete, you can move on to the dragon’s wings, arms, and legs. Each limb is crocheted separately and sewn onto the body after stuffing. The wings are usually made with a combination of chain stitches and double crochets to achieve a delicate, curved appearance. This step gives your amigurumi dragon pattern that recognizable fantasy element that sets it apart from other crochet animals.
The most fun part is making the dragon’s egg. The free crochet pattern includes instructions to form a cracked eggshell that your dragon will appear to be hatching from. You’ll crochet two separate pieces—the bottom shell and the top jagged edge—then place your baby dragon inside. You can even fix the shell in place or make it removable for extra playability. The contrast between the egg and dragon colors enhances the charm of your finished baby dragon crochet project.
When assembling all the pieces, make sure the seams are secure and invisible. Use a yarn needle to stitch the parts together neatly. Adding facial details like eyes, a small smile, and embroidered eyebrows will bring your dragon to life. Take your time arranging everything so that your crochet baby hatching dragon looks perfectly balanced and expressive.
One of the best aspects of this amigurumi dragon pattern is how easily it can be customized. You can change yarn colors, add sparkly threads, or experiment with different textures to give each dragon a distinct personality. Try combining pastel colors for a soft and dreamy look or metallic yarns for a fantasy-inspired aesthetic. A combination of scales made from textured stitches and smooth body parts can also create visual interest.
For those who enjoy adding accessories, consider crocheting tiny crowns, scarves, or miniature wings in contrasting shades. You could even make themed baby dragon crochet sets—like an ice dragon in cool blues and whites, or a fire dragon in reds and golds. The versatility of this DIY crochet toy pattern allows for endless creativity.
Adjusting the size is also easy. Using thicker yarn and a larger hook will produce a bigger, huggable dragon, while thinner yarns make smaller, delicate versions that fit in the palm of your hand. You can even crochet multiple dragons and eggs in different colors to create a display or gift set. Adding embroidered initials or dates can make them perfect keepsakes for birthdays or baby showers.
Finally, always remember to block your pieces gently with steam or water before assembly. This helps shape the wings and body, giving your crochet baby hatching dragon a polished finish. Your attention to these little details will transform your project from a simple toy into a charming work of art that captures everyone’s imagination.
Even with clear instructions, making a baby dragon crochet can be tricky for beginners. One of the most common mistakes is using uneven tension, which leads to lumpy or distorted shapes. Consistent tension ensures your DIY crochet toy has a smooth, professional look. Practicing a few sample stitches before starting the main body helps achieve this consistency.
Another common issue is skipping or adding stitches unintentionally, which can throw off the symmetry of your amigurumi dragon pattern. Using a stitch marker for the first stitch in each round helps keep track. Also, counting your stitches regularly prevents errors that could ruin the final shape.
When assembling, some crafters struggle with attaching parts symmetrically. Always pin the wings, arms, and legs before sewing them on. This allows you to adjust their position before making it permanent. It’s also best to use matching yarn colors when sewing, so the seams remain invisible and clean.
Overstuffing or understuffing can affect your dragon’s overall shape. Use enough fiberfill to maintain structure, but not so much that the stitches stretch. If the stuffing shows, your stitches might be too loose, so tighten them slightly in future rounds. Lastly, rushing through details like the face can result in an uneven expression. Take your time positioning the eyes and embroidering features to give your crochet baby hatching dragon a balanced, adorable look.
Q1: Is this pattern suitable for beginners?
Yes! This free crochet pattern is beginner-friendly and includes clear instructions for each part.
Q2: What type of yarn is best for this project?
Soft cotton or acrylic yarn works best for amigurumi dragon patterns, providing structure and softness.
Q3: How long does it take to finish the baby dragon?
On average, 3–5 hours depending on your skill level and pace.
Q4: Can I sell dragons made from this pattern?
Yes, but always credit the original pattern creator if the license requires it.
Q5: How can I make my dragon stand out?
Experiment with color combinations, add accessories, and use creative embroidery details.
Q6: Is the egg included in the pattern?
Yes, the baby dragon crochet design includes instructions for both the dragon and its egg.
Creating your own Crochet Baby Hatching Dragon – Pattern is a magical experience that combines creativity, patience, and imagination. Each stitch brings the dragon to life, turning yarn into a mythical creature that’s both adorable and enchanting. Following this free crochet pattern, you’ll gain confidence, improve your technique, and end up with a stunning handmade keepsake. The DIY crochet toy you create will make the perfect gift for loved ones or a beautiful addition to your own collection.
We hope this detailed guide inspires you to make your own baby dragon crochet masterpiece. If you enjoyed this tutorial, please share your thoughts, leave a sincere opinion, and suggest new ideas for future crochet projects. Your feedback helps keep the crafting community alive, creative, and connected!


