
Crocheted house-shaped cookie for Christmas tree

If you are looking for a fun and cozy project, the Cat Face Crochet Blanket – Beginner Tutorial is the perfect choice. Creating your own cat face crochet blanket allows you to bring a sense of warmth and creativity to your home while learning a new skill.
Even if you are a beginner, this tutorial will guide you step by step to help you make a beautiful, adorable blanket that can become a treasured gift or a personal comfort item. With simple materials and clear instructions, anyone can start their crochet journey with this project.
Crocheting a cat face blanket is not only relaxing but also provides a sense of accomplishment. You will learn essential techniques such as basic stitches, color changes, and assembling motifs.
Each cat face crochet square can be personalized with different colors, patterns, or even tiny accessories, making your blanket truly unique. Plus, working on a crochet project like this helps improve hand-eye coordination and can be a soothing stress-relief activity.
Before you start, it’s important to gather all your materials and understand the basics. You will need yarn in your chosen colors, a crochet hook suitable for the yarn weight, scissors, and a tapestry needle for finishing touches. Following this beginner tutorial, you will gain confidence in your crochet skills while creating a charming, functional piece of art. Let’s dive into the world of cat face crochet blankets and explore how to bring your project to life.
When creating a cat face crochet blanket, selecting the right yarn is crucial. Beginners often wonder which type of yarn is best for a blanket. Acrylic yarn is highly recommended because it is durable, soft, and easy to work with. Cotton yarn can also be used for a more breathable texture, but it may be slightly harder to handle for beginners. Using the right yarn ensures your blanket will be comfortable, long-lasting, and visually appealing.
The crochet hook is another essential tool. Choosing a hook size that matches your yarn will make your stitches even and your work consistent. A hook that is too small may make your blanket stiff, while a hook that is too large can result in loose, uneven stitches. In this beginner tutorial, following the recommended hook and yarn combination will make your experience smoother and more enjoyable.
Color choice plays an important role in creating a visually stunning cat face crochet blanket. Consider using contrasting colors for the cat’s face and background to make the features pop. Many beginners start with neutral tones for the blanket and add bright accents for the cat face details. Planning your color scheme ahead of time will make the assembly process easier and the final blanket more cohesive.
Understanding yarn types, hook sizes, and color combinations is the first step to mastering your cat face crochet blanket. These decisions will affect the overall look, feel, and ease of your project. Taking the time to select the best materials ensures a more satisfying crochet experience, especially for beginners. With the right foundation, you can confidently move forward in creating your blanket.
Crochet projects like this also allow beginners to experiment with textures and stitch patterns. By practicing on small squares or swatches before starting the blanket, you can get comfortable with basic techniques. This preparation step is highly beneficial and increases the chances of achieving a polished final piece that you can be proud of.
Finally, remember that patience and practice are key. Crocheting a cat face blanket is not a race, and each square you complete brings you closer to a cozy, adorable masterpiece. Enjoy the process, and don’t be afraid to make mistakes—they are part of learning and improving your crochet skills.
Before diving into your cat face crochet blanket, it’s important to familiarize yourself with basic stitches. The foundation of your blanket will likely involve chain stitches, single crochet, double crochet, and slip stitches. Mastering these techniques ensures that each square of your blanket is even and sturdy. Practice each stitch individually before incorporating them into the cat face pattern.
Color changes are essential for creating the cat’s features. Beginners often struggle with switching yarns cleanly, but using simple methods such as the “carry yarn along the row” technique or fastening off and joining a new color can make the process much easier. These methods help keep your edges neat and prevent gaps in the design.
Reading crochet patterns is another skill you’ll develop while working on your cat face crochet blanket. Patterns typically include abbreviations and stitch counts, so taking time to understand them will save you frustration. Start with small motifs and gradually build confidence before attempting the full blanket.
Increasing and decreasing stitches are important techniques for shaping the cat face. These skills allow you to form ears, cheeks, and other details that give the blanket its adorable appearance. Practicing increases and decreases on sample squares helps you master these techniques without worrying about ruining your main project.
Joining squares is another fundamental aspect of making your blanket. Beginners can use simple slip stitch or whip stitch methods to connect the cat face squares. Consistent joins make the blanket look professional and seamless while adding durability to the finished piece.
Finally, finishing techniques like weaving in ends and blocking your blanket are crucial for a polished result. Taking the time to properly finish your cat face crochet blanket enhances both appearance and longevity, making your creation a cherished item for years to come.
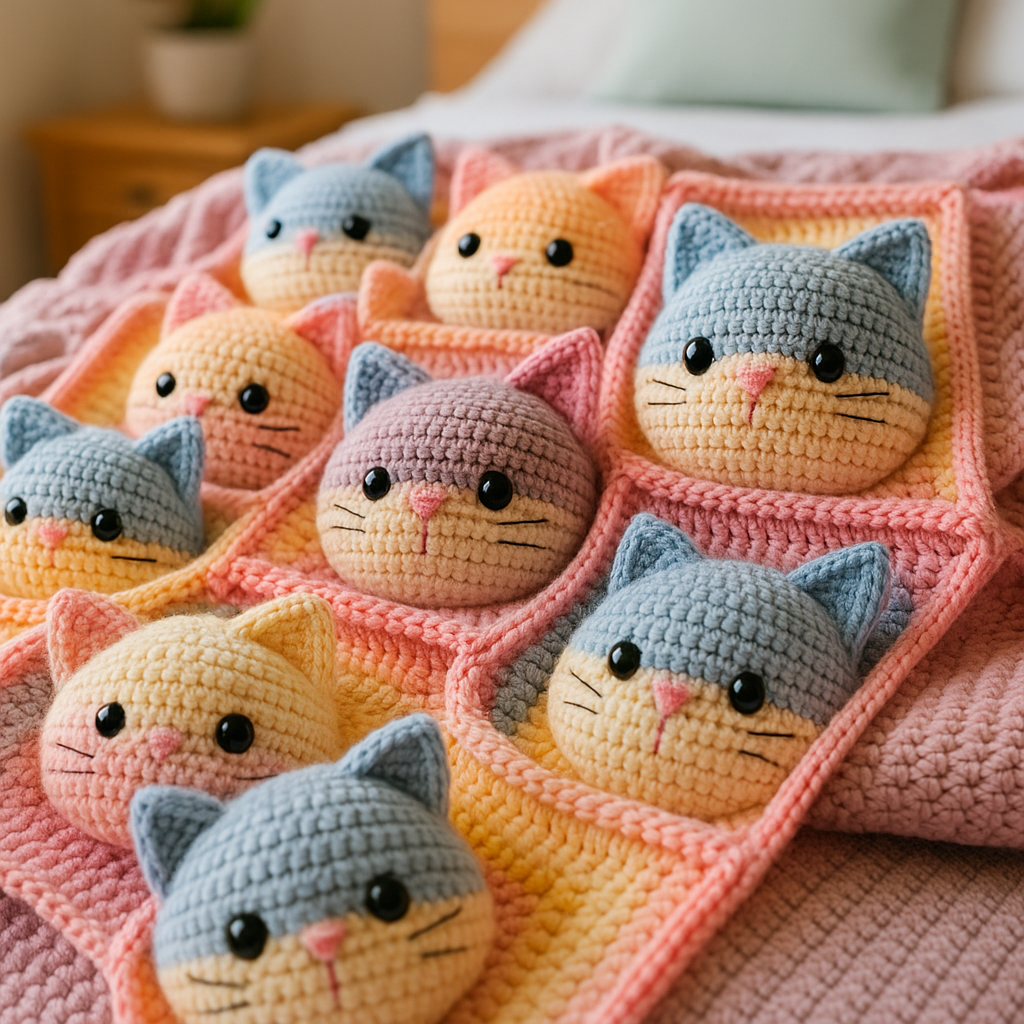
The centerpiece of your blanket is, of course, the cat face motif. Start by making a square or circular base, then crochet the facial features individually or as part of the square. Eyes, nose, mouth, and ears can all be created using contrasting yarn colors, simple stitches, and basic embroidery techniques.
Eyes can be crocheted as small circles or ovals, then sewn onto the blanket. Beginners can use safety eyes as an alternative for a quick, polished look. The nose and mouth are usually embroidered using a tapestry needle, ensuring clean lines and expressive features.
Ears add dimension and character to your cat face. Crocheting small triangles and attaching them to the top of the square creates a charming 3D effect. This step may require extra attention for beginners, but following the tutorial carefully will make it manageable.
Adding whiskers or small decorative elements completes the motif. Using yarn or embroidery thread, these fine details bring life and personality to your cat face crochet blanket. Each addition enhances the visual appeal and uniqueness of your project.
Consistency in motif size is crucial if you plan to make multiple squares for a full blanket. Measuring each square ensures that all pieces fit together seamlessly during assembly. Uniform squares contribute to a professional-looking final product that feels cohesive and balanced.
Finally, take your time assembling the motifs. Layout the squares before joining to plan color placement and orientation. This step allows you to make adjustments and ensures that your cat face crochet blanket will be visually pleasing from every angle.
Once all the cat face motifs are ready, it’s time to assemble your blanket. Lay out the squares in your preferred arrangement, ensuring an even distribution of colors and designs. This planning step is essential for achieving a balanced and harmonious look.
Joining the squares can be done using slip stitches, single crochet, or whip stitches. Beginners often find slip stitch joining the easiest, as it creates a clean seam while maintaining flexibility in the blanket. Make sure to weave in all loose ends to prevent fraying and give the blanket a polished finish.
Adding a border around the entire blanket enhances its structure and appearance. Simple single crochet or decorative scalloped edges are great options for beginners. Borders not only make the blanket look professional but also add durability to the edges, preventing stretching or curling over time.
Blocking the blanket is another important finishing step. Lightly dampening the blanket and pinning it to shape ensures even squares and smooth edges. This process can significantly improve the overall look of your cat face crochet blanket, giving it a refined and cozy finish.
Cleaning and maintaining your blanket properly ensures its longevity. Hand washing in cold water or using gentle machine cycles keeps the yarn soft and prevents damage. Proper storage in a dry place maintains the blanket’s shape and vibrant colors.
Finally, enjoy your creation! Whether it’s for personal use or as a gift, your cat face crochet blanket is a unique, handmade masterpiece that reflects your creativity and effort. Take pride in your work and appreciate the skill and patience required to complete such a project.
Q: Can beginners make a cat face crochet blanket?
A: Absolutely! This tutorial is designed for beginners and guides you through basic stitches, color changes, and motif assembly step by step.
Q: What yarn is best for a cat face crochet blanket?
A: Acrylic yarn is highly recommended for beginners due to its softness, durability, and ease of handling. Cotton yarn is also an option but may be slightly harder to work with.
Q: How do I create the cat face features?
A: Eyes, nose, and mouth can be crocheted or embroidered onto the blanket. Ears are usually small triangular pieces sewn onto the top of the square.
Q: How do I join the squares?
A: Slip stitches, single crochet, or whip stitch are common methods. Beginners often find slip stitch joining the easiest and neatest.
Q: Can I customize the colors of the cat face?
A: Yes! You can choose any color combination for the cat face and background to match your style or home decor.
Q: How do I maintain my blanket?
A: Hand wash or use a gentle machine cycle in cold water. Store in a dry place to maintain shape and color.
Creating a Cat Face Crochet Blanket is a rewarding project for beginners and experienced crafters alike. Throughout this tutorial, we explored how to choose the right yarn, master basic stitches, create charming cat face motifs, and assemble your blanket into a cohesive, cozy piece. Each step is designed to help you gain confidence, improve your crochet skills, and enjoy the process.
Your handmade blanket is not only functional but also a unique expression of creativity and care. Take pride in your accomplishment, experiment with colors and patterns, and don’t hesitate to personalize your designs.
We would love to hear your feedback! Share your thoughts, suggestions, and experiences in creating your cat face crochet blanket. Your insights help others in the crochet community and inspire more beautiful handmade projects.


