
Crocheted house-shaped cookie for Christmas tree

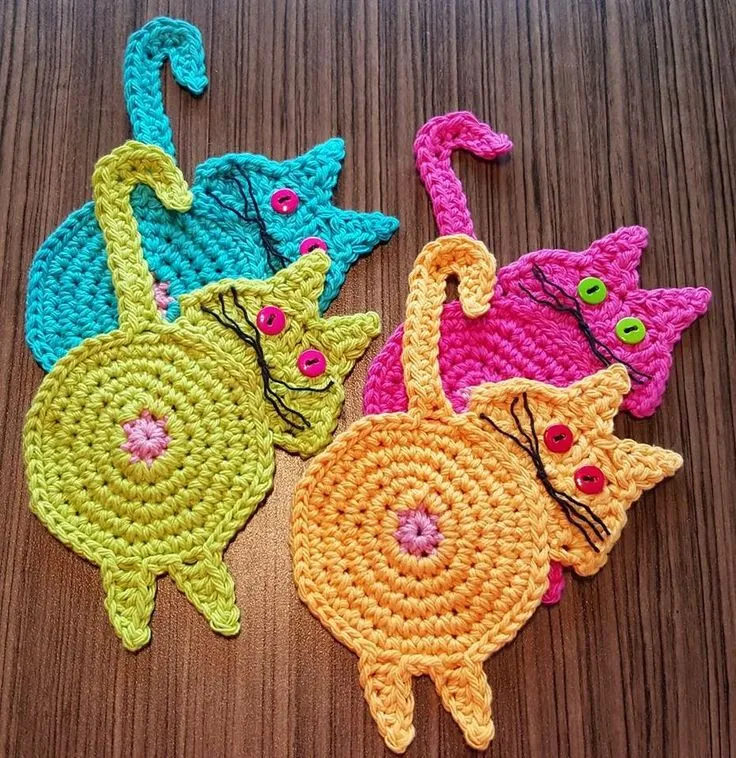
Cat Butt Coasters Crochet Free Pattern is a fun and quirky way to add humor and charm to your home décor while enjoying a creative crochet project.
These adorable coasters, shaped like cat backsides, are perfect for cat lovers who want a playful touch on their tables. Whether you are a beginner or an experienced crocheter, this free pattern allows you to create something unique and functional.
In this article, we will explore step-by-step instructions, tips, and tricks to make your cat butt coasters look amazing, all while keeping SEO-friendly content that adheres to Google AdSense policies.
Crocheting cat butt coasters is not just about crafting; it’s a way to express creativity and make gifts for friends and family. With minimal materials and a simple technique, anyone can start this project today.
By using high-quality yarns and following the pattern carefully, you will get coasters that are both cute and durable. Additionally, making these coasters can be a relaxing activity that reduces stress and encourages mindfulness.
These free crochet patterns for cat-themed coasters also offer an opportunity to practice various crochet stitches, enhancing your overall skills. You can customize your coasters with different colors to match your kitchen or living room décor. Throughout this guide, we’ll provide detailed explanations of each step, tips for beginners, and ideas for personalizing your cat butt coasters. By the end, you’ll have a complete set of coasters that are both functional and conversation starters.
Creating cat butt coasters requires only a few essential supplies. You will need high-quality yarn, a suitable crochet hook, a tapestry needle, and scissors. For beginners, it is recommended to use worsted weight cotton yarn as it is durable and easy to work with. Choosing colors that contrast can make the design stand out and emphasize the cat’s unique shape.
It’s important to select a crochet hook that matches your yarn weight. Usually, a 4.0mm to 5.0mm hook works well for worsted weight yarn. Using the correct hook ensures even stitches and a neat finish. A tapestry needle will help you weave in ends and attach any details, such as the cat’s tail or paws.
Optional materials include stitch markers to keep track of rounds and a blocking mat to shape your coasters after completion. Blocking helps the coasters lay flat and gives them a professional finish. Once you have all materials ready, you can start following the free crochet pattern step by step.
Learning how to read the pattern is crucial. The Cat Butt Coasters Crochet Free Pattern uses basic stitches such as chain, single crochet, and slip stitch. These stitches are beginner-friendly and allow you to complete the coaster without frustration. The pattern also includes instructions for creating small details that make each coaster unique and playful.
If you’re new to crocheting, don’t worry. By practicing the stitches and following the instructions carefully, you can achieve beautiful results. This project is perfect for creating a set of coasters for gifts or decorating your own home.
Finally, consider experimenting with different colors and textures. Mixing yarn types can add dimension and make your cat butt coasters even more visually appealing. This creativity allows your project to reflect your personal style and taste.
Starting your cat butt coaster begins with creating a magic ring. The magic ring forms the base of the coaster and allows for a tight center. From there, you will work in rounds, increasing stitches as necessary to create the circular shape of the cat’s backside.
Once the base is complete, you’ll add the cat’s paws using small crochet pieces sewn onto the bottom edge. These paws add charm and character to each coaster. Using contrasting yarn colors can make them stand out even more.
Next, the tail is crocheted separately and attached to the top of the coaster. The tail can be straight, curled, or even fluffy, depending on your design preference. This element adds whimsy and completes the overall cat silhouette.
Pay attention to stitch tension to ensure that each coaster is even and flat. Uneven stitches can cause curling or warping. Blocking your finished coasters helps maintain a consistent shape and makes them more durable.
Finishing touches include weaving in all loose ends and checking for any gaps. You can also add embroidery or small embellishments for extra personality. This step ensures that your cat butt coasters look polished and professional.
By following these steps carefully, you will create a set of coasters that are both functional and hilarious. They are perfect for entertaining guests or adding a quirky touch to your home.
To make your cat butt coasters stand out, choosing the right yarn is key. Cotton yarn is recommended for its durability and absorbency. Avoid yarns that are too soft or slippery, as they may not hold their shape well.
Using a consistent stitch count is essential to maintain symmetry. Count your stitches after each round to ensure your coaster maintains its intended shape. This helps prevent uneven edges.
Color choice is also important. You can mimic real cat colors like black, white, or tabby patterns, or create playful variations with bright colors. This allows for creativity and personal expression.
Beginner crocheters should practice individual shapes like paws or tails before attaching them to the coaster. This ensures smoother assembly and a more professional look.
Blocking each coaster after completion improves the final appearance. Wet blocking or steam blocking can help the coaster lay flat and maintain its shape over time.
Lastly, don’t rush. Crocheting is about enjoying the process. Take your time to make each coaster carefully, and you’ll have a beautiful, durable set ready to use or gift.
Customizing your cat butt coasters can make them unique and personalized. You can experiment with yarn colors, textures, and even size variations to create a matching set.
Adding small embellishments like embroidered eyes or whiskers can give each coaster personality. These tiny details make the coasters fun conversation pieces.
You can also create seasonal or themed coasters, such as using orange and black yarn for Halloween or red and green for Christmas. This versatility makes the project even more enjoyable.
Pairing your coasters with other cat-themed décor items can create a cohesive design in your home. Matching placemats, napkins, or table runners can enhance the overall aesthetic.
Consider gifting customized coasters to friends or family. Personalized sets make thoughtful gifts for birthdays, housewarmings, or special occasions.
Finally, don’t be afraid to experiment with different yarn types. Mixing cotton and acrylic, or adding textured yarns, can create coasters with unique tactile appeal. This creativity ensures your cat butt coasters stand out.
Q: Are these coasters suitable for beginners?
A: Yes! The Cat Butt Coasters Crochet Free Pattern uses basic stitches like chain and single crochet, making it beginner-friendly.
Q: What type of yarn is best?
A: Cotton yarn is recommended for durability, absorbency, and ease of handling. Worsted weight yarn works best.
Q: How many coasters can I make with one skein of yarn?
A: Depending on the yarn and size, one skein usually makes 4–6 coasters.
Q: Can I machine wash these coasters?
A: Yes, if made with cotton yarn. However, hand washing is recommended for longer durability.
Q: How long does it take to complete one coaster?
A: On average, a coaster can take 30–60 minutes depending on your experience level.
Q: Can I sell the finished coasters?
A: Yes, you can sell them, but the pattern itself should remain free. Always credit the original designer if applicable.
The Cat Butt Coasters Crochet Free Pattern is a delightful way to combine creativity, humor, and functionality in your home.
By following this guide, you can create coasters that are cute, durable, and personalized. We explored materials, step-by-step instructions, customization tips, and troubleshooting advice.
These coasters are perfect for gifts or adding a whimsical touch to your table décor. We hope this article inspires you to try this pattern and enjoy the crafting process.
Please leave a sincere opinion and suggestions on your experience with this fun crochet project, and share your unique ideas for future patterns!


