
Crocheted house-shaped cookie for Christmas tree

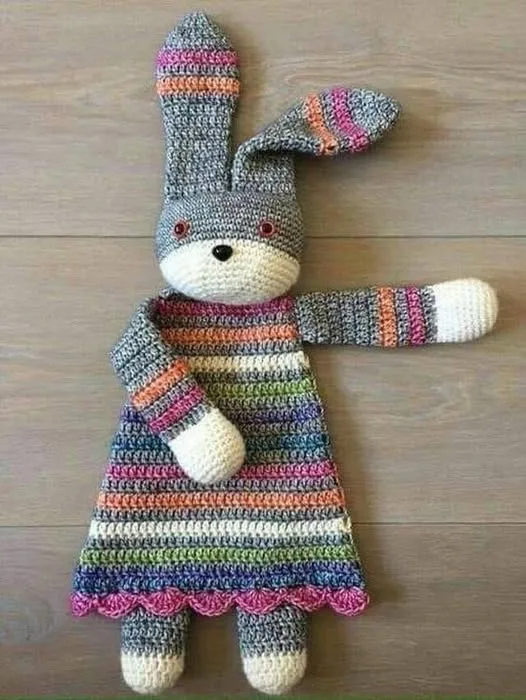
There’s nothing quite as heartwarming as a handmade toy, and the Bunny Ragdoll – Crochet Pattern offers the perfect opportunity to craft a charming companion for children or collectors alike.
This pattern combines softness, cuteness, and creativity, resulting in a doll that’s both cuddly and visually delightful. By following this pattern, you can create a Bunny Ragdoll that is entirely unique, using your choice of yarn colors, textures, and personalized details.
The Bunny Ragdoll – Crochet Pattern is designed to be approachable for all skill levels. Even if you’re a beginner, you can achieve impressive results by taking your time with each step.
The combination of basic crochet stitches, amigurumi techniques, and simple assembly ensures that each doll is well-structured and huggable. This project also allows for creativity—choose soft pastel tones for a traditional bunny look, or bold, whimsical colors for a fun, playful twist.
Another beautiful aspect of the Bunny Ragdoll is its versatility. You can adjust the size of your doll depending on your needs: make a small, pocket-sized bunny for a toddler, or create a larger version for decorative purposes. Accessories such as tiny crochet clothes, bows, or even miniature stuffed carrots can add personality and charm. Each doll becomes a little masterpiece, showcasing both your crochet skills and your creative flair.
To start your Bunny Ragdoll – Crochet Pattern, gather the appropriate materials. Choose soft, medium-weight yarns (category 3 or 4) for the body, ears, and limbs. Cotton yarn provides a firmer structure, while acrylic or acrylic blends offer extra softness, making the doll more cuddly. Neutral tones, soft pastels, or even playful multi-colored yarns work beautifully depending on the character you want to create.
You will also need a crochet hook suited to your yarn—usually 3.5 mm to 4.5 mm works best for medium-weight yarn. Other essential tools include stitch markers to keep track of rounds, a tapestry needle for sewing pieces together, and scissors. Safety eyes or embroidered features can be used for the bunny’s face, depending on your preference and the intended recipient.
Stuffing is crucial for giving your Bunny Ragdoll a soft and huggable feel. High-quality fiberfill ensures the doll maintains its shape without being too firm or lumpy. You may also consider using a small amount of plastic pellets in the bottom to help the bunny sit upright.
Optional accessories include tiny crochet clothing, bows, scarves, or miniature props like carrots. These touches add personality and can be customized to suit holidays, seasons, or personal themes.
Begin your Bunny Ragdoll with the head, typically starting with a magic ring. Work in continuous rounds to create a smooth, rounded shape, gradually increasing and then decreasing stitches to form the contours of the head. Use stitch markers to maintain even rounds and ensure symmetry.
The ears are worked separately and can be long and floppy or short and perky depending on your design choice. Attach them securely to the head using a tapestry needle. For a more realistic look, you can shape the inner ear with contrasting yarn or lightly stuff them for dimension.
Next, create the body using similar techniques—start with a magic ring, build the shape with increasing rounds, and add stuffing as you go. Pay attention to symmetry and proportionality so that your Bunny Ragdoll looks balanced when finished.
The arms and legs are crafted separately and sewn on carefully. Ensure that the limbs are securely attached, especially if the doll is intended for children. Small variations, like slightly bendable limbs or a gentle pose, make the bunny more lifelike and charming.
Once the main parts are assembled, it’s time for details. Embroider the nose, mouth, and any other facial features, or use safety eyes if desired. Accessories can now be added—tiny bows, scarves, or even miniature crochet clothes bring your bunny to life.
One of the joys of working with the Bunny Ragdoll – Crochet Pattern is its flexibility. You can make a classic pastel bunny, or create a whimsical, colorful version for a playful child’s toy. Changing the ear shape, body proportions, or adding little outfits can make each doll unique.
For a seasonal twist, dress your bunny in holiday-themed accessories. Think tiny Santa hats, Easter bonnets, or autumn scarves. These small additions make your Bunny Ragdoll a versatile gift or décor piece for any time of year.
You can also experiment with textures. Using fuzzy or boucle yarn can give the bunny a soft, plush feel, while smooth cotton creates clean, defined stitches. Adding small embellishments like tiny crochet carrots, flowers, or bows enhances the charm and makes your doll truly special.
For collectors, you can create multiple bunnies in a series, each with a unique expression, outfit, or size. This approach adds storytelling and personality, turning your crochet project into a small, handmade collection of characters.
Even beginners can enjoy experimenting with color combinations and accessories, as the Bunny Ragdoll pattern is forgiving and allows room for creative expression.
Proper finishing is key to a professional-looking Bunny Ragdoll. Weave in all yarn ends securely to prevent unraveling and ensure seams are tight. Gently shape the doll after stuffing to give it a smooth, uniform appearance.
For durability, especially if the bunny is a child’s toy, double-check all attachments. Safety eyes should be securely fastened, and limbs firmly sewn. Avoid small detachable parts for young children to ensure safety.
Washing your Bunny Ragdoll should be gentle. Hand wash in cold water with mild detergent and air dry flat. Avoid wringing or twisting, as this can distort the shape. For decorative bunnies, occasional dusting or gentle spot cleaning is sufficient.
Display your bunny proudly or gift it with love. Its handmade charm is unmatched, and each doll carries the care and effort you put into it. Accessories can be changed or added later, giving your Bunny Ragdoll even more personality over time.
1. Is this pattern suitable for beginners?
Yes! The Bunny Ragdoll – Crochet Pattern uses basic crochet stitches and clear assembly steps. Beginners can achieve great results with patience and careful attention to detail.
2. What yarn is best for a soft, cuddly bunny?
Soft acrylic or cotton blends work best. For extra fluffiness, consider fuzzy or plush yarns.
3. Can I customize the bunny’s size?
Absolutely! Adjusting yarn thickness and hook size allows you to create small or large versions. You can also modify the body and limb proportions.
4. How should I make the facial features?
Use embroidery for a safe, gentle look or safety eyes for more realistic features. Always secure small parts if the bunny is for children.
5. Can I dress my Bunny Ragdoll?
Yes! Tiny crochet outfits, bows, scarves, or props like carrots can be added to personalize your doll.
6. How do I care for my Bunny Ragdoll?
Hand wash gently with cold water and mild detergent, then air dry flat. Avoid wringing to maintain shape.
The Bunny Ragdoll – Crochet Pattern is a delightful and versatile project that brings charm, creativity, and warmth into your handmade creations. Every stitch contributes to a cuddly, lovable companion that can be customized in countless ways. From playful pastel tones to whimsical outfits, your Bunny Ragdoll becomes a cherished item for children, collectors, or yourself.
Creating this doll combines relaxation, skill-building, and personal expression, resulting in a project that’s as rewarding to make as it is to gift. Share your experience and creative ideas—I’d love to know how your Bunny Ragdoll – Crochet Pattern turned out and what unique touches you added!


