
Crocheted house-shaped cookie for Christmas tree

Creating a Bunny Lovey Parts & Pieces – Free Pattern is a delightful way to bring joy to both beginners and seasoned crafters. This pattern allows anyone to craft an adorable bunny lovey, combining creativity and practicality in a single project.
Whether you are looking to create a comforting toy for a child or a charming decorative piece, this free pattern offers all the guidance needed to assemble each part with ease.
Understanding the components and techniques behind this bunny lovey ensures a smooth crafting experience, making it perfect for personal projects or thoughtful handmade gifts.
One of the most appealing aspects of this Bunny Lovey Parts & Pieces – Free Pattern is its accessibility. It is designed to be beginner-friendly while still offering opportunities for advanced crafters to add personal touches.
From selecting the softest yarn to mastering basic crochet stitches, each step of the pattern encourages creativity. Following this guide ensures that each part of the bunny lovey is assembled accurately, resulting in a finished toy that is both sturdy and lovable.
Additionally, this pattern emphasizes versatility and customization. Crafters can adjust colors, textures, and sizes to suit individual preferences. The Bunny Lovey Parts & Pieces – Free Pattern includes detailed instructions for every component, including the head, body, ears, and security-safe embellishments. With clear guidance and careful attention to detail, even novice crafters can achieve a professional-looking finish, making this free pattern a valuable resource in the world of handmade toys.
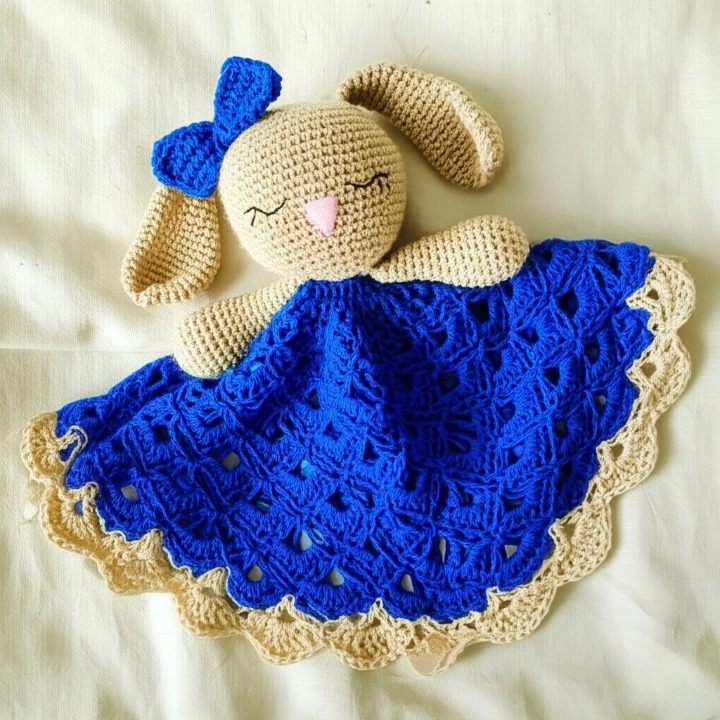
Creating a successful Bunny Lovey begins with understanding its essential parts. The head, body, ears, and limbs are each crafted separately before being carefully assembled. Learning about these components allows crafters to focus on precision and aesthetics, ensuring the final toy is both adorable and functional.
The head is typically the centerpiece of the Bunny Lovey Parts & Pieces – Free Pattern. It requires careful shaping to maintain symmetry and softness. Choosing the right stuffing and yarn ensures a smooth, cuddly finish that is safe for children.
Ears are another key element. They can be made floppy or upright, depending on personal preference. Following the instructions in the free pattern guarantees even sizing, which contributes to the toy’s overall charm.
The body provides structure and balance. Crafting it correctly ensures the bunny sits or rests naturally, which is important for usability and display. The body is generally designed to be proportionate to the head and limbs.
Limbs, including arms and legs, are usually small but crucial for the lovey’s completeness. They are carefully sewn or crocheted to provide stability and durability. This attention to detail enhances the toy’s appearance and longevity.
Finally, finishing touches like facial features, small decorations, or personalized accessories bring personality to the Bunny Lovey. These details allow crafters to inject individuality, making each toy a unique creation.
To follow the Bunny Lovey Parts & Pieces – Free Pattern, you will need a set of essential materials. Choosing the right supplies not only simplifies the crafting process but also ensures the final product is safe and long-lasting.
Soft yarn is the primary material. It should be durable yet gentle on a child’s skin. Common choices include cotton or acrylic blends that are both washable and hypoallergenic.
A suitable crochet hook or knitting needles, depending on your technique, are necessary for creating uniform stitches. The size of the hook or needle can affect the texture and tightness of the lovey, so following pattern recommendations is essential.
Stuffing is critical for achieving a cuddly and stable toy. Polyester fiberfill is a popular option due to its softness and ease of use. Proper stuffing techniques prevent lumps and maintain shape over time.
Safety eyes or embroidered features are recommended for children’s toys. Using secure methods ensures that small parts do not become hazards. This is especially important for babies and toddlers.
Scissors, stitch markers, and a yarn needle are practical tools that simplify assembly. These tools help manage yarn, track progress, and sew parts together neatly.
Optional materials such as ribbons, buttons, or additional decorative yarns can add personality. While these extras are not necessary for the structure, they allow crafters to personalize their Bunny Lovey and make it truly one-of-a-kind.
Following precise instructions is key to successfully completing the Bunny Lovey Parts & Pieces – Free Pattern. The assembly process brings together each pre-made part to form the finished toy.
Begin by attaching the head to the body. This foundational step requires careful alignment to ensure the bunny maintains balance and proper posture. Secure stitching or crocheting prevents parts from shifting over time.
Next, attach the ears. Symmetry is important, so take time to measure and position each ear correctly. Floppy or upright ears can be created depending on preference, and small adjustments can make a big difference in appearance.
Arms and legs are usually attached last. Positioning these limbs slightly angled can create a natural sitting or reclining pose. The instructions emphasize durability to withstand gentle play.
Facial features are added once the primary components are in place. Embroidered eyes, noses, and mouths provide safety and charm. Personalized expressions can also be created, giving each Bunny Lovey a unique personality.
Once all parts are attached, review the toy for any loose threads or uneven sections. Proper finishing techniques, including weaving in ends and tightening stitches, enhance durability and aesthetics.
Finally, optional decorations like bows, scarves, or tiny accessories can be added. These finishing touches allow crafters to experiment with creativity while keeping the structure safe and secure for children.
Whether you are a beginner or an experienced crafter, the Bunny Lovey Parts & Pieces – Free Pattern offers useful tips to make the process enjoyable and efficient. Attention to detail is key to achieving professional results.
Beginners should start by familiarizing themselves with the different parts of the lovey. Understanding how each piece fits into the overall structure reduces mistakes and enhances confidence.
Consistent tension in crochet or knitting is crucial. Uneven stitches can affect the shape of the bunny, making the toy look lopsided. Practicing tension beforehand can save time and frustration.
Experienced crafters may add personal touches, such as color gradients, textured yarn, or alternative stitch patterns. These enhancements provide a custom look without compromising the pattern’s integrity.
Maintaining organization is helpful. Keeping each part labeled or in separate piles prevents confusion during assembly. Small adjustments or corrections can be made more easily when the work is organized.
Patience is vital. Crafting a Bunny Lovey is a rewarding process that requires attention and care. Taking breaks, reviewing instructions, and double-checking assembly ensures a polished final product.
Finally, documenting your process with notes or photos allows for future reference. These records can be helpful for repeating the project or sharing your experience with other crafters.
Q: What skill level is required for this pattern?
A: The pattern is designed for beginners but also provides opportunities for experienced crafters to customize their bunny lovey.
Q: Can I wash the finished bunny lovey?
A: Yes, using washable yarn and safe stuffing ensures that the toy can be gently hand-washed or machine-washed on a delicate cycle.
Q: Are there alternatives to crochet for making this lovey?
A: Yes, the pattern can also be adapted for knitting or sewing, depending on your skill and material preferences.
Q: How long does it take to complete one bunny lovey?
A: Time varies depending on experience, but most crafters complete one bunny lovey in 6–10 hours.
Q: Can I sell the finished bunny lovey?
A: Generally, handmade items created from free patterns can be sold, but always credit the original pattern creator if specified.
Q: Are there safety recommendations for toys made from this pattern?
A: Always use child-safe materials and securely attach small parts to avoid choking hazards. Embroidery is preferred over plastic eyes for babies.
In conclusion, the Bunny Lovey Parts & Pieces – Free Pattern offers a delightful and rewarding project for crafters of all skill levels. By understanding the parts, selecting appropriate materials, and carefully following assembly instructions, anyone can create a charming, safe, and lovable bunny toy. Attention to detail, patience, and creativity result in a unique handmade item perfect for gifting or personal enjoyment.
Share your experiences, leave honest opinions, and provide suggestions to help others enjoy this free pattern and bring more Bunny Loveys to life.


