
Crocheted house-shaped cookie for Christmas tree

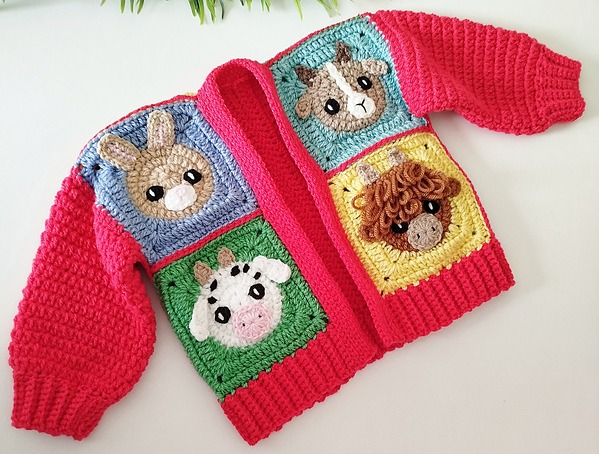
The Beautiful Crochet Coat made with animals is one of the most enchanting crochet projects you can create. Combining style, creativity, and a touch of nature-inspired design, this project allows you to turn simple yarn into a wearable piece of art.
Whether you’re an experienced crocheter or just learning, this tutorial will guide you step by step to create a cozy and artistic coat that celebrates the beauty of animals through crochet motifs.
The best part? Each piece you make is unique, reflecting your personality, creativity, and love for handmade fashion.
Crocheting a Beautiful Crochet Coat made with animals is not just about crafting clothing; it’s about storytelling through stitches. Each animal design, from cute foxes to elegant owls, adds life to your garment.
These motifs can be stitched into the pattern, crocheted separately, or embroidered afterward for a 3D effect. This coat is perfect for those who love originality and want to wear something that turns heads and sparks conversations.
This tutorial will help you understand how to choose the right yarn, create the animal patterns, assemble the coat, and add the finishing details. With patience and attention to detail, your crochet coat will look like a masterpiece straight out of a designer’s studio. So, grab your hooks and yarn — it’s time to bring your imagination to life through this Beautiful Crochet Coat made with animals tutorial.
Before you start crocheting, selecting the right materials is essential for a professional finish. For this Beautiful Crochet Coat made with animals, you’ll need a medium-weight yarn that provides warmth yet allows the animal details to stand out. Wool or acrylic blends are excellent choices because they maintain shape and texture over time. Choose a color palette that complements your animal motifs — earthy tones work wonderfully for natural-looking designs, while pastel shades give a whimsical touch.
The crochet hook size is also important. A 4.0 mm to 5.0 mm hook usually works well with worsted yarn, providing tight stitches without making the coat too stiff. Remember to make a small sample swatch before starting to ensure your tension is correct. Proper tension ensures that your coat will fit comfortably and the animal details remain neat and visible.
Another key step is selecting animal patterns. You can use pre-made charts or design your own. Popular motifs include foxes, owls, cats, bears, and rabbits — each adding charm and character. Consider creating multiple animals in different colors to make the coat playful and lively.
When planning your design, decide whether the animals will be crocheted directly into the fabric (using color changes) or made separately and sewn later. Each method has its charm. Colorwork techniques like tapestry crochet can give a smooth finish, while appliqué-style animals provide texture and depth.
Before you begin assembling, gather all your materials — scissors, yarn needles, stitch markers, and measuring tape. Organization makes the process smoother and ensures your project turns out beautifully. Preparing your workspace in advance helps you focus on creativity instead of searching for tools midway.
Finally, wash and block your finished motifs before joining them. Blocking not only evens out the stitches but also makes your animal designs look crisp and defined. It’s a professional touch that makes all the difference in the final look of your Beautiful Crochet Coat made with animals.
The heart of this project lies in the animal patterns. Each animal represents a creative expression that gives the coat its unique personality. Start by choosing simple designs if you’re a beginner — a smiling cat or a tiny fox is a great place to start. For more advanced crocheters, try complex motifs such as owls with textured feathers or elephants with color gradients.
To create your animal motifs, follow a crochet chart or diagram. Charts make it easier to visualize color changes and stitch placement. When working with multiple colors, remember to carry the unused yarn behind your stitches neatly to avoid bulky areas. This small detail will make your finished coat look professional and comfortable.
Use basic stitches like single crochet, double crochet, and slip stitches for most animal patterns. Combining these simple stitches strategically creates outlines, eyes, and textures. You can also add small embroidery details later — such as whiskers, eyes, or stripes — using contrasting yarn.
If you prefer appliqués, crochet the animals separately using smaller hooks so they remain compact. Afterward, sew them gently onto the coat using invisible stitches. This technique allows flexibility in arranging the animals across your garment, letting you decide on placement as you go.
To keep your work consistent, make sure each animal motif is roughly the same size. Uneven motifs can distort the coat’s shape once assembled. Measuring each square or section before joining ensures uniformity and symmetry throughout the project.
Adding 3D elements, like raised ears or tails, brings your animals to life. These small details create a fun, tactile effect that both kids and adults adore. The goal is to make your Beautiful Crochet Coat made with animals as expressive as possible, turning it into wearable artwork.
Once your motifs are ready, it’s time to assemble your coat. Begin by laying out all your crochet pieces on a flat surface. Arrange them according to your design plan, ensuring balance between the animal patterns. This step helps you visualize how the coat will look before you start joining.
Join the motifs using a slip stitch or whip stitch, depending on your preference. Make sure the joins are even and tight enough to hold but flexible enough to move naturally when worn. A loose, stretchy join ensures the coat maintains its comfort and drape.
For shaping, consider a simple cardigan-style structure. The coat can be made in panels — two fronts, one back, and two sleeves — then stitched together. Add borders or cuffs using single crochet or ribbed patterns to give a clean, finished edge. These touches enhance durability and add a polished appearance.
When sewing pieces together, always align the stitches. Misalignment can cause twisting or uneven seams. Take your time — precision in this stage ensures a professional result that fits beautifully.
Try on your coat as you assemble it to check the fit. Crochet naturally stretches, so slight adjustments may be necessary. You can add or remove rows to achieve the desired length or width. A well-fitted coat will drape naturally and flatter your figure.
After assembling, weave in all loose ends securely. This final cleanup step prevents fraying and ensures your Beautiful Crochet Coat made with animals looks flawless and long-lasting.
The finishing touches bring your crochet coat from handmade to high-fashion. Start by adding buttons, toggles, or even a crochet belt for closure. Large wooden buttons or colorful handmade ones can complement the animal motifs beautifully.
If you love cozy details, consider adding a hood or collar. A hood gives a playful touch that matches the whimsical animal theme, while a wide collar adds elegance. Both options elevate the overall design and provide warmth.
You can also add decorative borders. A scalloped edge or picot trim enhances the handmade charm and frames your coat perfectly. Choose colors that harmonize with your animal motifs for a cohesive look.
Styling your Beautiful Crochet Coat made with animals is just as fun as making it. Pair it with neutral-toned clothing to let the coat stand out, or embrace boldness by matching it with colorful scarves and accessories. This coat is not just outerwear — it’s a fashion statement.
For care, always hand wash your crochet coat in cold water using mild detergent. Avoid wringing; instead, press gently and lay flat to dry. Proper care maintains its shape and keeps the animal motifs looking fresh.
Lastly, show off your creation with pride! Post it on social media or gift it to someone special. Every stitch tells a story, and your coat will inspire others to explore their creativity through crochet.
1. What level of skill do I need to make this crochet coat?
This project is suitable for intermediate crocheters. However, beginners can also attempt it by starting with simple animal motifs and practicing basic stitches.
2. Can I use cotton yarn instead of wool or acrylic?
Yes, but cotton yarn offers less elasticity and warmth. It’s perfect for lightweight coats but not ideal for cold weather.
3. How long does it take to complete the coat?
Depending on your skill level and the complexity of your animal motifs, it may take between one to three weeks.
4. Can I customize the size of the coat?
Absolutely! Adjusting the number of motifs or adding extra rows allows you to make it larger or smaller.
5. How do I prevent my animal motifs from curling?
Blocking is key. After crocheting each motif, dampen it slightly, pin it flat, and let it dry completely to maintain shape.
6. What’s the best way to attach animal appliqués?
Use a yarn needle and invisible stitches. Sew gently to avoid puckering or distorting the coat’s shape.
7. Can I mix different animal designs in one coat?
Yes! Mixing animals adds charm and originality. Just ensure all motifs are of similar size for balance.
8. How can I make the coat warmer?
Use a wool blend yarn or line the inside with soft fabric to enhance warmth and structure.
9. Is this coat machine washable?
Only if your yarn label says so. Most handmade crochet garments should be hand-washed to preserve quality.
10. Can I sell coats made with this tutorial?
Yes! Handmade crochet coats are highly valued. Just credit the original design inspiration if applicable.
Creating a Beautiful Crochet Coat made with animals is a rewarding journey that blends creativity, patience, and skill. You’ve learned how to select materials, craft animal motifs, assemble the pieces, and add stylish finishing touches. The result is a stunning, personalized garment full of warmth and charm.
Every stitch tells a story — of imagination, dedication, and love for handmade art. If you followed this tutorial, you now own a wearable masterpiece that celebrates animals and artistry alike.
We’d love to hear from you! Share your experience, thoughts, and suggestions in the comments. Did you enjoy this Beautiful Crochet Coat made with animals tutorial? Your feedback inspires future creations and helps other crafters bring their ideas to life.


