
Crocheted house-shaped cookie for Christmas tree

If you’ve been searching for a creative and unforgettable crochet project, then you’re going to love this Amigurumi Skull & Roses Bouquet – Free Crochet Pattern.
This design combines the charm of amigurumi craftsmanship with a touch of gothic elegance, resulting in a stunning handmade bouquet that’s both cute and mysterious.
Whether you’re making it for Halloween, Valentine’s Day, or simply as a unique home décor piece, this project will add a special handmade touch to your collection.
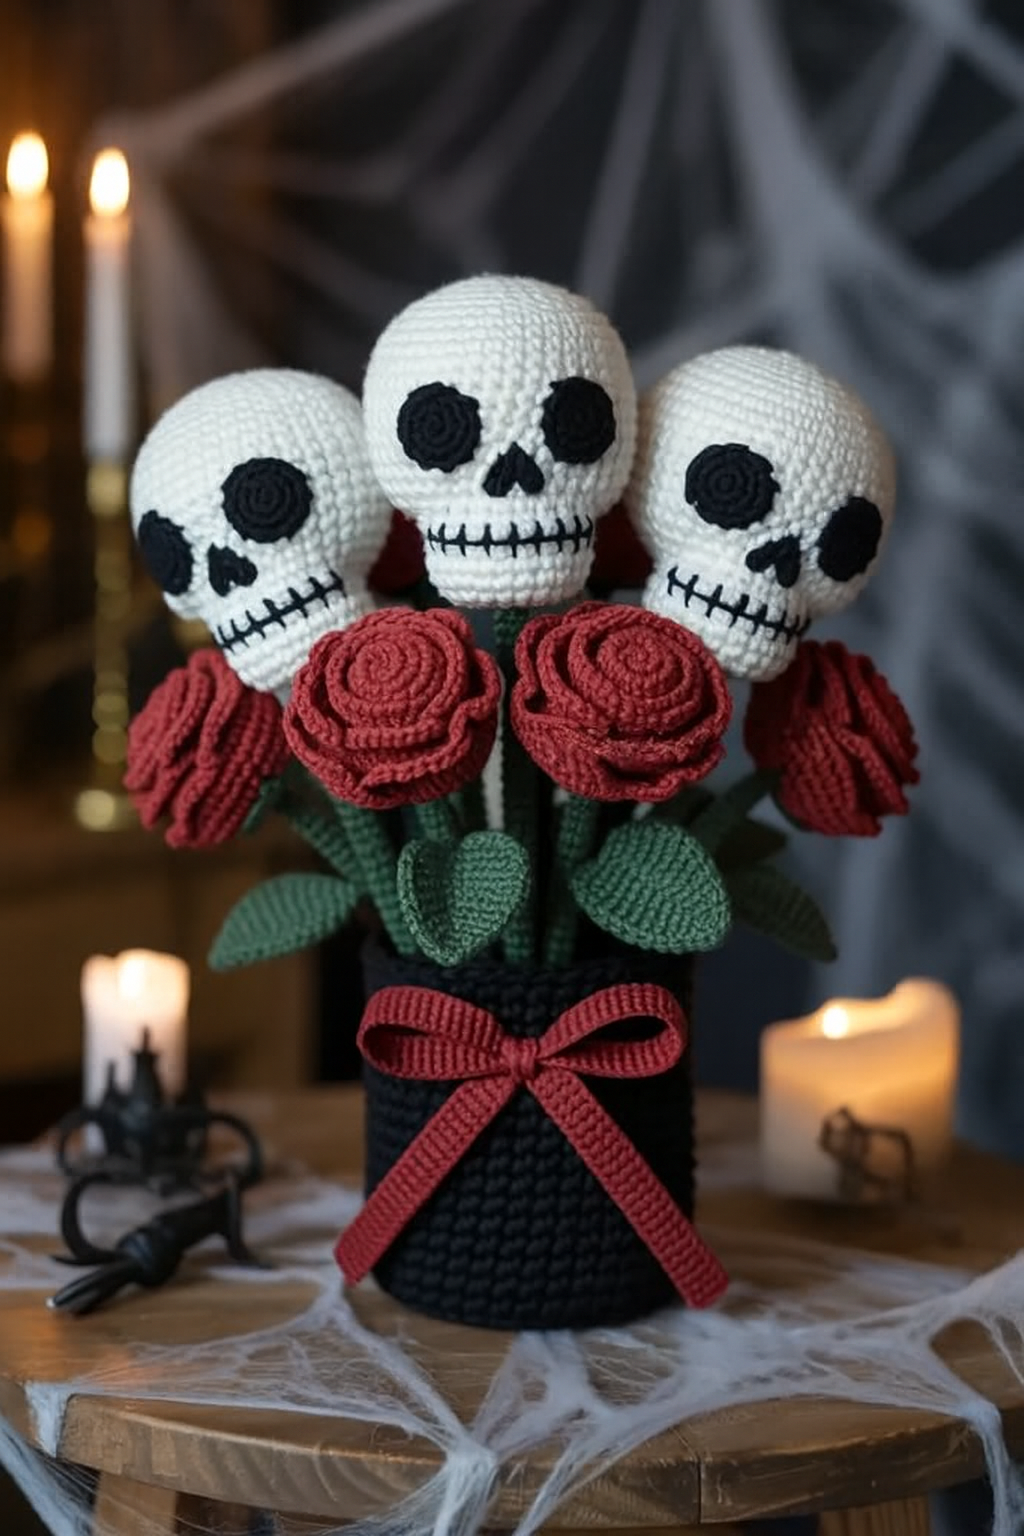
The idea behind an amigurumi skull and roses crochet pattern is to blend two contrasting elements — the beauty of roses and the edginess of skulls — into a single artistic piece.
Unlike traditional bouquets, this one never wilts, and every detail is lovingly crafted from yarn. It’s perfect for crafters who love to express individuality through crochet, whether they’re beginners or seasoned artisans looking for a fresh idea.
Before diving into the pattern, it’s worth noting that this free crochet pattern is as much about creativity as it is about technique. You’ll learn how to shape mini skulls, crochet realistic-looking roses, and assemble them into a lasting bouquet. Even if you’ve never made an amigurumi bouquet before, don’t worry — the steps are straightforward, and the results are absolutely worth it.
To get started on your amigurumi skull & roses bouquet, you’ll need some basic crochet supplies. Choosing the right materials makes all the difference when it comes to the final appearance and texture of your project. The beauty of amigurumi crochet is that it doesn’t require expensive materials — just creativity and patience.
You’ll need several shades of yarn: white or off-white for the skulls, red or dark crimson for the roses, and green for the stems and leaves. Cotton or acrylic yarns are ideal because they hold shape well and are easy to work with. If you prefer a soft and plush result, opt for medium-weight yarn, but if you want something more structured, use a slightly stiffer one.
Next, choose the appropriate hook size for your yarn, usually between 2.5 mm and 3.5 mm for amigurumi work. Having a smaller hook ensures that your stitches are tight, preventing stuffing from showing through. Don’t forget your tapestry needle, scissors, and some lightweight fiberfill for stuffing.
For assembly, floral wire and green floral tape come in handy to create realistic stems. You can also use a hot glue gun to secure flowers and skulls in place if you’re not sewing them directly. These small details help your DIY crochet gift look more professional and durable.
Lastly, make sure you have a stitch marker nearby — it will help you track your rounds when creating the skulls and rose petals. Having all your materials organized before you start will make the process smoother and more enjoyable, especially for beginners trying this free crochet pattern for the first time.
The centerpiece of this project is, of course, the amigurumi skull. Despite its intricate appearance, it’s actually quite simple to make once you understand the pattern structure. The skull is worked in continuous rounds, beginning from the top of the head and gradually shaping downward.
Start by creating a magic ring with six single crochets. Increase evenly around each round until you reach the desired width — typically around 24 stitches for a medium-sized skull. Once you have your base, continue crocheting without increases for several rounds to form the skull’s height. Stuff the piece lightly before decreasing.
To shape the facial details, you can use black yarn or embroidery thread to create eye sockets and a small stitched nose. If you prefer a more playful look, use safety eyes instead of embroidered ones. The key is to keep your stitches tight so the amigurumi skull maintains its shape.
After completing the skull base, close it securely and weave in all loose ends. You can add a touch of shading using fabric paint or blush to give it depth, though this is optional. When grouped together in your amigurumi bouquet, these little skulls will look both adorable and spooky — a perfect balance of cute and creepy.
If you want to make the skulls more expressive, try varying the eye shapes or adding tiny bows or veils. This personal touch transforms your gothic crochet decor into something truly unique and memorable.
Now let’s move on to the most romantic part — the amigurumi roses. These flowers complement the skulls beautifully, creating a contrast between life and death that’s both artistic and elegant. Crocheting roses might look complex at first glance, but once you master the basic petal pattern, it becomes a relaxing and repetitive process.
Begin by chaining a base of around 50 stitches. Work single and double crochets along the chain to form curved petals. Once the row is complete, gently roll the strip into a spiral, shaping it into a rose as you go. Secure the base with a few stitches or a dab of hot glue. Repeat this step until you have enough roses to fill your bouquet.
For leaves and stems, use green yarn to crochet small ovals or leaf shapes. You can also crochet a long stem by wrapping yarn around floral wire, giving it structure. Combine these with your roses to create a realistic botanical effect.
The beauty of these amigurumi roses lies in their customization. You can use different shades of red, pink, or even black for a gothic twist. If you want your amigurumi bouquet to feel extra lush, add small white flowers or crocheted vines to fill the gaps.
When assembled with your skulls, these roses create a visually stunning bouquet — the perfect DIY crochet gift for someone with a love of dark romance or alternative aesthetics.
Once all your individual pieces are ready, it’s time for the fun part — assembling the amigurumi skull & roses bouquet. This stage allows you to showcase your creativity and personalize the design according to your taste. The goal is to balance the eerie charm of the skulls with the delicate beauty of the roses.
Begin by arranging your skulls and flowers on a flat surface to visualize the layout. You can alternate between skulls and roses or cluster them in small groups. Using floral wire helps you position each piece at the desired height and angle.
Next, wrap the stems together using floral tape, ensuring everything feels secure and cohesive. Add extra greenery or smaller crochet flowers to fill any empty spaces. Don’t be afraid to play with asymmetry — a slightly imperfect arrangement often looks more natural.
If you plan to display your bouquet in a vase, consider adding decorative ribbon around the base or wrapping the stems in black lace for a dramatic effect. For gifting, you can place the arrangement in a clear wrap with a personalized tag — perfect for birthdays, anniversaries, or Halloween parties.
The final result is a breathtaking gothic crochet decor piece that’s not only handmade but also timeless. It’s a conversation starter and a symbol of creativity, patience, and love for detail.
1. Is this project beginner-friendly?
Yes! While it looks detailed, this free crochet pattern is suitable for beginners who are comfortable with basic stitches like single crochet and double crochet. The most important thing is to work tightly and count your stitches.
2. How long does it take to make an amigurumi skull & roses bouquet?
Depending on your skill level, it can take anywhere from 6 to 12 hours in total. Each skull and rose takes about 30–60 minutes to complete.
3. Can I use different yarn types for this project?
Absolutely. Cotton yarn gives a crisp shape, while acrylic offers softness. Mixing textures can even enhance the look of your DIY crochet gift.
4. How can I make the bouquet sturdier?
Use floral wire inside each stem and wrap it securely with floral tape. This provides support and allows you to bend and position your bouquet easily.
5. Can I sell the finished bouquets?
Yes, handmade amigurumi bouquets are popular in craft markets and online shops. Just remember to credit the original free crochet pattern source if you used one as a base for your design.
6. What occasions are best for gifting this project?
This bouquet makes a perfect handmade gift for Halloween, gothic weddings, anniversaries, or as a unique home decoration year-round.
Creating an Amigurumi Skull & Roses Bouquet – Free Crochet Pattern is more than just a craft project — it’s a way to express creativity and emotion through yarn. By combining the softness of crochet with a touch of dark romance, you can produce a piece that’s elegant, personal, and unforgettable.
In this guide, we covered everything from materials and skull-making to crocheting roses and assembling your bouquet. Whether you’re crafting for fun or gifting to someone special, this project showcases the beauty of handmade artistry.
If you enjoyed this tutorial, feel free to share your thoughts in the comments — I’d love to hear your experiences, ideas, and suggestions for future crochet projects!


