
Simple Crochet Balaclava - Free Pattern

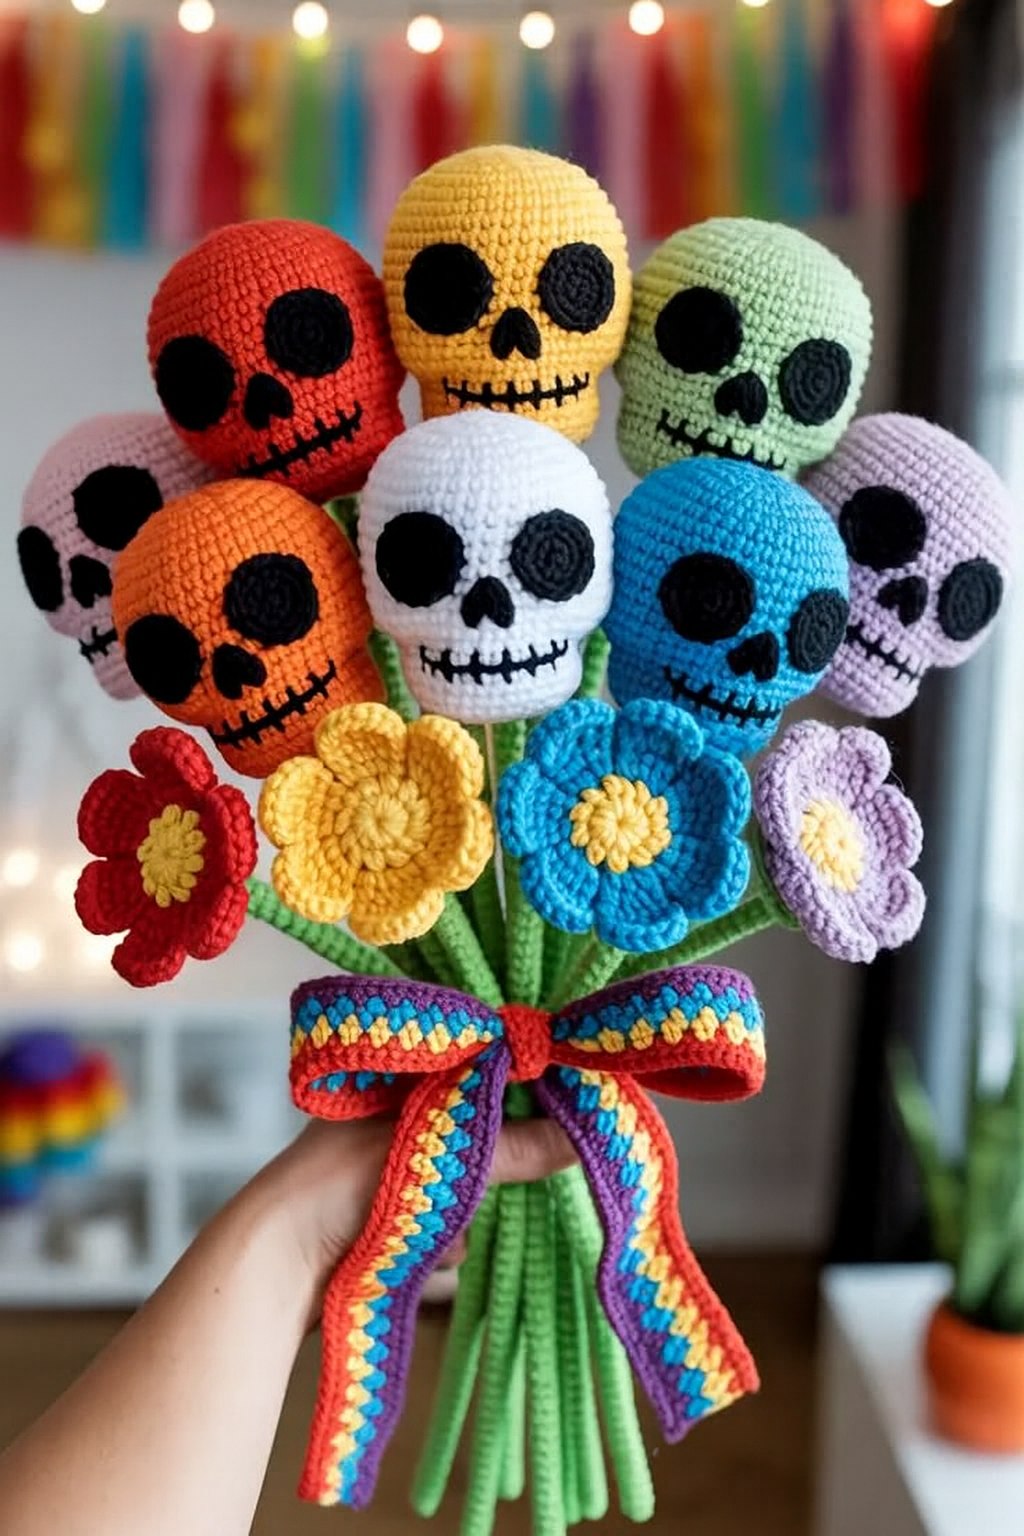
Amigurumi Rainbow Skull Bouquet – FREE Crochet Pattern is a delightful and creative project that combines the charm of amigurumi with a colorful, slightly spooky twist.
Whether you are a beginner or an experienced crocheter, this free crochet pattern allows you to create a unique and eye-catching decoration that will impress friends, family, or anyone who appreciates handmade crafts.
With its vibrant colors and whimsical design, the amigurumi rainbow skull bouquet is perfect for seasonal décor, gifts, or simply adding a touch of personality to your home.
Crocheting an amigurumi skull bouquet is not only fun but also therapeutic. Working with yarn and hook allows you to focus on each stitch, creating a satisfying rhythm and a tangible result at the end.
The combination of bright rainbow colors with playful skull designs gives this project a modern, alternative aesthetic that is perfect for Halloween, Day of the Dead, or just a cheerful display year-round. Using this free crochet pattern, you can make multiple skulls in different sizes and colors, arranging them into a bouquet that is truly one-of-a-kind.
In this guide, we will break down the process into manageable steps, explain essential techniques, and offer tips for customization. By following this amigurumi rainbow skull bouquet – free crochet pattern, you’ll learn how to create detailed skull shapes, incorporate multiple yarn colors seamlessly, and assemble the finished bouquet like a professional crafter. Let’s explore everything you need to know to bring this whimsical project to life.
Creating your amigurumi rainbow skull bouquet begins with gathering the right materials. Choosing high-quality yarn and the correct crochet hook size will ensure your skulls hold their shape and look polished. The basic supplies include various colors of worsted-weight yarn for the rainbow effect, a crochet hook compatible with the yarn, polyester fiberfill for stuffing, and safety eyes or embroidery thread for facial details. Additionally, you’ll need a yarn needle, stitch markers, and scissors to complete the project neatly.
Selecting the right yarn colors is key to achieving a vibrant and attractive bouquet. Opt for a range of hues—reds, oranges, yellows, greens, blues, and purples—to make each skull pop. You can also choose pastel or muted shades for a softer, more whimsical look. The yarn’s texture matters too; smooth cotton or acrylic yarn works best for small details and helps your amigurumi pieces maintain structure.
When it comes to tools, the crochet hook size affects the tightness of your stitches. For beginners, following the hook size recommended on the yarn label is a safe choice. Tighter stitches prevent the stuffing from showing, giving your crochet skull bouquet a clean, professional finish. Using stitch markers can help keep track of rounds and prevent mistakes, especially when shaping the skulls and attaching them to the bouquet.
Other optional materials include floral wire or wooden sticks to support each skull in the bouquet, as well as decorative ribbons to enhance presentation. These small additions make your finished piece more durable and visually appealing, turning your amigurumi rainbow skull bouquet into a charming, gift-ready creation.
Always prepare your workspace before starting. Clear surfaces, good lighting, and organized supplies improve efficiency and reduce mistakes. By having everything ready, you can enjoy the relaxing process of crocheting without unnecessary interruptions, making the experience of creating your free crochet pattern skull bouquet even more enjoyable.
Finally, remember to check the pattern notes. Some amigurumi designs include special stitch techniques or assembly instructions. Reading these in advance ensures you’re familiar with the workflow and helps you plan your project, making the crafting journey smoother and more satisfying.
The heart of this project is shaping the skulls. Start by making a magic ring, which forms the foundation for the amigurumi skull. Crochet in the round, increasing gradually to form a spherical shape. This technique creates a smooth, even surface for the skull and is essential for achieving professional-looking results in your amigurumi rainbow skull bouquet.
Once the sphere reaches the desired size, decrease stitches carefully to close the top of the skull. Stuff each skull firmly with polyester fiberfill, ensuring it maintains its shape but isn’t overstuffed. Proper stuffing enhances the overall aesthetic and gives each skull a soft, plush feel.
Eyes can be added using safety eyes, buttons, or embroidery. Position them evenly on the skull for a symmetrical look. Adding small details like stitched noses or teeth can enhance the character and charm of each skull. These elements make your free crochet pattern skull bouquet truly unique.
Next, create the skull’s bottom section, often slightly flattened, to allow it to stand or attach to a stem. Use single crochet stitches to taper the base, and remember to check symmetry. Balanced skulls are easier to arrange into a visually pleasing bouquet.
Crocheting multiple skulls in different colors builds the rainbow effect. Repeat the shaping process for each color, adjusting size if desired for variety. Mixing larger and smaller skulls adds depth and visual interest to your amigurumi skull bouquet.
Finally, attach each skull to a support stick or floral wire using yarn or thread. Position them in a natural, slightly irregular arrangement to mimic real flowers. By following these steps carefully, your amigurumi rainbow skull bouquet will be vibrant, durable, and ready for display.
Once all skulls are crocheted and stuffed, it’s time to assemble the bouquet. Start by grouping the skulls by size and color. Arrange them to create a balanced visual flow, placing larger skulls in the center and smaller ones around them. This ensures your amigurumi rainbow skull bouquet looks full and harmonious.
Use floral tape or ribbon to secure the skull stems together. Wrapping tightly prevents the arrangement from shifting and keeps it compact. Adding a decorative ribbon around the base enhances the bouquet’s aesthetic and gives it a professional finish.
Adjust the angle and height of each skull to achieve a dynamic composition. Slightly tilting some skulls or staggering heights creates a natural, whimsical look. This step is where your personal creativity truly shines, making your crochet skull bouquet distinct and memorable.
Consider adding leaves or small yarn flowers to complement the skulls. These details provide contrast and soften the overall appearance, making the bouquet more visually appealing. Handmade touches like these elevate the charm of your amigurumi rainbow skull bouquet.
Check for loose yarn ends and weave them in carefully. This not only tidies up the project but also ensures durability, so your bouquet can be handled or displayed without unraveling. A neat finish enhances the professional feel of your free crochet pattern project.
Finally, admire your work and make any final adjustments. Step back and view the bouquet from different angles, repositioning skulls as needed. Once satisfied, your amigurumi rainbow skull bouquet is complete and ready to delight everyone who sees it.
For beginners, practice basic stitches before starting your amigurumi rainbow skull bouquet. Familiarity with single crochet, increases, and decreases makes shaping skulls much easier. Mastering these techniques ensures smooth, consistent results throughout your project.
Choosing contrasting yarn colors for facial features improves visibility. Eyes, noses, and mouths should stand out against the skull’s base color. This small adjustment enhances the visual impact of your crochet skull bouquet.
Maintain consistent tension in your stitches. Uneven tension can distort the skull’s shape, making assembly difficult. Practicing even tension helps your amigurumi rainbow skull bouquet look polished and professional.
If you make a mistake, don’t panic. Amigurumi is forgiving, and unraveling a few rows is part of the learning process. Correcting errors early ensures the final bouquet is flawless.
Consider customizing skull expressions. Smiling, winking, or quirky faces add personality. This personalization transforms your free crochet pattern project into a memorable, unique gift.
Finally, take breaks and enjoy the process. Crocheting is not just about the finished product—it’s also a relaxing, creative journey. By pacing yourself, you’ll enjoy making your amigurumi rainbow skull bouquet and feel proud of your handmade creation.
Q1: Can beginners make this amigurumi rainbow skull bouquet?
A1: Yes! While some experience with basic stitches helps, the step-by-step instructions make this project accessible for beginners. Using small, simple skulls can also ease the learning curve.
Q2: What materials are needed?
A2: You’ll need multiple yarn colors, a crochet hook, polyester fiberfill, safety eyes or embroidery thread, stitch markers, scissors, and optional floral wire or sticks.
Q3: How long does it take to complete the bouquet?
A3: Depending on experience and size, it can take a few hours to several days. Working in stages and making multiple skulls simultaneously speeds up the process.
Q4: Can I wash the finished amigurumi bouquet?
A4: Handwashing gently with mild soap is safest. Avoid machine washing to prevent distortion or color bleeding.
Q5: Can I customize the colors?
A5: Absolutely! The rainbow effect is flexible. You can use any combination of yarn colors, including pastels or muted shades, for a unique look.
Q6: Is this a good gift idea?
A6: Definitely! Handmade and whimsical, this amigurumi rainbow skull bouquet is perfect for birthdays, Halloween, Day of the Dead, or as a quirky home décor item.
In this guide, we explored how to create an amigurumi rainbow skull bouquet – FREE crochet pattern, covering materials, step-by-step instructions, assembly tips, and tricks for perfection. You now have everything you need to craft a charming, colorful, and whimsical decoration that reflects your creativity. From choosing vibrant yarns to arranging the finished bouquet, each step is an opportunity to personalize your handmade project.
We hope this tutorial inspires you to experiment, enjoy the process, and proudly display your crochet skull bouquet. Share your thoughts, experiences, or suggestions in the comments below—we’d love to hear your honest feedback and see how your bouquet turned out!


