
Crocheted house-shaped cookie for Christmas tree

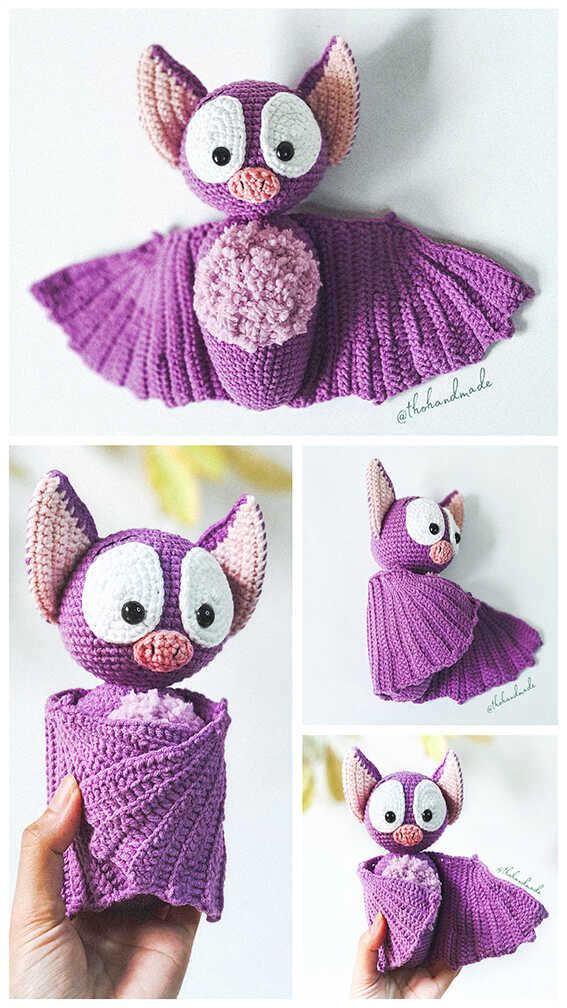
The Amigurumi Bat Recipe is a delightful guide for crafters who want to create charming, small crocheted bats that are perfect for decorations, gifts, or even as part of a Halloween collection.
This pattern combines the fun of amigurumi crochet with simple techniques that beginners and advanced crocheters alike can enjoy. By following this recipe, you can make an adorable bat with just a few basic crochet supplies, bringing a touch of whimsy and creativity into your crafting world.
Crocheting an amigurumi bat allows you to experiment with shapes, textures, and color combinations. Unlike traditional flat crochet patterns, amigurumi involves creating three-dimensional stuffed figures, which adds depth and personality to your projects.
The bat recipe provides a structured approach, making it easy to follow along while allowing room for customization in size, color, and expression.
One of the best aspects of the Amigurumi Bat Recipe is its versatility. You can use it as a standalone decoration, a keychain, a plush toy, or even as part of a larger project like a spooky garland. With a few creative touches, your handmade bat can become a centerpiece of seasonal décor or a charming gift for friends and family. Let’s explore how to create this whimsical figure, understand the essential techniques, and discover fun ways to personalize your amigurumi bat.
To make the Amigurumi Bat Recipe successfully, you’ll need just a few basic supplies. First, select your yarn. Many crafters prefer worsted-weight acrylic or cotton yarn in black, gray, or purple for a classic bat look, but you can experiment with other colors for a fun twist.
You’ll also need a crochet hook suitable for your yarn weight. A smaller hook than recommended for the yarn is often used in amigurumi to create tight stitches, ensuring the stuffing stays securely inside. In addition, gather a tapestry needle for sewing parts together, a pair of safety eyes or felt for the bat’s eyes, and polyfill stuffing to give your bat its plush form.
Optional accessories include stitch markers to keep track of your rounds, scissors, and a small piece of felt for added facial features or wing accents. Having all materials ready before starting ensures a smooth crafting experience and allows you to enjoy the process without interruptions.
The Amigurumi Bat Recipe emphasizes simple construction, so beginners can easily follow along while still achieving a professional-looking result. With just a few materials, you can create a fun, three-dimensional project that brings joy and charm to any room.
The beauty of the Amigurumi Bat Recipe is in its simplicity. You start by creating the body, which is usually made in a continuous spiral of single crochet stitches. Begin with a magic ring and gradually increase stitches to form a rounded shape. Pay attention to stitch counts, as even increases will ensure a smooth, symmetrical body.
Next, you’ll make the wings. Typically, wings are crocheted flat in rows using a combination of chain stitches, single crochets, and increases or decreases to shape them. After finishing, attach them carefully to the sides of the body using a tapestry needle. Proper placement ensures your bat looks balanced and cute.
The head and ears are formed similarly to the body but on a smaller scale. Use a magic ring to start and work in spirals to shape each piece. Once the head is complete, attach ears to the top and sew the head onto the body securely. Safety eyes or felt pieces can then be added to give the bat a friendly or spooky expression.
Stuffing is crucial in amigurumi. Use polyfill gently, making sure the bat keeps its shape without overstuffing, which could distort stitches. After assembling all parts, weave in loose ends neatly, ensuring a clean finish. Following these steps ensures your Amigurumi Bat Recipe yields a charming, well-constructed figure every time.
One of the most enjoyable parts of the Amigurumi Bat Recipe is customization. You can adjust the size, shape, and color of your bat to create unique designs. For example, smaller versions can become keychains, while larger ones make excellent plush toys.
Color choices are limitless. While black and gray are traditional, using purple, orange, or even rainbow yarns can give your bat a playful, whimsical appearance. Adding embroidery details, glittery eyes, or fabric accents can make each bat stand out as a one-of-a-kind creation.
Wing shapes can also be customized. Some crafters prefer wide, rounded wings, while others make pointy, gothic-style wings for a more dramatic effect. Experimenting with different stitch patterns within the wings can add texture and dimension to your bat.
Personal touches extend to facial expressions as well. Changing eye size, adding a tiny felt nose, or embroidering a mischievous smile gives your bat character and personality. The Amigurumi Bat Recipe is designed to be flexible, letting you express your creativity fully.
For seasonal projects, you can combine several bats in a garland or mobile, mix colors for themed decorations, or even integrate them into larger amigurumi scenes. Customization is what makes this pattern not just a craft, but an opportunity for artistic expression.
To get the best results with the Amigurumi Bat Recipe, there are several tips and tricks to keep in mind. First, always count your stitches carefully. Even a small mistake can affect the symmetry of your bat, especially in the body and wings.
Using a smaller hook than suggested on your yarn label helps create tight stitches, which prevents stuffing from showing through. This technique is standard in amigurumi and essential for a polished look.
Another important tip is to use stitch markers to keep track of rounds, especially if you’re working in continuous spirals. It’s easy to lose your place without them, and markers can save a lot of frustration.
Take your time with assembly. Pin parts before sewing to ensure proper placement, especially with wings and ears. This step allows you to adjust alignment before committing with stitches.
Finally, don’t forget to block your pieces slightly if needed. While not always necessary for amigurumi, gently shaping wings or ears can help achieve a more professional appearance. With attention to these details, your Amigurumi Bat Recipe project will look neat, polished, and absolutely adorable.
1. What yarn is best for amigurumi bats?
Medium-weight cotton or acrylic yarn is ideal. They hold shape well and are easy to work with for small details.
2. Is this pattern suitable for beginners?
Yes. It uses basic stitches like single crochet, increase, and decrease, making it beginner-friendly.
3. How do I make my bat stand or hang?
You can lightly stuff the body to maintain shape or attach a loop of yarn to hang it as decoration.
4. Can I adjust the bat’s size?
Absolutely. Using thicker yarn and a larger hook will create bigger bats, while thinner yarn and a smaller hook create mini versions.
5. How do I attach wings securely?
Pin the wings in place and sew them with tight, even stitches. A tapestry needle is best for a clean finish.
6. Can I add decorations to the bat?
Yes. Felt pieces, embroidery, safety eyes, and color variations are all great ways to personalize your bat.
The Amigurumi Bat Recipe is a fun, versatile, and beginner-friendly project that allows crafters to explore three-dimensional crochet. By following the steps, using creative color combinations, and paying attention to detail, anyone can make an adorable bat that is perfect for gifts, decorations, or seasonal projects.
This pattern encourages personalization and experimentation, ensuring that every bat is unique. Whether you are new to amigurumi or an experienced crocheter, creating these bats is a satisfying way to combine skill and creativity.
If you enjoyed this guide, leave your sincere opinion and suggestions below! Your feedback helps the crafting community grow and inspires new creative projects.


