
Crocheted house-shaped cookie for Christmas tree

Creating a crochet pumpkin keychain is a fun and creative way to celebrate the fall season. With free crochet patterns, crafters of all levels can make adorable, functional accessories that reflect the spirit of autumn and Halloween.
These mini pumpkins are not only perfect for your keys but also for backpacks, bags, or even as small decorative pieces around your home. Using a DIY pumpkin keychain allows you to combine practicality with creativity, resulting in charming handmade items.
The joy of making a crochet pumpkin keychain lies in its simplicity and versatility. Each pattern gives you the opportunity to experiment with colors, stitches, and embellishments to create unique designs.
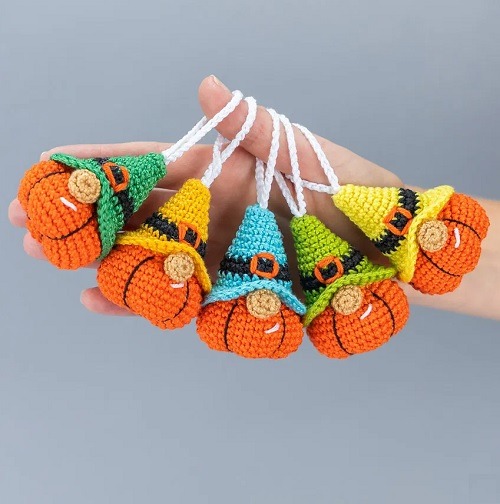
Whether you prefer classic orange pumpkins or festive variations like white, green, or pastel shades, these free crochet patterns make it easy to customize each mini pumpkin to your liking. They are also perfect for gifts or party favors during Halloween and Thanksgiving.
Another advantage of working with DIY pumpkin keychains is the opportunity to practice and improve your crochet skills. Even if you are a beginner, following free crochet patterns step-by-step ensures that your project turns out beautifully. From understanding basic stitches to mastering small embellishments like leaves or stems, making these pumpkins is a satisfying and rewarding crafting experience. Plus, they are small enough to complete in a few hours, making them ideal for quick seasonal projects.
Before starting your crochet pumpkin keychain, gathering the right materials is essential. Most free crochet patterns suggest using worsted-weight yarn for a sturdy yet soft pumpkin. Cotton yarn is ideal for durability, while acrylic yarn offers a variety of colors and ease of care. You can mix yarn types depending on your design preferences.
In addition to yarn, you will need a suitable crochet hook. The hook size recommended in the free crochet patterns ensures your stitches are tight enough to maintain the pumpkin’s shape while keeping it soft and flexible. Beginners might prefer slightly larger hooks to make handling stitches easier.
Stuffing is another crucial element. Polyester fiberfill is commonly used for DIY pumpkin keychains because it is lightweight, washable, and keeps the pumpkin plump. You can also use scrap yarn or fabric as eco-friendly alternatives. Make sure your stuffing is evenly distributed to maintain the pumpkin’s round shape.
You will also need small keychain rings or lobster clasps to turn your mini pumpkin into a functional accessory. Attach these securely to your finished pumpkin using yarn or thread. Optional materials include small beads, buttons, or embroidery floss for adding decorative details like eyes, stems, or leaves.
Scissors and a yarn needle are necessary for cutting and weaving in ends neatly. Stitch markers can also be helpful, especially when working with patterns that require counting rows or rounds. Organizing your materials before beginning makes the project smoother and more enjoyable.
Finally, color selection is important. Traditional orange pumpkins are always a hit, but experimenting with unique colors like pastel or metallic yarn can make your crochet pumpkin keychain stand out. Coordinating the color of stems and leaves adds a finishing touch that enhances your miniature accessory.
Making a crochet pumpkin keychain begins with the base, usually formed by creating a small circle or oval. This foundational step is crucial for shaping the pumpkin correctly and ensuring that it holds its form after stuffing. Following the free crochet pattern ensures that your base is perfectly proportioned.
After the base, work your way up by crocheting in rounds to build the body of the pumpkin. Most patterns involve gradual increases and decreases to achieve a plump, round shape. Consistently counting your stitches is key for a symmetrical result in your DIY pumpkin keychain.
Once the pumpkin body is complete, add the stem. Stems are usually crocheted separately and sewn on, though some patterns integrate them directly into the pumpkin body. This small addition gives your mini pumpkin its characteristic autumn look.
Adding details like leaves, vines, or small embroidered accents can enhance the charm of your crochet pumpkin keychain. Many free crochet patterns suggest using contrasting colors or simple embroidery stitches to create these embellishments, making your pumpkin look realistic and festive.
Stuff your pumpkin carefully, ensuring even distribution for a smooth, round shape. Avoid overstuffing, which can distort the stitches and make sewing on the stem or keychain hardware difficult. A well-stuffed pumpkin maintains its form and durability as a keychain.
Finally, attach your keychain ring or lobster clasp securely. Weave in all loose ends neatly, and if desired, block your pumpkin gently to even out stitches. These finishing touches ensure your DIY pumpkin keychain is not only cute but also functional and long-lasting.
One of the best parts of making a crochet pumpkin keychain is the ability to customize each pumpkin. While traditional orange pumpkins are classic, you can explore shades like white, green, or even pastel colors for a modern twist. Using multiple yarn colors within one pumpkin adds texture and interest to your miniature creation.
Size customization is also simple. You can make tiny pumpkins for delicate keychains or larger ones for bag charms or table decorations. The free crochet patterns are flexible, allowing you to adjust the number of stitches and rounds to achieve your desired size.
Adding embellishments is another way to personalize your DIY pumpkin keychain. Crochet leaves, embroidered facial expressions for a Halloween theme, or even small beads and sequins can make your pumpkin unique. These details make each pumpkin a one-of-a-kind accessory.
Experimenting with stitch patterns adds depth and texture. Using bobble stitches, puff stitches, or shell patterns can create the illusion of ridges and natural curves on your crochet pumpkin keychain, enhancing its realism and visual appeal.
You can also mix yarn textures for a unique look. Combining smooth yarn with fuzzy or metallic yarns can create interesting contrasts. This approach makes your mini pumpkin an eye-catching accessory that stands out from ordinary keychains.
Finally, consider making themed sets. Creating pumpkins of different sizes, colors, or expressions allows you to display a mini pumpkin collection or gift multiple DIY pumpkin keychains to friends and family. These thoughtful handmade items are perfect for fall parties, Halloween events, or holiday gift exchanges.
Proper care ensures that your crochet pumpkin keychain lasts through multiple seasons. Most yarn types used for these projects are washable, but using gentle cycles and mild detergent is recommended. Avoid high heat or harsh chemicals to prevent color fading or deformation.
Storage is important for maintaining the shape of your pumpkin. Keep keychains in a dry place when not in use and avoid crushing them with heavy items. Using small fabric bags or boxes can help protect your DIY pumpkin keychain from dust and damage.
Regularly check for loose stitches or decorations. Small repairs can prevent larger issues and ensure the longevity of your free crochet patterns creations. Fixing minor issues promptly keeps your pumpkin looking new and functional.
Avoid overloading your keychain with heavy items. While the mini pumpkin is sturdy, attaching too many keys or accessories may distort its shape. Balance functionality with aesthetics to keep your crochet pumpkin keychain intact.
Embellishments such as beads, buttons, or embroidered details may require extra care. Handle gently during cleaning and storage to prevent them from detaching or fading. These details enhance the charm of your DIY pumpkin keychain but should be protected properly.
Finally, enjoy displaying or gifting your pumpkins. Sharing your handmade crochet pumpkin keychains with friends, family, or colleagues spreads holiday cheer and inspires others to explore the fun of seasonal crafting. Their charm and versatility make them beloved mini accessories for fall.
Q1: Are these crochet pumpkin keychains suitable for beginners?
A1: Yes! Most free crochet patterns provide step-by-step instructions and use basic stitches, making them beginner-friendly. Starting with smaller pumpkins is recommended for beginners.
Q2: What type of yarn should I use?
A2: Cotton or acrylic yarn is ideal. Cotton provides durability, while acrylic offers a variety of vibrant colors. Both options work well for making a DIY pumpkin keychain.
Q3: How long does it take to make one pumpkin?
A3: Depending on skill level, it typically takes 1–3 hours. Beginners may take longer, but the small size of these pumpkins makes them a quick project.
Q4: Can I customize the colors and sizes?
A4: Absolutely! You can adjust yarn colors, stitches, and rounds to create unique pumpkins. Customization allows for endless creativity with your crochet pumpkin keychain.
Q5: Are these keychains washable?
A5: Yes. Most yarn types used are machine washable on gentle cycles. Always check the yarn label and handle with care to maintain shape and color.
Q6: Can these pumpkins be gifted?
A6: Definitely! Handmade DIY pumpkin keychains make thoughtful, seasonal gifts. Personalizing colors and details adds a special touch.
Creating crochet pumpkin keychains using free crochet patterns is a fun, creative, and practical way to celebrate fall and Halloween. By following step-by-step instructions, choosing the right materials, and adding personal touches, you can make charming accessories that are both functional and festive. These mini pumpkins are perfect for gifting, decorating, or simply enjoying as a small seasonal craft.
We hope this guide has inspired you to try your own DIY pumpkin keychains. Share your honest feedback and any suggestions to help us continue providing high-quality, practical, and festive free crochet patterns for all crafters.


