
Crocheted house-shaped cookie for Christmas tree

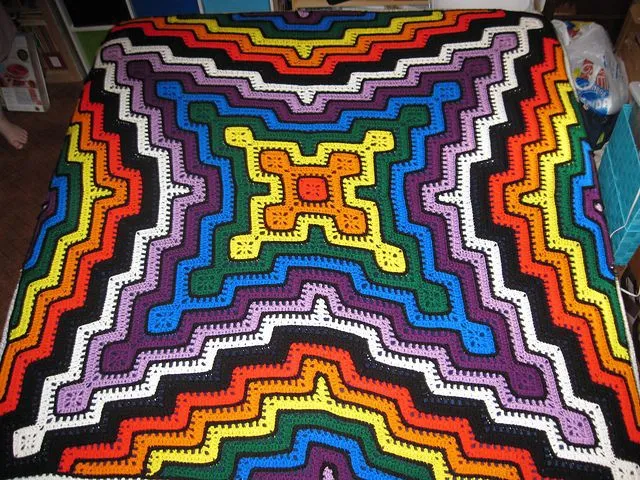
Creating a Pronged Square and Ripple Blanket is a rewarding project for crochet enthusiasts of all skill levels. This blanket combines the classic charm of square motifs with the elegant flow of ripple stitches, producing a cozy, visually stunning result.
Whether you are making a blanket for a newborn, a gift, or simply to decorate your home, this pattern offers both functionality and beauty.
Learning how to craft this type of blanket not only improves your crochet skills but also allows you to experiment with colors, textures, and stitch combinations.
The Pronged Square and Ripple Blanket is perfect for beginners and experienced crafters alike. Its design is versatile, making it suitable for various occasions, from baby showers to home décor.
By following this free pattern and PDF tutorial, you can create a blanket that looks professional without needing years of experience. This project emphasizes consistency and patience, but the end result is incredibly satisfying. Additionally, the blanket’s structure ensures it remains durable and cozy, ideal for everyday use.
One of the key benefits of creating a Pronged Square and Ripple Blanket is the ability to personalize it. You can choose your favorite yarn colors, experiment with different stitch patterns, and even adjust the size to fit a crib, sofa, or lap. The combination of pronged squares and ripple stitches adds depth and texture, giving the blanket a unique character that standard blankets often lack. Plus, working with these techniques allows crafters to improve their skills in creating modular motifs and joining them seamlessly.
The foundation of the Pronged Square and Ripple Blanket lies in the pronged square motif. This motif is essentially a square made up of multiple prongs or loops, which create a delicate, lacy effect. Learning to crochet pronged squares is essential because these squares form the building blocks of the entire blanket. Each square can be made in different colors, allowing you to create vibrant patterns or subtle gradients depending on your preference.
Pronged squares are not only beautiful but also practical. Their structure allows for easy joining, ensuring your blanket remains sturdy and maintains its shape. Crocheters often experiment with different yarn weights and hook sizes to achieve various textures. A lighter yarn creates a soft, airy blanket, while thicker yarns produce a warmer, more substantial result.
Working with pronged squares helps improve precision in crochet. Each stitch and loop must be carefully crafted to ensure that the square remains even and symmetrical. Over time, mastering these squares enhances your overall crochet technique, making more complex projects easier to tackle.
Pronged squares also allow for modularity. This means you can make squares in advance and assemble them at your own pace. This flexibility makes the Pronged Square and Ripple Blanket ideal for busy crafters who prefer working on projects in stages.
Another advantage of pronged squares is their adaptability. You can combine them with various stitch patterns, including ripple or shell stitches, to create a blanket that is uniquely yours. The squares can be positioned to create geometric patterns, adding an artistic element to the finished piece.
Finally, the beauty of pronged squares lies in their versatility. Whether you choose bold, contrasting colors or subtle, monochromatic tones, these squares provide endless design possibilities, making your blanket a true reflection of your personal style.
The ripple stitch is a cornerstone technique in the Pronged Square and Ripple Blanket. It produces a wave-like pattern that adds movement and visual interest to your work. Ripple stitches are versatile and can be adapted for various projects, from baby blankets to scarves and throws. Mastering this stitch is essential for achieving the signature undulating effect that makes this blanket so appealing.
Ripple stitches involve increasing and decreasing stitches at regular intervals to create peaks and valleys. The pattern can be adjusted to be wide or narrow, depending on your desired effect. Crocheters often enjoy experimenting with different color sequences, creating stunning striped designs that highlight the ripple pattern.
Consistency is key when working with ripple stitches. Each row must be carefully counted to ensure that the peaks and valleys align properly. Using stitch markers can help maintain accuracy, especially for larger blankets. Once you get the hang of the rhythm, the ripple stitch becomes a relaxing and almost meditative process.
Another benefit of the ripple stitch is its adaptability. It works well with various yarn textures, allowing you to create both lightweight summer blankets and warm winter throws. Combining the ripple stitch with pronged squares adds an extra layer of complexity, producing a blanket that is both elegant and functional.
Crocheters often choose the ripple stitch for its aesthetic appeal. The flowing waves create a sense of movement, breaking the monotony of straight rows and adding a dynamic touch to your blanket. By varying colors and stitch heights, you can achieve a rich, textured effect that enhances the overall design.
Finally, the ripple stitch contributes to the blanket’s durability. The interlocking peaks and valleys create a sturdy structure that resists stretching and sagging over time. This makes the Pronged Square and Ripple Blanket not only beautiful but also practical for long-term use.
Selecting the right yarn and crochet tools is crucial for a successful Pronged Square and Ripple Blanket. Yarn type affects the blanket’s softness, warmth, and drape. Cotton and acrylic blends are popular for baby blankets due to their softness and easy care, while wool adds extra warmth for colder climates. Choosing the right weight of yarn is also important; medium-weight yarn is ideal for achieving a balanced texture without making the blanket too heavy.
The crochet hook size should complement your yarn choice. A hook that is too small can make the blanket stiff, while a hook that is too large can result in loose stitches. Check the yarn label for recommended hook sizes, and consider making a small swatch to test tension before starting your project.
Color selection is another important consideration. Coordinating colors between pronged squares and ripple sections enhances the blanket’s visual appeal. You can choose a monochromatic palette for a classic look or mix bright, contrasting colors for a playful, modern style.
Texture plays a key role in the final outcome. Smooth yarns highlight the stitch patterns clearly, while textured or variegated yarns create a more rustic, dynamic effect. Combining different textures can give your blanket a rich, multi-dimensional appearance.
In addition, consider the blanket’s intended use. Baby blankets should be soft and hypoallergenic, while throws for living spaces can experiment with more robust textures. This ensures that the Pronged Square and Ripple Blanket is not only beautiful but also practical for its purpose.
Finally, ensure you have all necessary tools on hand, including stitch markers, scissors, and a tapestry needle for weaving in ends. Proper preparation makes the crochet process smoother and more enjoyable, allowing you to focus on creating a stunning blanket.
Once your pronged squares and ripple panels are complete, it’s time to assemble your Pronged Square and Ripple Blanket. Begin by arranging the squares and ripples in a layout that pleases you. Experiment with color placement and pattern alignment before joining pieces to avoid surprises.
Joining methods vary. Some crafters prefer slip-stitch joins, while others use whipstitch or single crochet for a sturdier finish. Choose a method that complements your design and ensures the blanket remains durable.
Seam alignment is critical. Take your time to match corners and edges accurately, ensuring a professional-looking result. Pinning pieces together before stitching can help maintain alignment and prevent stretching.
Adding a border around the blanket gives a polished finish. Simple single crochet or scalloped edges can enhance the overall design, while a wider border can provide extra warmth and structure. Select a border that harmonizes with the blanket’s style and color scheme.
Weaving in ends is the final step. Tidy ends contribute to the blanket’s neat appearance and prevent unraveling. Use a tapestry needle to securely hide all yarn tails within the stitches.
Once assembled, gently block your blanket if needed. Blocking helps even out stitches, especially for ripple sections, and gives the blanket a flat, professional look. Your Pronged Square and Ripple Blanket is now ready to be used or gifted.
Q: Is the Pronged Square and Ripple Blanket suitable for beginners?
A: Yes, the blanket is beginner-friendly if you take your time with pronged squares and practice the ripple stitch. The PDF tutorial provides step-by-step guidance.
Q: Can I adjust the size of the blanket?
A: Absolutely. You can add or remove squares and ripple rows to customize the blanket’s dimensions.
Q: What type of yarn is best?
A: Soft acrylic, cotton, or blends are ideal for baby blankets, while wool can be used for warmer throws.
Q: How do I join the squares and ripples together?
A: You can use slip-stitch, single crochet, or whipstitch techniques, depending on your desired finish and durability.
Q: Can I use multiple colors?
A: Yes. Combining colors adds visual interest and allows for creative designs.
Q: How do I care for the finished blanket?
A: Follow the yarn manufacturer’s washing instructions. Generally, acrylic and cotton blends are machine washable, while wool may require hand washing.
Creating a Pronged Square and Ripple Blanket is an enjoyable and fulfilling project. This article covered the essentials, including understanding pronged squares, mastering the ripple stitch, selecting the right yarn and tools, and assembling the blanket. By following the free pattern and PDF tutorial, you can craft a personalized, durable, and beautiful blanket suitable for any occasion.
We encourage you to share your experiences, opinions, and any creative variations you tried. Your feedback and suggestions help other crafters and make the crochet community even more vibrant.


