
Crocheted house-shaped cookie for Christmas tree

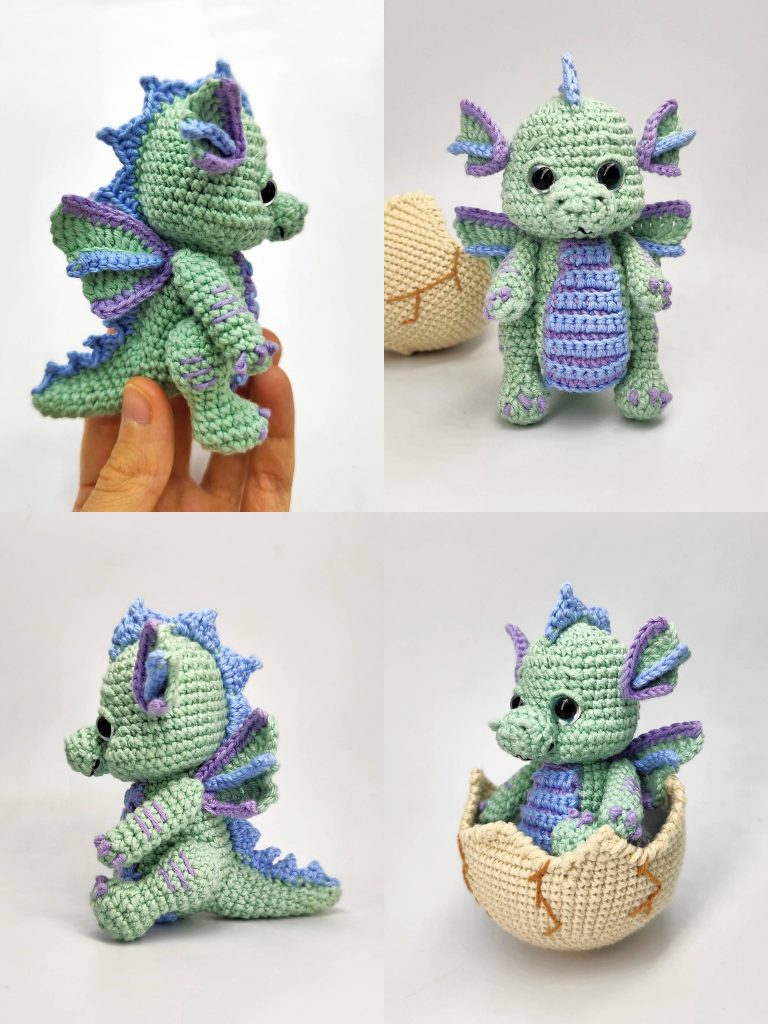
Creating a Water Dragon Crochet is a fun and rewarding project for both beginner and experienced crocheters. A Water Dragon Crochet – Pattern allows you to combine creativity with technique, producing a stunning and unique amigurumi or decorative piece.
Whether you’re looking to craft a gift, a collectible, or simply expand your crochet skills, this guide will give you all the tools you need. Following this article, you’ll understand key stitches, materials, and tips to bring your crochet water dragon to life.
Crocheting a Water Dragon is more than just following a pattern; it’s an opportunity to explore textures, colors, and shapes. With a detailed water dragon crochet pattern, you can create scales, fins, and tails that reflect the beauty and mystique of mythical water dragons.
Using a free crochet pattern ensures that you have a step-by-step guide to achieve professional-looking results. By taking the time to master each part of the dragon, your DIY crochet water dragon will be both durable and visually impressive.
A Water Dragon Crochet – Pattern project also allows you to experiment with different yarns, hooks, and stitches. Soft acrylic yarn works well for beginners because it’s easy to handle and forgiving with mistakes. For more advanced projects, blends like wool or cotton add texture and longevity. Regardless of the yarn, following the pattern ensures your dragon’s proportions are accurate and that the final piece is both charming and functional.
Before starting your Water Dragon Crochet – Pattern, gathering the right materials is essential. The primary items you’ll need are yarn, crochet hooks, stuffing, stitch markers, and a yarn needle. Choosing high-quality yarn ensures that your dragon will maintain shape and color over time.
Different yarn weights will give your water dragon different looks. For small dragons, lightweight yarns like sport or DK work well, while medium worsted-weight yarn gives a sturdier, larger dragon. Consider colors that reflect water themes: shades of blue, teal, silver, or white.
The crochet hook size must match your yarn weight and tension preferences. A smaller hook creates tight stitches, which are perfect for stuffed amigurumi because they prevent the stuffing from showing. Following the recommended hook in your water dragon crochet pattern ensures consistent size and stitch density.
Stuffing is another critical material. Use polyester fiberfill for a soft but firm body. Even distribution is important; too little stuffing makes the dragon floppy, while too much can distort the shape. Your DIY crochet water dragon will look more professional with careful stuffing.
Stitch markers help track rounds and pattern repeats, which is especially useful in complex water dragon crochet patterns. They ensure symmetry and keep track of increases and decreases.
Lastly, a yarn needle is necessary for sewing parts together and weaving in ends. It helps you attach limbs, tail, and decorative fins neatly, giving your crochet water dragon a polished, finished look.
The foundation of a successful water dragon crochet is mastering basic and intermediate stitches. Common stitches in the pattern include single crochet (sc), double crochet (dc), half-double crochet (hdc), and slip stitches (sl st). Each stitch creates texture and stability, essential for both body and limbs.
Ribbing or post stitches can simulate scales or fins, giving your water dragon a more realistic and detailed appearance. Understanding these stitches allows you to follow the pattern without confusion and achieve a professional result.
Increases and decreases shape the body, limbs, tail, and head. Accurate counting of stitches is vital to maintain symmetry. The water dragon crochet pattern often includes instructions for strategically placed increases to form a rounded body and tapered tail.
Decorative techniques like bobble or popcorn stitches can add a 3D effect for scales. Using these stitches sparingly enhances realism without overwhelming the design. Practicing these on a small swatch before adding them to the dragon is recommended.
Joining rounds smoothly is crucial for a neat finish. Most crochet water dragon patterns are worked in continuous rounds to avoid visible seams, so understanding invisible joins or spiral techniques is beneficial.
Finishing touches like sewing limbs and fins and adding safety eyes or embroidered details complete your DIY crochet water dragon. These final steps make a big difference in the dragon’s overall appearance and charm.
Start your Water Dragon Crochet by creating a magic ring or adjustable loop for the head. This technique helps form a tight, round shape without gaps, which is essential for stuffed amigurumi.
Follow the pattern carefully, increasing stitches for shaping the head and body. Keeping consistent tension ensures that your dragon is symmetrical and proportional. Beginners may find it helpful to mark the beginning of rounds with a stitch marker.
For the limbs, tail, and fins, work in smaller pieces and attach them later. The water dragon crochet pattern usually provides precise stitch counts and shaping instructions to ensure everything fits perfectly.
Scales, spikes, or fins can be added as decorative elements. These can be made using bobble stitches, shell stitches, or small crochet motifs. Carefully attach them using a yarn needle for a secure and clean look.
Stuff each section evenly as you go. Consistent stuffing helps maintain shape and prevents lumpy areas. This attention to detail ensures your DIY crochet water dragon looks professional and polished.
Finally, weave in all ends and make any final adjustments to positioning. Step back and check symmetry, fin placement, and proportions. Your crochet water dragon is now ready to display or gift!
Patience is key. A water dragon crochet project may take several hours or days depending on complexity. Working in small, manageable sessions helps maintain consistency and reduces hand fatigue.
Follow the pattern closely. Skipping steps or miscounting can lead to misaligned limbs or uneven shapes. Accurate stitch counting is essential for a balanced dragon.
Experiment with textures. Using different stitches for scales, fins, and tail adds depth and realism to your DIY crochet water dragon.
Choosing the right colors enhances the water theme. Blues, greens, silver, and white can evoke flowing water or mystical qualities. Consider gradient yarns for a magical effect.
Use stitch markers generously. They keep track of rounds, increases, and pattern repeats, making complex sections easier to manage in your water dragon crochet pattern.
Finally, customize! Your dragon can have unique colors, patterns, or accessories like wings or horns. Personalizing your DIY crochet water dragon ensures that each piece is one-of-a-kind.
Q1: Can beginners make a water dragon crochet?
A: Yes! Starting with basic stitches and a clear pattern makes it accessible. Decorative elements can be added as skills improve.
Q2: What yarn is best for a crochet water dragon?
A: Soft acrylic or cotton blends are ideal. Acrylic is beginner-friendly, while cotton gives more structure and durability.
Q3: How long does it take to complete one dragon?
A: Depending on complexity, a DIY crochet water dragon may take 5–10 hours or more. Advanced patterns with scales and spikes take longer.
Q4: Can I use the water dragon pattern to make multiple dragons?
A: Absolutely! The free pattern can be repeated for gifts, decorations, or sales.
Q5: How do I attach limbs and fins neatly?
A: Use a yarn needle and follow the stitch placement in the pattern. Secure all parts with tight stitching for durability.
Q6: Can I sell the finished crochet water dragon?
A: Yes, as long as you are not selling copyrighted patterns without permission. Original creations are perfectly fine for sale.
Creating a Water Dragon Crochet is a rewarding journey that combines skill, creativity, and patience. By following a detailed water dragon crochet pattern, understanding essential stitches, and customizing colors and textures, you can craft a unique and enchanting piece. From gathering materials to finishing touches, every step contributes to a polished and charming dragon.
We hope this guide inspires your next crochet adventure. Please leave your honest feedback, share suggestions, and showcase your unique variations. Your experiences and creativity help the crafting community grow and inspire others to try their own DIY crochet water dragons.


