
Crocheted house-shaped cookie for Christmas tree

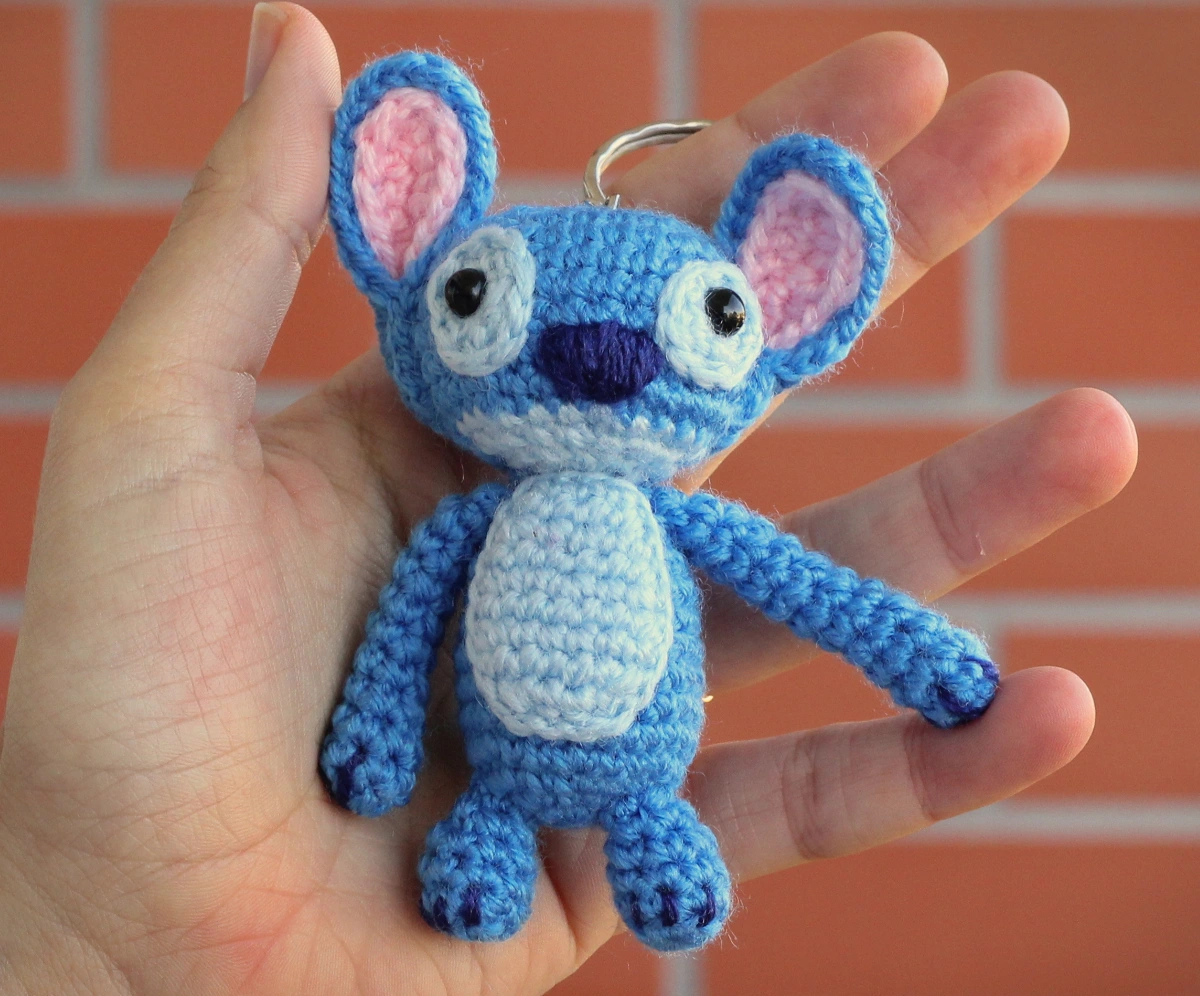
The Stitch Keychain Amigurumi Pattern is a delightful and creative crochet project perfect for fans of Disney’s mischievous alien character, Stitch.
This pattern allows crafters to create a miniature, portable version of Stitch that can be used as a keychain, bag charm, or small collectible. The charm of this amigurumi lies in its cute proportions, vibrant colors, and expressive features that capture Stitch’s iconic personality.
Whether you’re a crochet beginner or an experienced amigurumi maker, this pattern offers a fun and rewarding experience that combines artistry, patience, and skill.
Creating your own Stitch Keychain Amigurumi Pattern can also be an excellent way to personalize your accessories or craft heartfelt gifts for friends and family.
Handmade items like these stand out because they carry the warmth and care of their creator. Additionally, making miniature amigurumi pieces is a great way to use up leftover yarn from other projects while honing your crochet techniques. With the right materials and a bit of practice, you can create a Stitch keychain that looks adorable and durable enough for everyday use.
As you follow the Stitch Keychain Amigurumi Pattern, you’ll notice how the process involves detailed stitching, shaping, and assembling to give life to Stitch’s recognizable features—his big ears, round eyes, and playful smile. The beauty of amigurumi is that it allows crafters to express creativity through texture, color, and small custom touches. In this guide, we’ll explore materials, steps, tips for perfecting your stitches, and creative variations you can try to make your own Stitch-inspired keychain truly unique.
When preparing to start your Stitch Keychain Amigurumi Pattern, having the right materials is essential. Gathering everything beforehand will help you enjoy a smoother, uninterrupted crafting experience. You don’t need expensive tools—just some basic supplies and a bit of patience to bring your Stitch to life.
Start with yarn in the right shades of blue, light blue, and pink for Stitch’s body, belly, and ears. Choose a lightweight cotton or acrylic yarn suitable for small projects to ensure a neat and compact finish. You’ll also need a crochet hook that matches your yarn size, typically 2.0mm to 2.5mm for tight, firm stitches.
In addition to yarn and hook, you’ll need fiberfill stuffing to shape your amigurumi. Stuffing helps maintain structure and gives your Stitch a plush, soft texture. Keep a pair of sharp scissors, a yarn needle, and some stitch markers handy for seamless assembly.
A keychain ring or small lobster clasp is another key item, allowing you to turn your tiny Stitch into a practical and portable accessory. These rings can be attached using a small yarn loop or metal connector.
Finally, for facial details, you can use safety eyes or black embroidery thread to stitch the eyes and mouth. Safety eyes offer a polished finish, while embroidery gives you flexibility for expression. Some crafters even use felt pieces to create Stitch’s large, charming eyes.
Make sure to organize all these materials in one workspace so you can fully focus on crafting your amigurumi without interruptions.
The heart of the Stitch Keychain Amigurumi Pattern lies in following each crochet step carefully. While it may seem detailed, breaking it into smaller parts makes it very manageable—even for beginners. Let’s go through the process.
Begin by crocheting the head, which forms the main part of your Stitch. Use blue yarn and work in a magic ring, increasing stitches gradually to form a round shape. Once you reach the desired size, decrease stitches symmetrically to close the top, leaving an opening for stuffing.
Next, move on to the ears—a signature feature of Stitch! Crochet two long, slightly curved ear shapes using blue yarn for the outer part and pink yarn for the inner. Attach them symmetrically to the top sides of the head using a yarn needle. Make sure the ears are evenly shaped and slightly bent outward for a realistic touch.
For the body, crochet a smaller oval shape using the same blue yarn. Add a lighter blue patch to represent Stitch’s belly, sewing it securely in place. Stuff the body lightly to give it volume before attaching it to the head.
The arms and legs are small and simple tubes or spheres that you can crochet separately and sew onto the body. They don’t need to be perfectly identical—minor variations give your amigurumi personality.
Once the main parts are complete, assemble your Stitch by sewing all pieces together carefully. Use a fine needle and matching yarn to ensure invisible joins.
Finally, attach your keychain ring securely to the top of the head, and you’ll have a perfect mini Stitch ready to hang anywhere!
Making the perfect Stitch Keychain Amigurumi Pattern requires patience, precision, and a few insider tips to get professional-looking results.
Always maintain consistent tension while crocheting. Uneven tension can cause bumps or gaps in the fabric. Tight, uniform stitches are key for a polished amigurumi.
If you’re a beginner, use stitch markers to mark the beginning of each round. This prevents confusion when counting stitches and ensures that your shape develops evenly.
Pay attention to proportions—since this is a small keychain, minor differences in size can affect balance. Keep the head slightly larger than the body to capture Stitch’s cute, cartoon-like proportions.
For a soft yet firm feel, don’t overstuff your amigurumi. Add stuffing gradually and press gently to shape it evenly. Too much filling may stretch the stitches or distort the shape.
When adding the facial details, take your time. The eyes, nose, and mouth define Stitch’s personality, so position them carefully before sewing or gluing. You can even look at reference images from the original character to match the expression you like best.
Lastly, to make your keychain more durable, use a metal ring with a secure clasp, and reinforce the area where it’s attached with a few extra stitches.
The fun doesn’t stop with the original Stitch Keychain Amigurumi Pattern. Once you’ve mastered the basics, you can experiment with different styles and themes.
Try creating mini Stitch variations by adjusting yarn weight or hook size. Using thinner yarn makes a tiny, delicate version, while thicker yarn produces a plushier version that’s still portable.
You can also experiment with different expressions—make Stitch smiling, winking, or surprised by adjusting the placement of eyes and mouth. These tiny changes make each keychain unique.
Another creative twist is adding accessories. Crochet a little flower crown, sunglasses, or even a mini scarf to personalize your Stitch. These details make your amigurumi a true conversation piece.
For those who love color, try making a “Rainbow Stitch” by alternating yarn colors in bright shades. While it won’t be traditional, it adds a whimsical and artistic flair to your keychain.
You can also adapt this pattern into other uses, like bag charms, zipper pulls, or ornaments. With a small adjustment to the hanging loop, your mini Stitch can decorate bags, backpacks, or even Christmas trees.
Lastly, if you’re creating amigurumi for gifts or small businesses, consider packaging your Stitch in a clear box or a handmade pouch—it adds value and charm for your customers or recipients.
Q1: Is the Stitch Keychain Amigurumi Pattern suitable for beginners?
Yes, this pattern is beginner-friendly. With basic stitches like single crochet, increase, and decrease, even new crocheters can follow along easily.
Q2: What kind of yarn should I use?
Use lightweight cotton or acrylic yarn to achieve a smooth texture and vibrant color. These yarns hold shape well and are easy to work with.
Q3: How long does it take to finish one Stitch keychain?
Depending on skill level, it usually takes about 2–4 hours to complete one, including assembly and detailing.
Q4: Can I sell the finished Stitch keychains?
Yes, handmade items can be sold, but ensure you’re not infringing on trademarked designs if marketing under the Stitch name. You can describe it as a “blue alien-inspired amigurumi keychain.”
Q5: What if I don’t have safety eyes?
You can replace them with black yarn embroidery or small felt circles for a soft, handmade look.
Q6: How do I clean my Stitch keychain?
Spot clean gently with a damp cloth. Avoid soaking, as water may deform the stuffing or loosen stitches.
The Stitch Keychain Amigurumi Pattern offers a perfect blend of fun, creativity, and practicality for crochet enthusiasts. From choosing colors to assembling each tiny part, every step allows you to personalize and express your style. Whether you make it for yourself or as a thoughtful handmade gift, this mini Stitch adds a touch of joy wherever it goes. Try different variations, practice your technique, and enjoy the process of creating something truly special.
We hope this guide inspired you to craft your own adorable Stitch keychain! If you enjoyed this article, please leave your honest opinion and share suggestions for future crochet projects you’d love to see. Your feedback helps our community grow and keeps creativity alive!


