
Crocheted house-shaped cookie for Christmas tree

If you have ever dreamed of creating a realistic cat amigurumi that looks almost alive, this free pattern is exactly what you need.
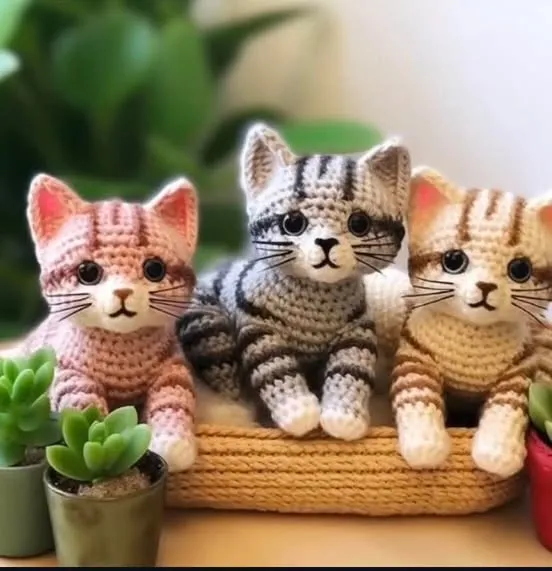
The Realistic Cat Amigurumi Free Pattern allows you to crochet a detailed and lifelike feline that captures the charm, grace, and personality of a real cat.
Whether you are an experienced crocheter or just learning, this tutorial will guide you through every step with clear instructions and helpful tips to make your crochet cat come to life. This project is not only relaxing but also rewarding, making it an excellent gift or home decoration piece for cat lovers.
Making a realistic amigurumi cat takes patience and creativity, but the result is worth every stitch. The pattern focuses on shaping the body, adding details like paws, ears, and expressive eyes that give your creation that true feline appearance.
Using soft yarns and subtle color transitions, you can achieve a natural fur effect that enhances the realism. Even if you are a beginner, you will find the process enjoyable and satisfying once you see your little crocheted cat take form.
This Realistic Cat Amigurumi Free Pattern includes step-by-step instructions for assembling the head, body, and tail, as well as attaching safety eyes and embroidering features to make your cat’s face look expressive and alive. The tutorial also covers how to shape the limbs and stuff the amigurumi to keep it firm and balanced. By following the techniques described, you’ll learn how to create a realistic texture that closely resembles a cat’s fur. Once finished, you’ll have a handmade keepsake that captures the spirit of a real kitten in yarn form.
Before starting the Realistic Cat Amigurumi Free Pattern, it’s important to gather all the right materials. Choosing the correct yarn, hook, and stuffing can make a huge difference in the final appearance of your crocheted cat.
First, select a soft acrylic or cotton blend yarn in shades that resemble a cat’s natural fur—such as gray, beige, white, or black. Variegated yarns work wonderfully to mimic fur patterns. A 2.5mm or 3mm crochet hook is ideal for maintaining tight stitches that prevent stuffing from showing through.
Next, you’ll need polyester fiberfill for stuffing, safety eyes, and a small amount of pink or black yarn for the nose and mouth embroidery. For advanced detail, you can use fine yarn or thread to add whiskers. A tapestry needle will help you sew parts together neatly.
Having stitch markers and scissors on hand will also keep your project organized. Good lighting and a comfortable workspace make crocheting easier, especially when working on small and detailed pieces.
If you wish to make your realistic cat amigurumi poseable, you can insert lightweight wire inside the legs and tail before closing them. This step is optional but adds more realism and flexibility to your final piece. Always remember to secure wire ends safely to prevent them from poking through the yarn.
Once you have all materials ready, it’s time to start crocheting. Keeping your tension consistent is key to creating an evenly shaped body. Using a yarn brush can help fluff the surface after finishing, giving your cat a soft fur-like texture.
Lastly, remember that creativity has no limits in amigurumi. You can mix yarn textures, adjust proportions, or even design your own color patterns inspired by real cat breeds like Siamese, Maine Coon, or Tuxedo cats.
To begin your Realistic Cat Amigurumi Free Pattern, start with the head. Create a magic ring and work in continuous rounds to form a sphere shape. Gradually increase and then decrease stitches to shape the cheeks and forehead. Insert safety eyes before closing the head, placing them symmetrically for balance. Use embroidery thread to add a small nose and mouth.
Next, move on to the body. This section is worked from the bottom up using tight single crochet stitches. The realistic cat amigurumi should have a slightly elongated body to mimic the natural feline form. As you progress, stuff the body firmly but evenly to prevent lumps.
Then, crochet the legs and tail separately. The legs should be slightly bent, as cats rarely sit with perfectly straight limbs. When sewing them to the body, position them carefully to ensure the cat can sit or stand on its own. The tail can be straight or curled depending on the desired pose.
Once all body parts are complete, attach them using a tapestry needle and matching yarn color. Make sure the stitches are secure but invisible. Lightly brush the yarn surface with a soft toothbrush to create a fluffy, fur-like finish.
For the final touch, you can shade parts of the cat’s body using pastel chalk or fabric paint to give depth and highlight areas like the ears, cheeks, and paws. This subtle coloring makes your realistic cat amigurumi look even more lifelike.
Take your time assembling and refining every detail—small adjustments can transform a simple crochet toy into a beautiful, realistic work of art.
One of the most exciting parts of working with a Realistic Cat Amigurumi Free Pattern is customizing it to resemble your favorite cat. You can easily adapt the pattern to match different breeds, fur colors, or even facial expressions. For example, if you own a tabby cat, you can use alternating stripes of gray and beige yarn to recreate that distinct pattern.
If you prefer a more whimsical touch, experiment with unique color palettes such as pastel or fantasy tones. Adding accessories like a tiny collar, bow, or even a miniature toy mouse enhances your cat’s personality. You can also crochet a small blanket or pillow for your cat to rest on as a decorative touch.
Adjusting the yarn type can also change the texture and look of the final piece. For instance, fluffy yarns can make your realistic cat amigurumi appear softer and fuzzier, while smooth yarns create a clean, sleek look. Blending both textures can help you achieve the illusion of real fur.
Changing the size is simple—use thicker yarn and a larger hook for a bigger cat or thinner yarn and a smaller hook for a miniature version. Just remember that the stuffing and proportions should scale accordingly to maintain balance.
You can even personalize your creation by adding embroidered details like eyebrows, blush on the cheeks, or unique eye patterns to express emotion. Every small detail makes your handmade cat more expressive and special.
In the end, the best part about customizing is seeing how your creativity brings a unique personality to your crocheted feline friend.
To make your Realistic Cat Amigurumi look truly professional, there are a few techniques that experienced crafters use to elevate their work. First, ensure your stitches are uniform and consistent—uneven tension can distort the shape. Always count your stitches carefully when increasing or decreasing to maintain symmetry.
When stuffing, fill the head and body firmly but not too tightly to avoid stretching the stitches. Shape the amigurumi as you go, using your fingers to smooth out bumps and adjust the form.
Blocking can also help refine the overall structure. Lightly mist the finished piece with water and let it dry in the desired position. This process helps set the shape and keeps your realistic cat amigurumi looking polished.
If you want your cat to sit or stand independently, position the limbs precisely during assembly. Use pins to test placement before sewing them permanently. It’s also a good idea to reinforce joints with a few extra stitches for durability.
For added realism, gently brush the completed amigurumi using a fine pet brush to separate yarn fibers and create a furry appearance. You can even trim stray fibers with scissors for a clean finish.
Finally, display your masterpiece proudly or gift it to a fellow cat lover. A Realistic Cat Amigurumi is more than just a crochet project—it’s a heartfelt handmade creation that captures the essence of one of the world’s most beloved animals.
1. Is this pattern suitable for beginners?
Yes, the Realistic Cat Amigurumi Free Pattern is beginner-friendly, though it requires patience and attention to detail. Step-by-step instructions make it easy to follow even for new crocheters.
2. How long does it take to make the realistic cat amigurumi?
Depending on skill level, it can take between 8 to 12 hours to complete. More time may be needed for detailing and assembly.
3. Can I use different yarn types?
Absolutely! Cotton, acrylic, or fluffy yarns all work well. Choose based on the texture and appearance you want your cat to have.
4. How can I make my amigurumi cat more realistic?
Add subtle color shading, brush the yarn for a fur effect, and carefully position the eyes and ears. These small touches make a big difference.
5. Is the pattern available in different sizes?
Yes. You can scale the Realistic Cat Amigurumi Free Pattern up or down simply by changing your hook size and yarn thickness.
Creating a Realistic Cat Amigurumi is a rewarding and enjoyable experience for any crochet enthusiast. This free pattern provides everything you need to craft a lifelike feline companion, from material selection to finishing touches. With patience, creativity, and attention to detail, your crocheted cat can look astonishingly real and full of personality.
Now that you’ve learned how to make your own realistic amigurumi cat, give it a try and share your results! Leave your honest opinion and suggestions below to inspire others and help improve future patterns. Happy crocheting! 🧶🐾


