
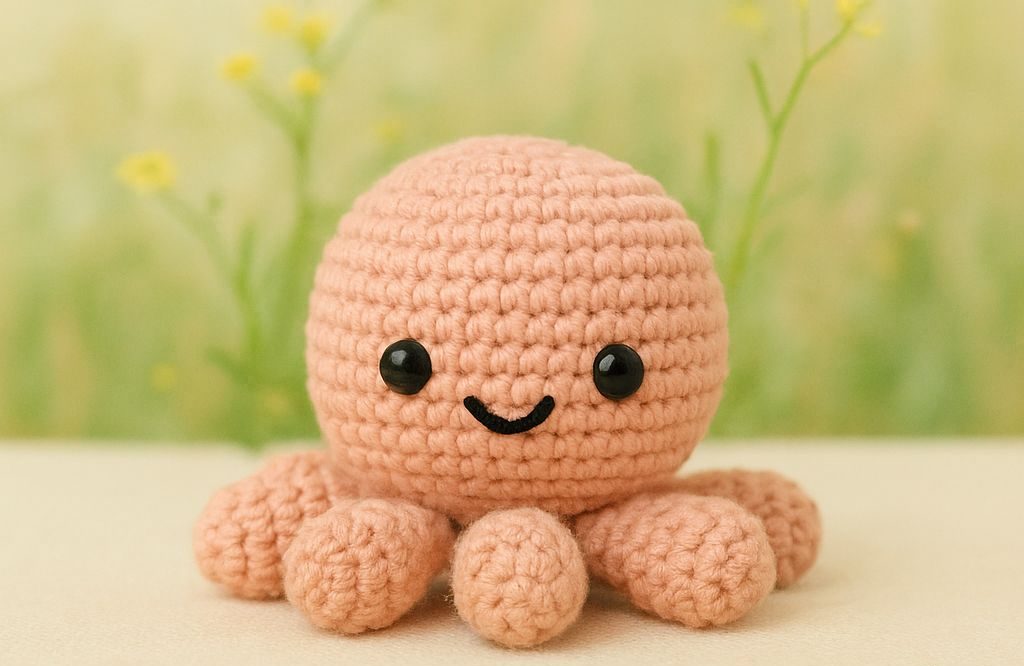
If you love crocheting cute and comforting handmade toys, then you’ll absolutely adore this Friendly Octopus Crochet Pattern – Step by Step Tutorial.
Whether you’re an experienced crocheter or just starting out, this adorable ocean friend is a fun and relaxing project to make. With soft yarn, easy stitches, and a joyful personality, the friendly octopus is perfect as a baby gift, a decorative piece, or a comforting plushie for anyone who needs a smile.
The friendly octopus crochet pattern has gained popularity among craft lovers for its simplicity and charm. It’s beginner-friendly yet creative enough to satisfy advanced crocheters who enjoy adding a personal touch.
Plus, it’s a great way to use leftover yarn while creating something beautiful and meaningful. In this article, you’ll learn each step clearly, from choosing the right yarn to stitching the final tentacle.
What makes this project even more exciting is how customizable it is. You can use bright colors for a playful toy, soft pastel tones for a baby gift, or natural shades for a sea-inspired decoration. This step by step crochet tutorial will guide you through everything, ensuring that even if you’ve never crocheted an octopus before, you’ll end up with a result you’ll be proud of. Let’s dive right in and start creating your own ocean friend!
Choosing the Right Materials for Your Friendly Octopus
Before starting your friendly octopus crochet pattern, it’s essential to gather the right materials. The quality and texture of your materials can make a big difference in the final result, giving your creation the right balance of softness and durability.
Begin with yarn selection. The best choice for this project is a soft, medium-weight cotton or acrylic yarn. Cotton yarn provides a smooth and clean finish, while acrylic yarn offers more flexibility and vibrant color options. Choose two or more colors if you want to add personality to your octopus.
Next, choose the right crochet hook size. Generally, a 3.5 mm to 4.0 mm hook works well for medium-weight yarn. The tighter your stitches, the firmer your octopus will be, which is ideal for a stuffed toy. If you prefer a softer, cuddly texture, use a slightly larger hook for looser stitches.
Don’t forget about stuffing. You’ll need polyester fiberfill or any soft stuffing material that’s washable and safe, especially if the toy is meant for babies. Proper stuffing ensures your octopus keeps its shape and remains plush for a long time.
You’ll also need safety eyes or black embroidery thread to create your octopus’s friendly face. Safety eyes give a polished, professional look, but embroidered eyes are a great choice for younger children to avoid small detachable parts.
Lastly, have a yarn needle, scissors, and stitch markers ready. These simple tools make the process smoother and more organized, especially when working on multiple tentacles and rounds. Preparing your materials properly ensures a stress-free crafting experience and a delightful final product.
Step-by-Step Guide to Crocheting the Octopus Body
Now that you have everything ready, let’s start crafting the body of your friendly octopus. The process is simple once you understand the rhythm of crochet stitches and increases.
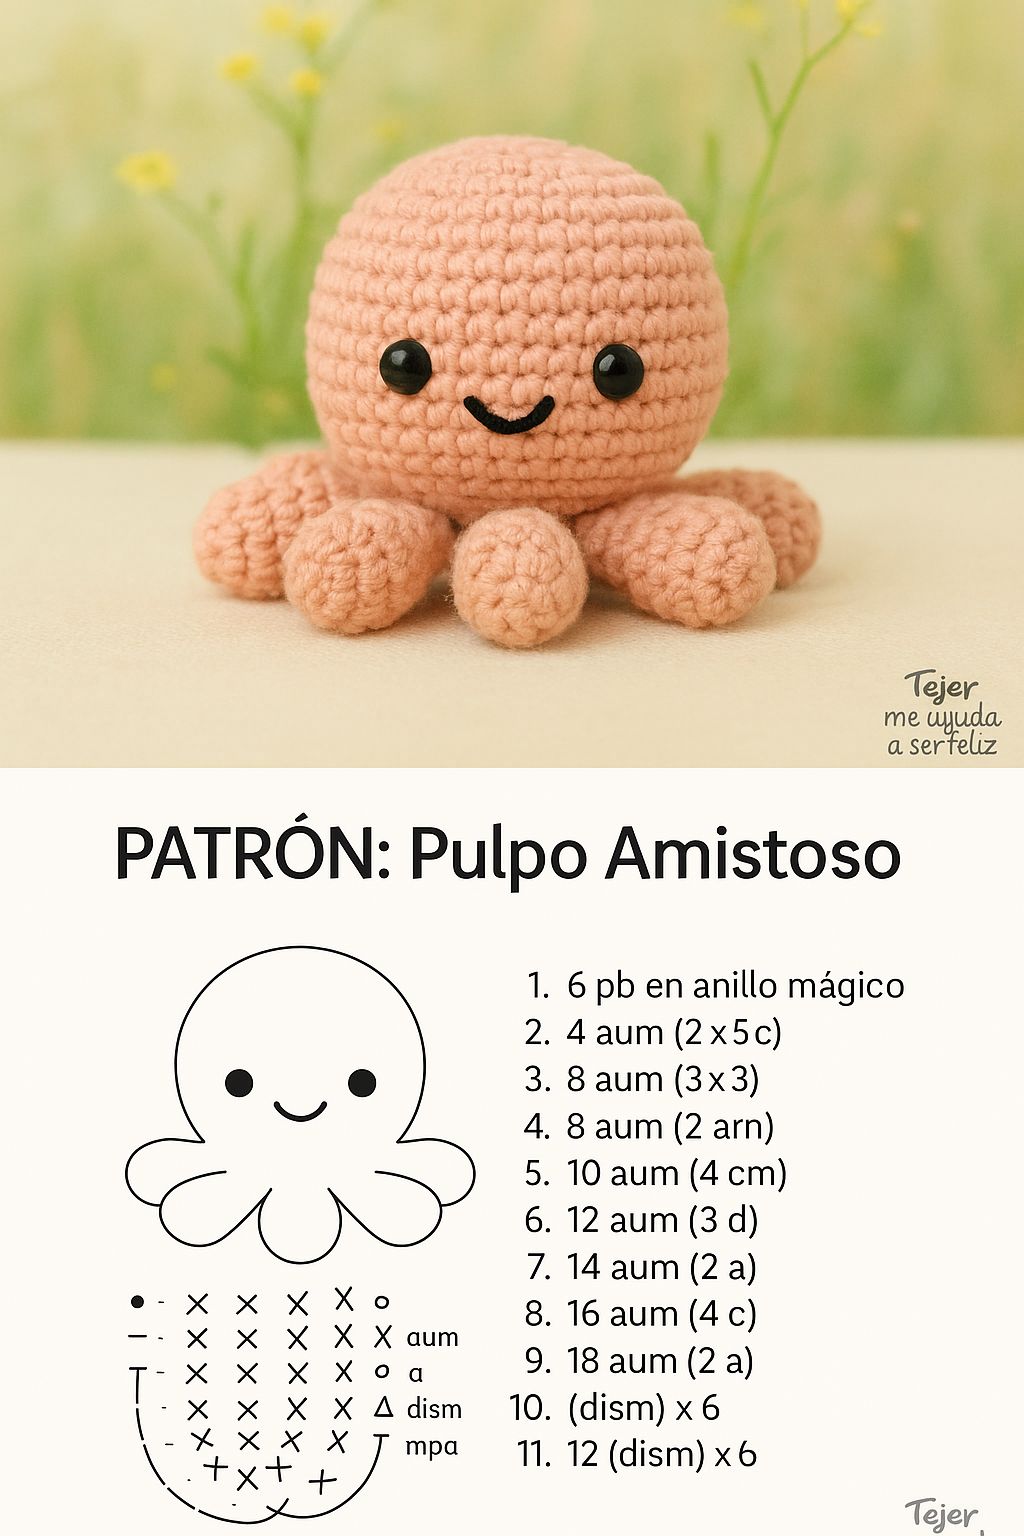
Begin with a magic ring — this is the foundation for most amigurumi projects. Work six single crochet (sc) stitches into the ring. This creates a small, neat circle that will form the top of your octopus’s head. Pull the ring tight to close it completely.
The next step involves increasing stitches in each round to make the head wider. For round two, make two single crochets in each stitch around, ending with twelve stitches. Continue increasing gradually — one extra stitch every other round — until the shape starts to resemble a dome.
Once you reach your desired head size, usually around 36–48 stitches per round, it’s time to stop increasing and maintain the same stitch count for several rounds. This creates the smooth cylindrical body shape that gives your octopus its adorable form.
Before closing the bottom, insert your stuffing carefully. Add a small amount at a time, pressing gently to avoid lumps. Make sure the stuffing fills the head evenly, maintaining a soft yet firm shape.
To finish the body, start decreasing in each round by skipping stitches or crocheting two together. Keep tightening until only a small hole remains, then sew it closed neatly with your yarn needle. The result should be a smooth, rounded head — the base for your friendly underwater companion.
Crocheting the Tentacles – The Fun Part
The most delightful feature of any friendly octopus crochet pattern is its curly, wavy tentacles. They bring life and charm to your creation, making it instantly lovable.
To start, attach your yarn to the base of the octopus body. For each tentacle, chain about 35 to 45 stitches depending on how long you want it to be. The longer the chain, the more dramatic the curl will appear.
In the second chain from your hook, make two single crochets in each stitch all the way back. This simple increase automatically creates a spiral effect, forming the signature tentacle curl.
Once you reach the base, fasten off the yarn and weave in the ends neatly. Repeat this process seven more times to create eight beautiful tentacles — each with its own playful personality.
If you’re feeling creative, you can make the tentacles in different colors or even alternate shades in a gradient pattern. This gives your octopus a unique and eye-catching appearance.
Remember, consistency is key. Try to keep each tentacle’s curl and thickness uniform for a balanced final look. After attaching all tentacles evenly around the base, your friendly octopus will finally start taking shape.
Finishing Touches and Personalization
Once all the tentacles are attached, it’s time to add character and charm. The finishing touches turn your friendly octopus crochet pattern from a simple toy into a delightful keepsake.
First, focus on the face. Place the safety eyes evenly across the upper front of the head, leaving a small gap between them for a cheerful expression. If you’re embroidering eyes, use black yarn and make two small ovals or X shapes for a cute look. Add a simple curved stitch between the eyes for a smiling mouth.
For added detail, consider using blush or pink yarn to embroider tiny cheeks. It’s a small touch that makes your octopus even more expressive.
You can also personalize your creation by adding accessories. A small bow, a mini hat, or even a tiny crocheted heart can make your octopus truly one of a kind.
Another great idea is to experiment with different yarn textures. Velvet or chenille yarn gives a luxurious, soft finish perfect for baby toys, while classic cotton adds structure for decorative pieces.
Finally, inspect your work. Make sure all loose ends are woven securely, and the stuffing is evenly distributed. When everything looks perfect, give your octopus a gentle fluff — and admire your new adorable ocean friend!
FAQ – Friendly Octopus Crochet Pattern
1. Is the friendly octopus crochet pattern suitable for beginners?
Yes! This pattern uses basic stitches such as single crochet and increases, making it perfect for beginners. The step-by-step tutorial ensures you can follow along easily.
2. How long does it take to complete the octopus?
Depending on your crochet speed, it typically takes between 3 to 5 hours to finish one octopus, including assembly and stuffing.
3. Can I wash the finished crochet octopus?
Absolutely. If you use washable yarn and polyester stuffing, your octopus can be machine washed on a gentle cycle or hand-washed in warm water.
4. What size will my octopus be?
With standard medium-weight yarn and a 3.5 mm hook, your octopus should measure around 6–8 inches tall. You can adjust the size by changing the yarn thickness or hook size.
5. Can I sell the octopus I make using this pattern?
Yes, you can sell finished items handmade by you, but it’s recommended to give credit to the pattern source or creator when sharing online.
6. What colors work best for this crochet octopus?
Soft pastels, ocean blues, lavender, and mint green are popular choices, but feel free to experiment with bright or contrasting colors for a fun, modern twist.
Conclusion
Creating a Friendly Octopus Crochet Pattern – Step by Step Tutorial project is not only a relaxing experience but also a rewarding one. You’ve learned how to choose materials, crochet the body, shape the tentacles, and personalize your creation with expressive details. The process combines creativity and craftsmanship, resulting in a unique handmade toy full of charm and warmth.
Crocheting allows you to express yourself while bringing joy to others — and this friendly octopus is a perfect example of that magic. Whether it becomes a baby’s companion, a decorative piece, or a gift from the heart, it will surely be cherished.
If you enjoyed this tutorial, leave your honest opinion and suggestions below. Your feedback helps make future crochet guides even better and keeps this creative community growing strong. Happy crocheting!