
Crocheted house-shaped cookie for Christmas tree

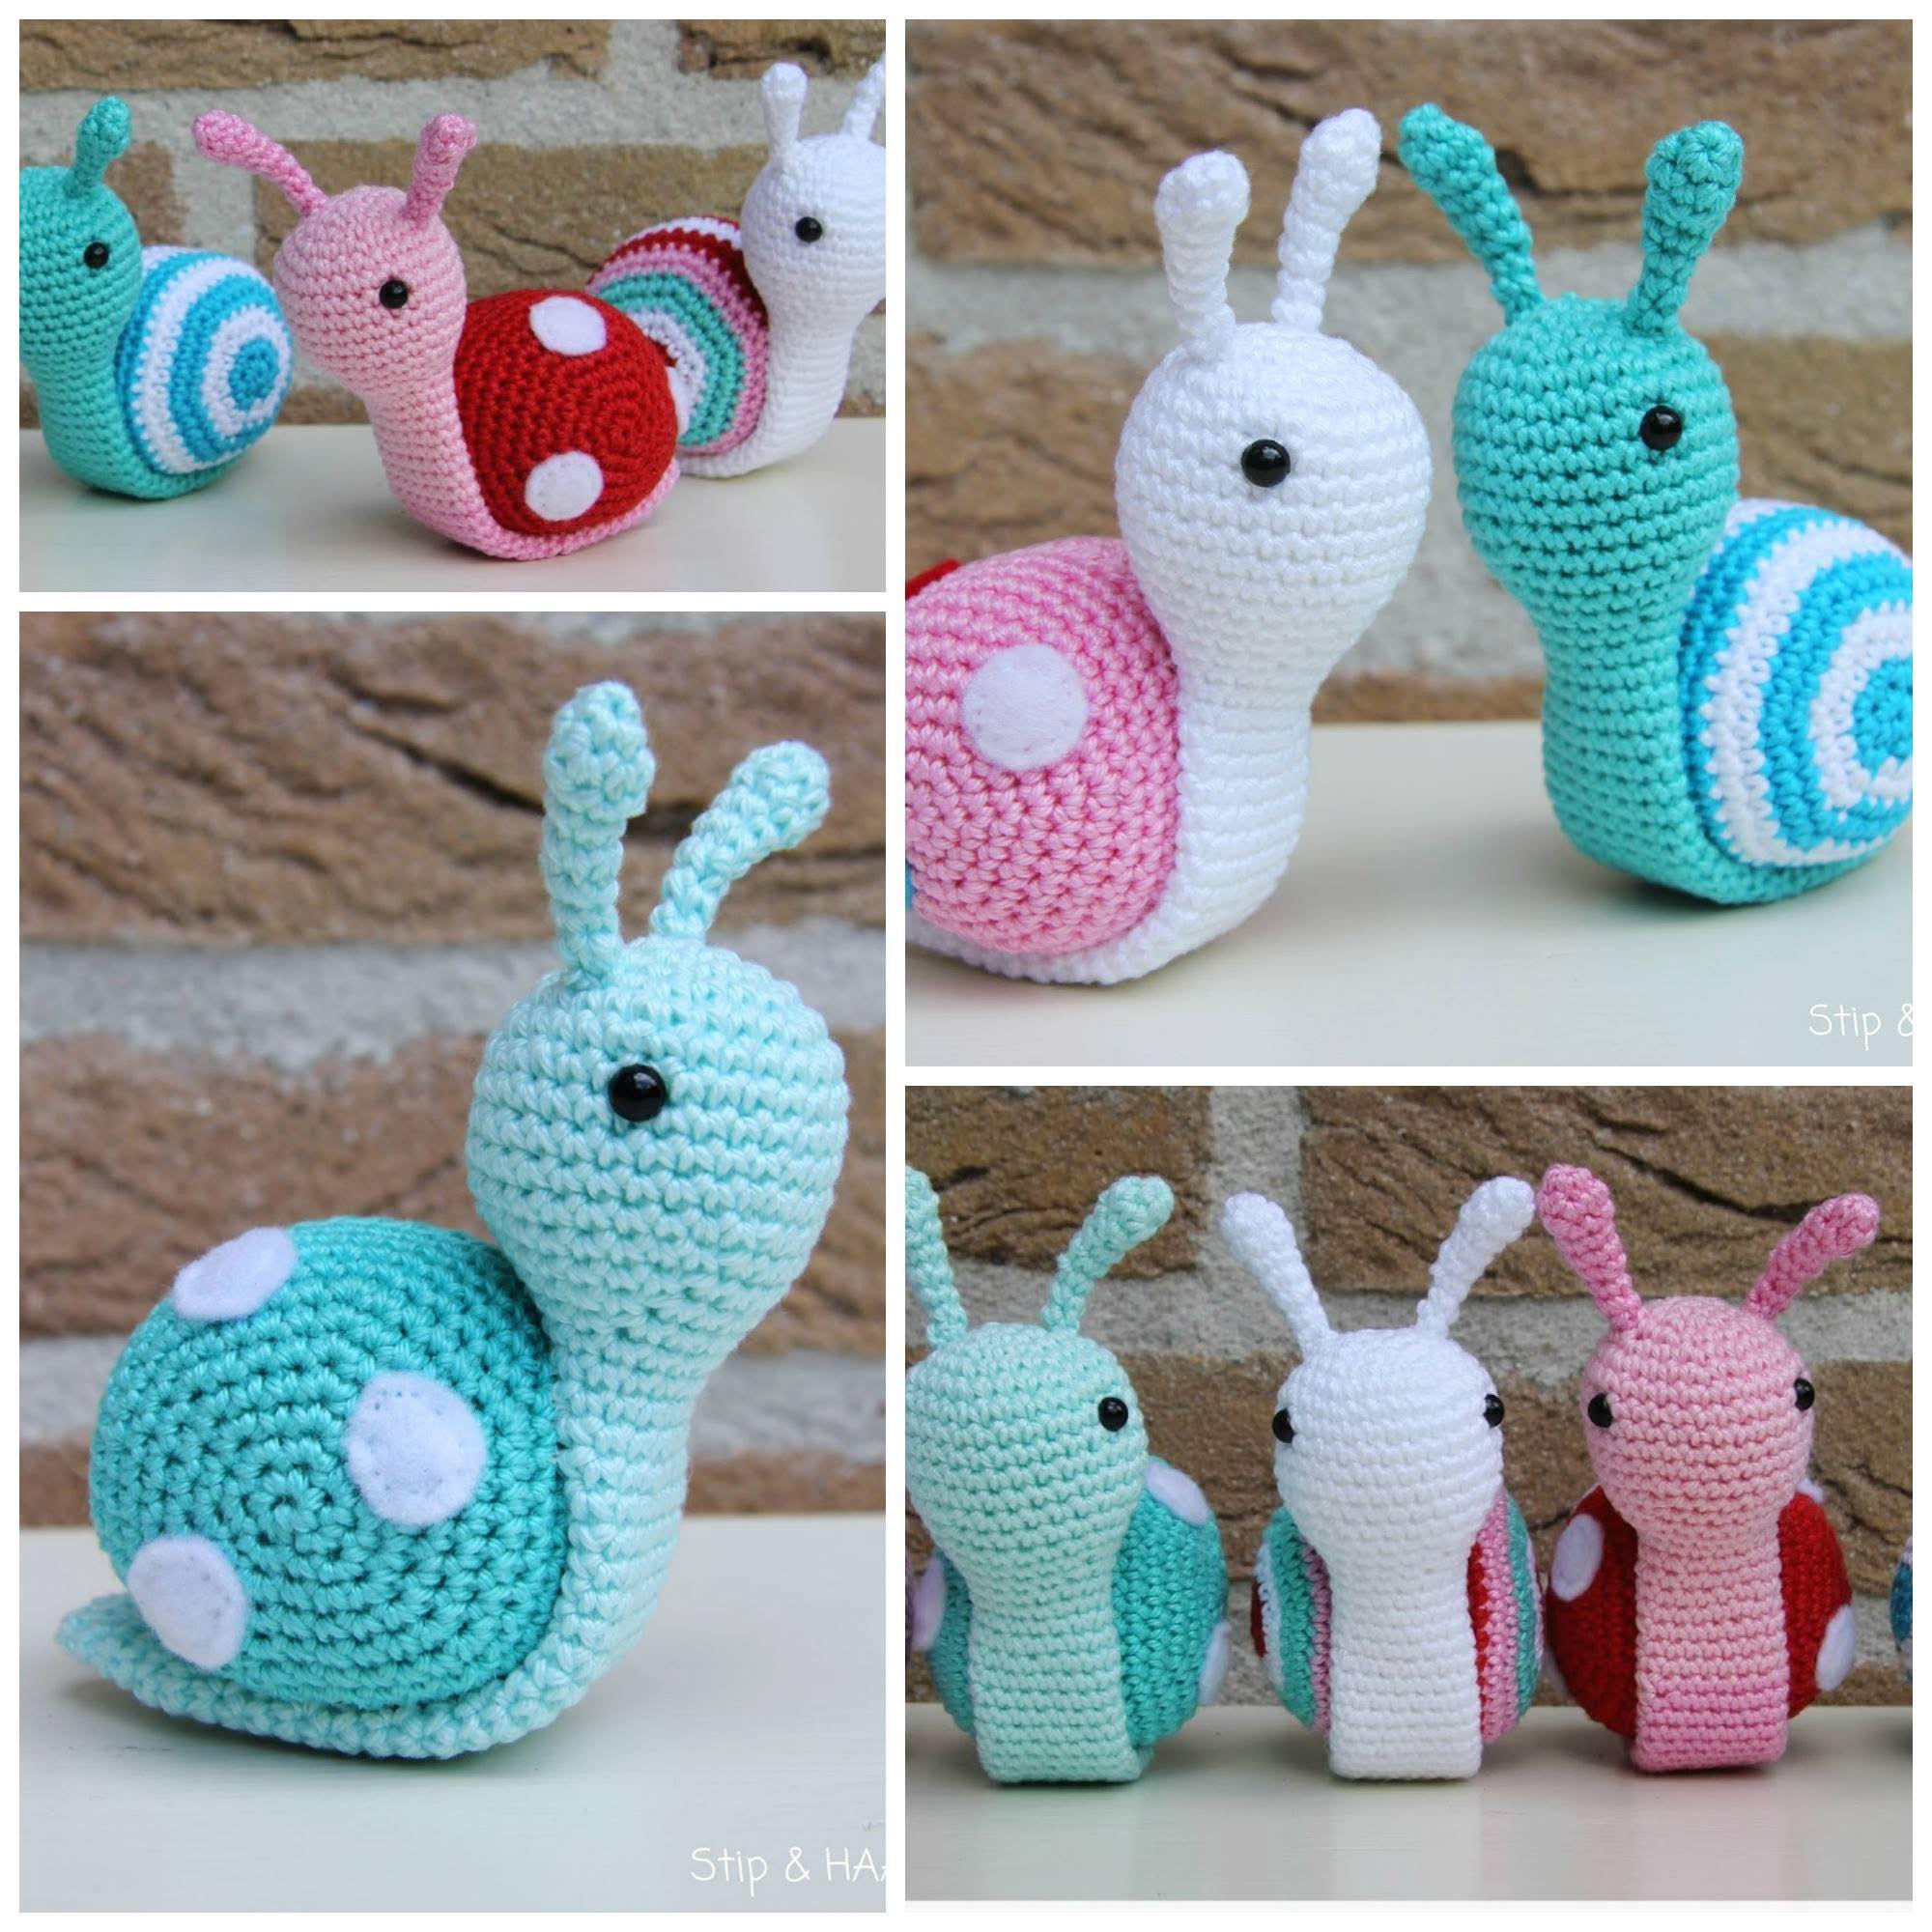
Learning how to crochet a stuffed snail – free pattern is a delightful way to bring charm and creativity into your crafting projects. This project is perfect for those who love amigurumi and want to create a cute, handmade gift idea.
Unlike more complicated patterns, this easy crochet project is suitable for beginners, providing clear instructions and step-by-step guidance. From the cozy body of the snail to the adorable spiral shell, every detail allows crafters to practice important skills while producing something whimsical and functional.
Creating a crochet stuffed snail combines creativity with relaxation. Following this free crochet pattern, you will explore basic stitches like single crochet, increases, and decreases, while learning how to shape a three-dimensional object.
Beginners will appreciate the simplicity of the steps, while experienced crafters can enjoy adding personal touches or experimenting with yarn colors. The process is satisfying and rewarding, as you watch a small ball of yarn transform into a playful, decorative piece.
Another great aspect of the crochet stuffed snail project is its versatility. You can make it as a toy for children, a decorative item for your home, or even as part of a handmade gift idea for friends and family. The compact size and lightweight nature of the finished snail make it easy to display or carry. With the right yarn and a little attention to detail, this beginner crochet tutorial will help you create a charming and lasting amigurumi piece.
Before starting your crochet stuffed snail, gather all necessary materials. The main component is worsted-weight cotton or acrylic yarn, typically in two colors: one for the snail’s body and another for the shell. Bright, vibrant colors help bring the snail to life, while neutral shades offer a more natural appearance.
A suitable crochet hook, usually sized 3.5mm to 4mm, is essential to achieve the proper tension. Using a hook that matches your yarn ensures uniform stitches, which is particularly important in shaping the snail’s body and shell. Maintaining consistent tension is one of the most critical aspects of producing a polished finished product.
Other tools include a yarn needle for sewing pieces together, scissors for cutting yarn, and stitch markers to keep track of rounds. Beginners may also benefit from a small measuring tape to ensure accurate sizing. Preparing all materials beforehand makes the process smoother and more enjoyable, allowing you to focus entirely on crafting your amigurumi snail.
Stuffing material, such as polyester fiberfill, is needed to give your snail its plush shape. Proper stuffing ensures the snail maintains its form while remaining soft and cuddly. Be careful not to overstuff, as this can distort the shape of your crochet stuffed snail.
Optional decorative elements, such as small beads for eyes or embroidery thread for detailing, can add personality to your snail. These little touches allow for creative expression and make your project more unique.
Finally, an organized workspace with good lighting will make following the free crochet pattern easier. Comfortable seating and a tidy surface reduce distractions and make it simpler to focus on intricate details, improving the overall crafting experience.
Start by crocheting the snail’s body using your chosen color. Typically, the body begins with a magic ring, followed by single crochet stitches worked in the round. Gradually increase stitches to form the rounded head and taper into the tail. Practicing consistent stitch tension is key to a smooth, symmetrical shape.
Once the body is complete, switch to the second color to create the shell. The spiral shell is formed by crocheting in continuous rounds, increasing at regular intervals to achieve the desired width. Beginners may find it helpful to mark the start of each round with a stitch marker to maintain proper alignment.
Stuff the body and shell lightly with fiberfill as you progress. Adding stuffing gradually ensures that the snail maintains a firm but soft structure. Avoid overstuffing, as it may make sewing the shell to the body more difficult.
After the body and shell are complete, sew the shell securely onto the back of the snail using a yarn needle. Ensure it is centered and evenly attached for a balanced appearance. This step allows for customization in placement and orientation, giving your crochet stuffed snail a polished look.
Create facial features such as eyes and antennae next. Small beads, safety eyes, or embroidery thread can be used for the eyes, while thin yarn can form cute antennae. These details bring the snail to life and allow for personalization.
Finally, review your work and make adjustments as needed. Tidy up loose ends, smooth the shape, and ensure all stitches are secure. A little attention to finishing touches makes a significant difference in the overall quality of your easy crochet project.
Maintaining consistent stitch tension is crucial when crocheting a stuffed snail. Uneven stitches can distort the shape of both the body and shell, so practice on small swatches if needed.
Choosing high-quality yarn enhances durability and visual appeal. Soft cotton or acrylic yarn works best for plush amigurumi, ensuring your crochet stuffed snail feels smooth and cuddly.
Use stitch markers to track rounds and increases. This small tool prevents mistakes, especially when working in continuous rounds for the shell. Accurate tracking leads to uniform shapes and a professional-looking finish.
Gradually add stuffing to avoid overfilling. Proper stuffing ensures the snail maintains a soft, rounded form while keeping it lightweight and flexible.
Experiment with color combinations for a unique look. While classic brown or green bodies with red or yellow shells are popular, combining unexpected colors can produce a fun and whimsical snail.
Enjoy the process! Crocheting a free crochet pattern like this is as much about creativity and relaxation as it is about the final product. Patience, attention to detail, and personal touches will result in a charming, polished amigurumi snail.
A common mistake is inconsistent stitch tension, which can make the snail lopsided. Practice and patience will help maintain uniform stitches for a balanced crochet stuffed snail.
Overstuffing the body or shell can distort shapes. Add fiberfill gradually and adjust as needed to maintain smooth curves and a natural form.
Incorrect placement of the shell is another frequent issue. Use pins or temporary stitches to position the shell before sewing it permanently to the body.
Skipping stitch markers can cause misaligned rounds, particularly in the spiral shell. Marking the beginning of each round ensures consistent increases and proper shaping.
Neglecting to secure loose ends can lead to unraveling. Always weave in yarn ends carefully to maintain the integrity of your easy crochet project.
Finally, rushing through the project can result in errors and frustration. Take your time to enjoy each step, and your finished snail will be both beautiful and durable.
Q1: Is this pattern suitable for beginners?
Yes! The how to crochet a stuffed snail – free pattern is designed for beginners, with simple stitches and clear instructions.
Q2: What type of yarn is recommended?
Worsted-weight cotton or acrylic yarn is ideal for softness, durability, and vibrant colors.
Q3: How long does it take to complete?
Depending on experience, this easy crochet project can be completed in a few hours or over a weekend.
Q4: Can I customize the snail colors?
Absolutely! Experimenting with colors allows for a personalized amigurumi snail.
Q5: Are safety eyes necessary?
No, you can use beads or embroidery thread to create eyes safely, especially for children.
Q6: How do I keep the shell evenly shaped?
Use stitch markers to track rounds and maintain consistent increases for a symmetrical spiral shell.
In conclusion, crocheting a stuffed snail is a fun and rewarding project that combines creativity with skill-building. From crafting the body to assembling the spiral shell and adding facial details, this free crochet pattern allows both beginners and experienced crafters to create a charming amigurumi snail. By practicing consistent stitch tension, experimenting with colors, and paying attention to finishing touches, you can craft a polished and delightful handmade gift idea.
We would love to hear your thoughts! Share your honest opinions, tips, or creative variations of this project. Your feedback helps inspire the crafting community and encourages more creative projects like this adorable easy crochet project.


