
Crocheted house-shaped cookie for Christmas tree

If you are looking for an Eeyore Amigurumi – Free Pattern, you have come to the perfect place. This comprehensive step-by-step guide will teach you how to crochet your own adorable Eeyore, inspired by the beloved character from Winnie the Pooh.
Whether you’re an experienced crocheter or a beginner eager to try something new, this pattern is designed to be clear, simple, and fun to follow.
Creating an Eeyore Amigurumi – Free Pattern allows you to combine creativity and craftsmanship, resulting in a handmade keepsake full of personality and charm.
Crocheting an Eeyore Amigurumi – Free Pattern is not only a creative outlet but also a relaxing activity that can reduce stress and improve focus.
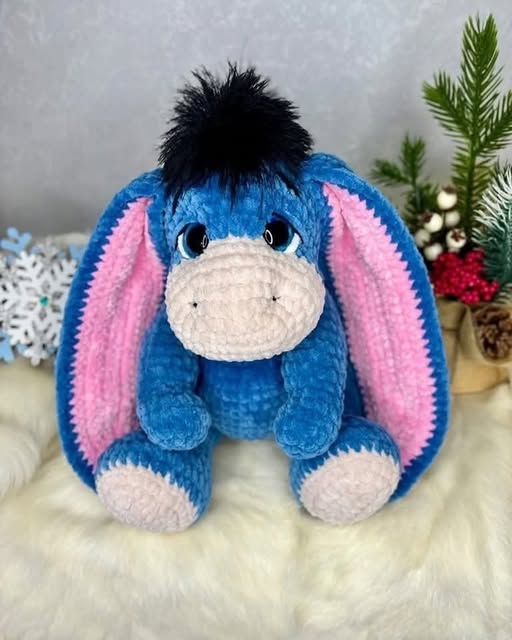
Amigurumi, the Japanese art of crocheting small stuffed toys, has become incredibly popular worldwide. Eeyore, with his droopy eyes and lovable expression, is a favorite among crafters. With this Eeyore Amigurumi – Free Pattern, you’ll learn to create your own soft, huggable version of this iconic character step by step.
What makes this Eeyore Amigurumi – Free Pattern special is its accessibility. You don’t need to be an expert to complete it. The instructions are straightforward, and you’ll only need basic materials like yarn, a crochet hook, stuffing, and a few accessories. The end result is a beautifully detailed toy that captures Eeyore’s gentle, melancholic charm. Let’s explore everything you need to make this heartwarming project.
Before starting your Eeyore Amigurumi – Free Pattern, it’s important to gather all the materials you’ll need. First, you will require yarn in several colors: light gray or blue-gray for the body, pink for the inner ears and bow, and black for the mane and tail. Using a soft, medium-weight yarn helps your amigurumi hold its shape while remaining cuddly.
You’ll also need a crochet hook that matches your yarn weight—usually a size 2.5 mm to 3.5 mm works perfectly for amigurumi. Having the right hook size ensures that your stitches are tight enough to prevent stuffing from showing through.
Other essential tools include polyester fiberfill stuffing, scissors, stitch markers, and a tapestry needle. Stuffing adds shape and structure, while stitch markers help you track your rounds as you crochet. The tapestry needle is used to sew the parts together neatly at the end.
For the eyes, you can use safety eyes to give your Eeyore a lifelike expression. If you’re making this for a child, you can also embroider the eyes using black yarn for safety.
Optional accessories like a pink ribbon for the tail bow and a bit of black felt for Eeyore’s mane add authenticity to the character’s look. These small details truly bring the Eeyore Amigurumi – Free Pattern to life.
Before beginning, ensure your workspace is comfortable and well-lit. Having all tools ready and organized will make the crocheting process smoother and more enjoyable.
To begin your Eeyore Amigurumi – Free Pattern, start with the head. Using gray or blue-gray yarn, make a magic ring and crochet six single crochets (sc) into the loop. Gradually increase your rounds until you reach the desired head size. The increases form a smooth, rounded shape perfect for Eeyore’s face.
Next, continue crocheting several rounds without increases to create depth. This will form the snout area where Eeyore’s nose will go. Then, begin decreasing to close the head’s back side. Stuff lightly before finishing the final round to maintain the perfect shape.
For the body, use the same color yarn. Start again with a magic ring and build it up through rounds of single crochet increases. Once you reach mid-body height, stop increasing and crochet several even rounds before decreasing toward the bottom. Stuff firmly before sealing to give your Eeyore Amigurumi – Free Pattern a solid, plush feel.
The ears are long and slightly floppy, giving Eeyore his recognizable expression. Crochet two identical pieces in gray, then add a pink inner layer for contrast. Sew the layers together and attach them symmetrically to the head.
The legs and arms are made separately and later sewn to the body. Keep them slightly stubby to maintain the cute amigurumi proportions. Use black yarn at the ends to mimic Eeyore’s hooves.
Finally, create the tail. Crochet a short tube, attach a small tuft of black yarn to the end for the hair, and finish it off with a pink bow. Once assembled, your Eeyore Amigurumi – Free Pattern will look irresistibly adorable!
Assembling your Eeyore Amigurumi – Free Pattern is a crucial step that brings all your hard work together. Start by sewing the head securely onto the body, ensuring it sits upright. Use small, even stitches to make the connection seamless and sturdy.
Next, attach the arms to the upper sides of the body and the legs to the lower section. Position them symmetrically so Eeyore can sit properly. Using pins before sewing can help you check alignment before finalizing.
Attach the ears carefully to each side of the head, slightly drooping downward for Eeyore’s signature sad look. Make sure both ears are even in length and position.
For the mane, cut several strands of black yarn, about 5–6 cm long each. Fold them in half and attach them along the center of the head and upper neck area using a latch-hook method or by sewing them in. Trim evenly for a tidy finish.
Finally, sew the tail at the back, ensuring the bow faces upward. If you used felt for the mane or embroidered details, attach those now. Take a moment to shape and adjust your amigurumi before setting it aside to admire your work.
The Eeyore Amigurumi – Free Pattern is now complete! What makes it special is that each handmade version carries a touch of its maker’s personality. No two Eeyores are exactly alike—and that’s the beauty of handmade art.
When following the Eeyore Amigurumi – Free Pattern, consistency is key. Try to maintain even tension throughout your stitches for a smooth and polished result. Using a smaller hook size than recommended can help tighten stitches and prevent gaps.
If you want a smaller or larger Eeyore, simply adjust your yarn thickness and hook size. Thinner yarn and a smaller hook create a miniature version, while thicker yarn yields a larger plushie.
For personalization, consider adding small accessories. You could give Eeyore a tiny scarf, a flower, or even a miniature honey pot to hold. This adds a unique touch to your Eeyore Amigurumi – Free Pattern creation.
Experimenting with different facial expressions is another fun idea. You can make your Eeyore look sleepy, cheerful, or extra sad depending on how you place the eyes and mouth embroidery.
If you’re gifting your creation, wrapping it in handmade packaging or including a small note adds sentimental value. Handmade toys always carry emotional warmth, especially when crafted with love and patience.
Finally, don’t be afraid to make multiple Eeyores! Creating a small collection allows you to practice and perfect your technique, making each new Eeyore Amigurumi – Free Pattern even better than the last.
Q1: Is the Eeyore Amigurumi – Free Pattern suitable for beginners?
A: Yes! This pattern is designed to be beginner-friendly with simple stitches and clear instructions.
Q2: How long does it take to complete the project?
A: It usually takes between 5–8 hours, depending on your crochet speed and experience.
Q3: Can I sell my finished Eeyore Amigurumi?
A: Absolutely! Handmade creations based on free patterns can be sold, but crediting the original design is always appreciated.
Q4: What type of yarn should I use?
A: Soft, medium-weight cotton or acrylic yarn works best for amigurumi projects like this.
Q5: How do I keep my Eeyore clean?
A: Handwash gently with mild soap and cold water, then let it air dry completely.
Q6: Can I make Eeyore in different colors?
A: Of course! Feel free to experiment with pastel blues, purples, or even creative color combinations.
Q7: How do I attach safety eyes securely?
A: Insert the safety eyes before stuffing the head and snap the washers tightly inside to ensure they stay in place.
Creating your own Eeyore Amigurumi – Free Pattern is a fun and rewarding crochet project that combines creativity, relaxation, and nostalgia. By following this guide, you can craft a charming version of one of Disney’s most beloved characters, filled with love and attention to detail.
This article covered everything from materials, step-by-step instructions, assembly, and finishing touches to creative ideas for customization. With patience and practice, you’ll find that crocheting your own Eeyore Amigurumi – Free Pattern becomes a joyful and meditative experience.
We hope you enjoyed this tutorial and that it inspired you to start crocheting your own Eeyore. Please share your honest opinion and suggestions about this guide—we’d love to hear your thoughts and see your adorable handmade creations!


