
If you are passionate about crocheting, the Crochet Peacock Pattern – Full Tutorial is the perfect guide to enhance your skills. This detailed guide will walk you through every step of creating a beautiful peacock with crochet, providing tips for both beginners and advanced crafters.
The Crochet Peacock Pattern combines creativity, color, and technique, allowing you to craft a stunning decoration or gift. By following this tutorial, you can transform simple yarn into a masterpiece that resembles the elegance of a real peacock.
Crocheting a peacock requires patience, attention to detail, and understanding of specific crochet techniques. The Crochet Peacock Pattern tutorial simplifies this process, breaking down complex steps into manageable parts.
Whether you want to create a small decorative piece or a larger statement item, this tutorial will help you master the design. Using colorful yarn and precise stitching will ensure your peacock looks lifelike, vibrant, and detailed, just like the real bird.
For many crafters, following a Crochet Peacock Pattern not only improves their crochet skills but also inspires creativity. This tutorial emphasizes using different stitches, textures, and colors to create a visually appealing result. Understanding how to read crochet patterns and implement advanced techniques such as shell stitches, puff stitches, and color changes is essential. By the end of this tutorial, you will feel confident in creating a peacock that is both beautiful and structurally strong, suitable for display or gifting.
Understanding the Crochet Peacock Pattern
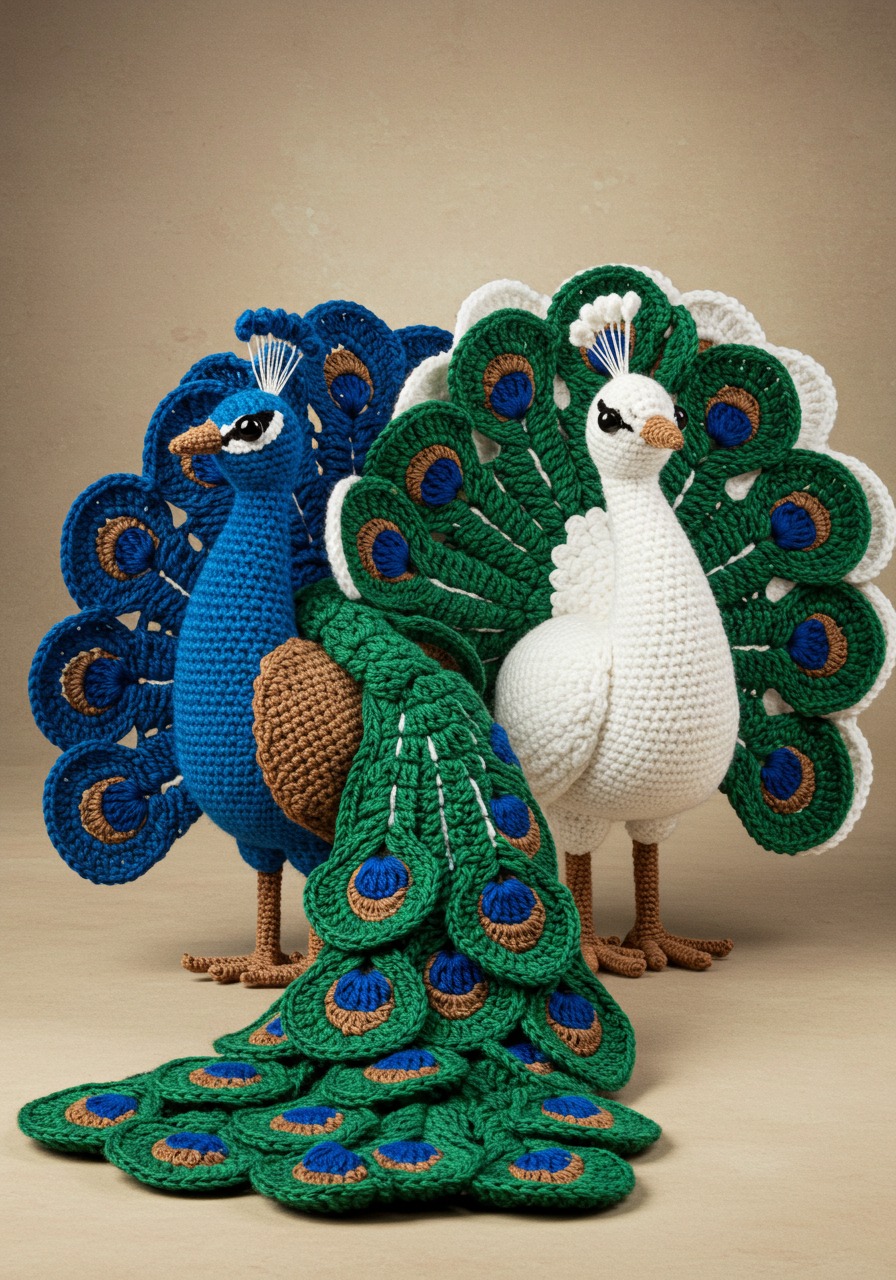
Before diving into the crochet process, it’s essential to understand the Crochet Peacock Pattern structure. This pattern is typically divided into sections: the body, the head, the feathers, and the decorative tail. Each part requires a specific type of stitch and color to achieve the correct shape and aesthetic. Knowing this structure will make the tutorial easier to follow and allow you to crochet with confidence.
The first element of the Crochet Peacock Pattern is the body. Usually worked in a round shape using single crochet or half-double crochet stitches, the body forms the foundation of your peacock. Choosing the right yarn weight and hook size is crucial for achieving the desired shape and texture. It’s recommended to use vibrant colors like blue and green to mimic a real peacock.
Next, the head and neck are crocheted separately and attached to the body. The tutorial explains how to create the perfect curve for the neck, using increases and decreases to shape it accurately. The peacock’s head may also include a small beak and eyes, made using embroidery or tiny crochet pieces. This attention to detail is part of what makes the Crochet Peacock Pattern unique and visually striking.
Adding the feathers is where creativity shines. The tutorial outlines how to crochet each feather individually and then attach them in layers to create fullness and movement. Feather details can include subtle variations in yarn color and stitch patterns. This part of the Crochet Peacock Pattern allows crafters to experiment and personalize their peacock.
Finally, the tail feathers are the crowning glory of the Crochet Peacock Pattern. The tutorial guides you through creating large, fanned-out feathers that can be adjusted in size and shape. Using shell stitches, popcorn stitches, or other textured techniques enhances the tail’s depth and realism. By following these steps, your peacock will have a majestic, eye-catching tail.
By fully understanding the pattern structure, you can approach each stage with clarity. The tutorial also includes tips for fixing common mistakes and advice on maintaining yarn tension throughout the project. Following this approach ensures that your Crochet Peacock Pattern results in a flawless and beautiful piece.
Choosing Materials and Tools
Selecting the right materials is crucial for a successful Crochet Peacock Pattern. The tutorial recommends using high-quality cotton or acrylic yarn for durability and vibrant colors. For the peacock’s body, consider using a solid blue or turquoise yarn. For the tail feathers, choose multiple shades of green, blue, and gold to mimic the natural gradient of a real peacock.
The hook size depends on the yarn weight, but most commonly, a 3.5 mm to 5 mm crochet hook is used. Using a consistent hook size ensures that stitches remain even, which is critical for shaping the body and feathers accurately. The tutorial also emphasizes the importance of having stitch markers, yarn needles, and scissors handy to streamline the process.
Optional embellishments can elevate your Crochet Peacock Pattern. Small beads or sequins can be added to the tail feathers to create a shimmering effect, making your peacock more realistic. Additionally, stuffing is essential for giving volume to the body, head, and some feathers, ensuring that your crochet piece maintains its shape.
Color selection plays a significant role in the overall impact of your peacock. Combining shades strategically helps to highlight feather patterns and enhance visual depth. The tutorial provides a palette suggestion but encourages crafters to experiment with their color choices. This freedom allows every Crochet Peacock Pattern to be unique.
Understanding yarn types and their properties is another critical factor. Cotton yarn gives a smooth, structured finish, while acrylic yarn provides softness and elasticity. Knowing these differences helps you decide which material best suits your project. Following these tips ensures that the final Crochet Peacock Pattern is both beautiful and durable.
Lastly, preparation is key. The tutorial advises organizing all materials before starting, so you don’t lose momentum while crocheting. With the right yarn, hook, and embellishments ready, you can focus entirely on crafting a stunning peacock that will impress anyone who sees it.
Step-by-Step Crochet Instructions
Creating a peacock using the Crochet Peacock Pattern requires following precise steps. The tutorial begins with the body, worked in continuous rounds. You’ll start with a magic ring and gradually increase to shape the round body. Maintaining consistent stitch tension ensures that the peacock’s body remains firm and even throughout the process.
Once the body is complete, the head and neck are crocheted separately. The tutorial demonstrates how to create a gentle curve by using a combination of increases and decreases. Attaching the head to the body securely is crucial for stability. For beginners, this step may take practice, but the tutorial provides detailed guidance to make it manageable.
Feathers are next, and they form the most visually striking part of the Crochet Peacock Pattern. Each feather is created individually, often using shell stitches, puff stitches, or other decorative techniques. The tutorial recommends attaching feathers in layers, starting from the bottom and working upward, to achieve a full and flowing appearance.
The tail is the final step, and this is where the peacock truly comes alive. Following the tutorial, you will create large, fanned feathers that form a stunning display. Experimenting with color blending and stitch variations gives the tail a lifelike quality. The tutorial also suggests lightly shaping feathers with your fingers for a natural curve.
Embellishments and finishing touches enhance the Crochet Peacock Pattern. Adding beads or embroidery details to the feathers gives extra dimension. The tutorial emphasizes securing all pieces tightly and weaving in ends carefully to maintain a polished appearance. These final steps ensure that your peacock looks professionally made.
Following these instructions carefully allows you to complete your Crochet Peacock Pattern successfully. Patience, attention to detail, and creativity are key factors that make this tutorial effective. With practice, each completed peacock will reflect your growing skills and artistic touch.
Tips for Perfecting Your Crochet Peacock Pattern
Even experienced crafters can benefit from tips for improving the Crochet Peacock Pattern. First, always check your gauge to ensure the body and feathers are proportionate. Inconsistent tension can make feathers look uneven or the body lopsided. The tutorial stresses the importance of measuring as you go to maintain symmetry.
Second, using high-contrast colors for the feathers adds visual impact. Layering lighter and darker shades creates depth, making the tail appear more realistic. The tutorial encourages experimenting with color placement for a personalized look. This attention to color detail elevates the Crochet Peacock Pattern from ordinary to stunning.
Third, maintain a clean workspace. Keeping yarn organized prevents tangling and reduces frustration. The tutorial recommends using small containers or bags for different yarn colors. This simple step makes the crocheting process smoother and more enjoyable, especially when handling multiple colors for feathers.
Fourth, practice advanced stitches on a small swatch before applying them to the pattern. Techniques like puff stitches, shell stitches, and color changes may require practice to master. The tutorial suggests trying these on scrap yarn to build confidence before working on the actual peacock.
Fifth, take breaks and review your work frequently. Stepping back allows you to see your progress and spot any errors early. The tutorial emphasizes checking for loose stitches or uneven shapes regularly. This habit ensures that your Crochet Peacock Pattern remains flawless and visually appealing.
Finally, enjoy the creative process. Crocheting a peacock is both a skill-building exercise and a chance to express artistry. The tutorial encourages experimentation, creativity, and pride in each finished piece. Following these tips ensures that every Crochet Peacock Pattern you create is a work of art.
FAQ – Crochet Peacock Pattern
1. What skill level is required for this Crochet Peacock Pattern?
The Crochet Peacock Pattern is suitable for intermediate to advanced crocheters due to the use of multiple stitches and color changes. Beginners may need extra practice on basic stitches first.
2. How long does it take to complete a crochet peacock?
Completion time varies depending on experience, but on average, it takes 8-12 hours for intermediate crocheters to finish a full peacock.
3. Can I use different yarn types for the peacock?
Yes, cotton, acrylic, or a blend can be used. Cotton gives structure, while acrylic provides softness. Choose based on your desired finish.
4. How do I attach feathers securely?
The tutorial suggests layering feathers from bottom to top and sewing them firmly to the body using a yarn needle to prevent shifting.
5. Can I make the peacock larger or smaller?
Yes, adjusting yarn thickness and hook size changes the overall size. Just maintain proportion by scaling each part consistently.
6. Are embellishments necessary?
No, embellishments are optional. Beads, sequins, or embroidery can enhance visual appeal, but the peacock is beautiful even without them.
Conclusion
The Crochet Peacock Pattern – Full Tutorial offers a comprehensive guide to creating a stunning and realistic peacock with crochet. By understanding the pattern, selecting the right materials, following step-by-step instructions, and applying tips for perfection, you can craft a masterpiece. This tutorial demonstrates that patience, attention to detail, and creativity are essential for success.
If you enjoyed this tutorial, feel free to share your experiences, leave a sincere opinion, and suggest improvements or variations. Each completed peacock is not just a craft but a testament to your dedication and artistry.