
Crocheted house-shaped cookie for Christmas tree

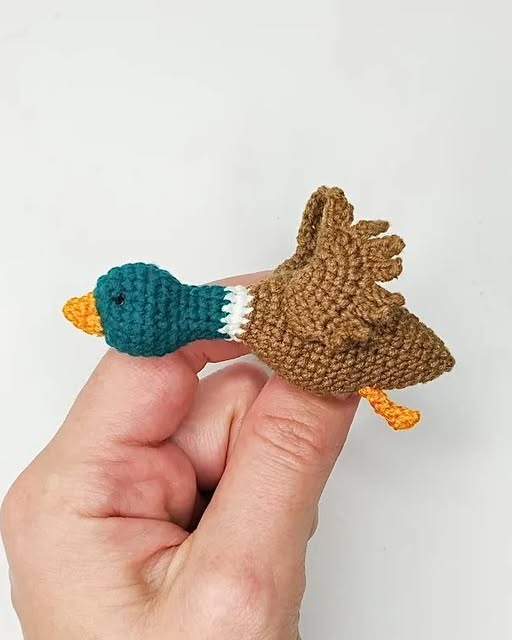
The Crochet Duck Pattern is one of the most adorable and heartwarming projects any crafter can create. This delightful DIY crochet duck combines simplicity, creativity, and fun into a single, rewarding experience.
Whether you’re a beginner looking for your next project or an experienced crocheter seeking something relaxing yet charming, this free crochet pattern is the perfect choice.
The little duck, with its soft texture, bright colors, and cute design, makes an ideal handmade gift or a cheerful decorative piece for your home. It can also become a toy for children, a nursery accessory, or even a collectible addition to your amigurumi family.
Working on an amigurumi duck allows you to improve your crocheting skills while expressing your creativity through color and detail. You can experiment with various yarn types, hook sizes, and stuffing techniques to achieve different sizes and shapes, giving each duck a unique personality.
The process of shaping the duck from simple loops of yarn into a 3D form is incredibly satisfying, and the finished result is something that can bring joy for years. With a few basic materials and a little patience, you’ll be able to transform yarn into a soft, cuddly duck that looks straight out of a storybook.
Aside from being fun and relaxing, this handmade crochet toy project is budget-friendly and beginner-accessible. You don’t need expensive tools or advanced skills—just a hook, some yarn, and a bit of enthusiasm. Following this crochet duck pattern step by step, you’ll quickly gain confidence and develop an understanding of shaping, stitching, and finishing amigurumi-style toys. The process is meditative, calming, and deeply fulfilling, making it one of the best crafting experiences for people of all ages.
To create your own crochet duck pattern, you’ll need only a few simple materials. The main component is yarn—ideally, a soft cotton or acrylic yarn that is easy to handle and produces a smooth texture. For a traditional duck look, choose a cheerful yellow for the body, orange for the beak and feet, and white or pastel shades for optional accessories like scarves or hats. Cotton yarn gives a neat finish, while acrylic yarn provides elasticity and a cozy touch. Depending on the yarn weight, your duck can be tiny and delicate or larger and more huggable.
The next essential tool is your crochet hook. For most amigurumi projects, a hook between 2.0mm and 3.5mm works best. Using a smaller hook than the yarn label suggests helps create tight stitches that prevent the stuffing from showing through. You’ll also need polyester fiberfill to stuff your DIY crochet duck, giving it shape and softness. Be careful not to overfill it, as excessive stuffing can distort the pattern and make sewing parts together more difficult.
Other tools include scissors, a yarn needle, and stitch markers. Stitch markers are particularly helpful in tracking rounds since most amigurumi duck projects are worked in continuous spirals without joining. You may also want to use safety eyes or embroidery thread for facial details. Safety eyes add a polished look, but embroidered features are best for very young children, ensuring the toy remains safe and child-friendly.
Finally, it’s a good idea to keep some optional accessories on hand. Small bows, buttons, or ribbons can enhance the personality of your handmade crochet toy. You might even design themed ducks—for example, a Christmas duck with a red scarf or a beach duck with a tiny float ring. Having all materials organized before starting ensures a smooth and enjoyable crocheting experience.
To start your crochet duck pattern, begin by making the head and body, which are often crocheted as one continuous piece. Use a magic ring to start, as it allows for a seamless beginning and prevents any gaps. Crochet in single stitches, increasing gradually until you reach the desired circumference of the head. After a few rounds, you’ll shape the body by adding increases and decreases strategically. Maintaining even tension throughout the process ensures a uniform, polished look.
Once the main body is finished, move on to the smaller components—the wings, beak, and feet. These parts are usually made separately and then sewn onto the body later. For wings, simple oval shapes work well, and for the beak, a small triangle or semicircle can be used. The feet can be crocheted flat and sewn underneath or made in the round for extra dimension. Each detail adds character to your DIY crochet duck, so take your time shaping and sewing them symmetrically.
When assembling your amigurumi duck, placement is key. Attach the wings slightly to the sides for a balanced appearance, and ensure the beak and eyes are aligned correctly. The eyes can be sewn or attached with safety backs, giving your duck a lively expression. If you want a sleepy or smiling duck, embroidery can be used to create subtle variations in facial expression, giving your handmade crochet toy extra charm.
Finally, once all parts are securely attached, it’s time for finishing touches. Add accessories like small scarves, hats, or bows to personalize your creation. You can even make miniature versions of your free crochet pattern duck to use as keychains, bag charms, or ornaments. The satisfaction of holding your finished duck in your hands—something you’ve made completely from scratch—is what makes this craft so enjoyable.
One of the greatest joys of using a crochet duck pattern is the opportunity to customize it. You can choose from a wide range of colors, materials, and details to give your ducks unique personalities. For instance, pastel tones make gentle, baby-themed ducks, while bright, vibrant colors give a fun, cartoonish look. Combining yarns of different textures—like fluffy and smooth—can create interesting visual contrasts.
Adding accessories is another fun way to personalize your DIY crochet duck. Try crocheting small hats, scarves, or even tiny clothes. You could make a whole collection of ducks representing different seasons or holidays—a Halloween duck with a pumpkin hat, a Christmas duck with a Santa cap, or a beach duck with sunglasses and a float. These details make your creations stand out and show off your creativity.
You can also experiment with size variations. By changing the yarn weight and hook size, you can create mini ducks for keychains or larger plush versions for hugging. Using safety eyes of different diameters or embroidered eyes can further change the duck’s overall expression and personality. The customization possibilities are endless, and this freedom is what makes amigurumi duck projects so addictive and enjoyable.
Lastly, consider adding small personal touches, such as embroidered initials or tags, especially if the duck is a gift. Handmade toys carry a warmth and charm that store-bought items simply cannot match. Through each free crochet pattern, you can express your creativity and create something truly special that reflects your own artistic style.
Like any handmade crochet toy project, making a crochet duck pattern can involve a few common mistakes—but they’re easy to fix once you know what to watch out for. One frequent issue is uneven tension. If your stitches are too tight, the toy may look stiff and uneven; if too loose, the stuffing might peek through. Practicing consistent tension helps achieve smooth and professional-looking results.
Another common problem is incorrect stitch counts. Skipping or adding extra stitches can alter the duck’s shape. To avoid this, always use a stitch marker at the beginning of each round and count carefully. Misplaced eyes, wings, or beaks can also make the duck look unbalanced. Before sewing any part permanently, pin it in place and adjust until you’re happy with the look.
Overstuffing or understuffing can affect the toy’s shape, too. Aim for a firm yet flexible filling that maintains form while keeping the toy soft. When using safety eyes, attach them before closing the head completely—it’s nearly impossible to insert them afterward! Finally, take your time when sewing pieces together; neat, invisible stitching will elevate your DIY crochet duck from homemade to professional quality.
Q1: Is this crochet duck pattern suitable for beginners?
Yes! The free crochet pattern is beginner-friendly, using simple stitches and easy-to-follow instructions.
Q2: What yarn is best for amigurumi ducks?
Soft cotton or acrylic yarn works best because it provides structure while remaining gentle to the touch.
Q3: How long does it take to complete one duck?
Depending on your skill level, it usually takes 2–4 hours to finish one handmade crochet toy.
Q4: Can I sell my finished ducks?
Yes, many designers allow selling finished items made from their free crochet pattern, as long as credit is given.
Q5: Can I make different sizes?
Absolutely! Adjust the yarn weight and hook size to create larger or smaller DIY crochet ducks.
Q6: How do I clean my crochet duck?
Spot clean with mild soap and water. Avoid machine washing if it has safety eyes or delicate embellishments.
Creating your own Crochet Duck Pattern is a delightful and creative journey from start to finish. This DIY crochet duck combines simplicity, imagination, and skill-building, resulting in an adorable toy that’s both meaningful and fun. By following this free crochet pattern, you can produce a charming handmade crochet toy perfect for gifting, decorating, or collecting. The satisfaction of bringing a ball of yarn to life is unmatched, and the possibilities for customization are endless.
We hope this guide inspires you to start your own amigurumi duck project today. Share your experiences, leave your honest opinions, and suggest new ideas for patterns you’d love to see next. Every creation tells a story—and yours can begin right here, with the joyful, cozy art of crochet.


