
Crocheted house-shaped cookie for Christmas tree

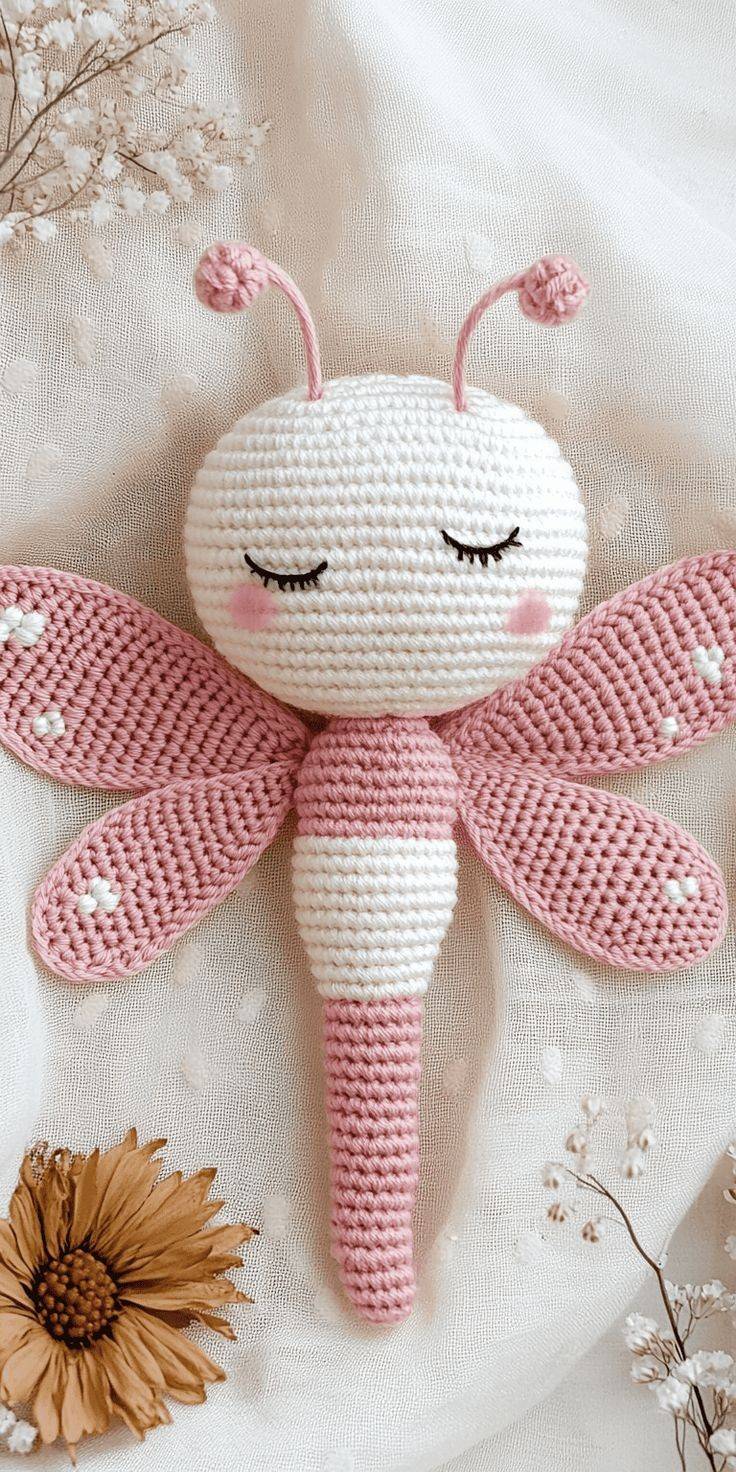
The art of crochet has always been a wonderful way to express creativity and relaxation, and the Crochet Dragonfly Tutorial stands out as one of the most charming projects you can create with yarn.
Whether you’re just learning the basics or already have some experience, this guide will walk you through every step needed to bring a delicate dragonfly to life.
The Crochet Dragonfly Tutorial is not only a fun pattern to master but also an excellent way to develop new stitches and design techniques that can be used in countless other projects.
Many crafters are drawn to dragonflies for their symbolism — they represent transformation, light, and grace. Following this Crochet Dragonfly Tutorial allows you to blend artistry and meaning in a single piece.
The process is simple enough for beginners yet offers enough creative flexibility for advanced crocheters who want to add their unique touch. By the end, you’ll have a beautiful handmade decoration that can be used in clothing, home décor, or as a thoughtful handmade gift.
In this complete guide, we will cover everything from choosing the right yarn and hook to understanding the stitches and shaping the wings. Each section of this Crochet Dragonfly Tutorial is designed to be easy to follow, with tips that will help you achieve professional-looking results. So, grab your favorite yarn, get comfortable, and let’s begin this magical journey into the world of crochet dragonflies.
Before diving into the detailed steps, it’s important to understand the foundation of the Crochet Dragonfly Tutorial. This pattern combines simple stitches in creative ways to form the body, wings, and tail.
To start, you’ll need a few basic supplies: a crochet hook (usually size 3.5mm to 4mm), light or medium-weight yarn, and a yarn needle for sewing ends. Beginners might prefer cotton yarn since it provides better stitch definition, making it easier to see your work. Selecting contrasting colors for the wings and body will make your crochet dragonfly even more eye-catching.
One of the best things about this pattern is that it introduces beginners to foundational stitches like chain stitch, slip stitch, single crochet, and double crochet. These are essential for almost any crochet project, and practicing them in this Crochet Dragonfly Tutorial will strengthen your skills for future creations.
As you work, remember that tension control is key. Keeping your stitches even will ensure your dragonfly maintains its shape and structure. If you tend to crochet tightly, try relaxing your grip or using a slightly larger hook.
Experienced crocheters can modify the design by adding textured stitches or using metallic thread to give the wings a shimmering effect. The possibilities are endless once you understand the structure behind the crochet dragonfly pattern.
Lastly, take your time. Even though the project is small, rushing through the stitches can lead to uneven wings or a crooked body. The beauty of crochet lies in its rhythm — every loop and pull contributes to the graceful shape of your dragonfly.
Now that you understand the basics, let’s move on to the practical side of the Crochet Dragonfly Tutorial. This part will help you create your dragonfly from start to finish, including the body, wings, and final assembly.
Begin by making a foundation chain of about 12 stitches. This will form the body of the dragonfly. Use single crochets along the chain, slightly tapering as you move to the tail end. To create a rounded head, you can add a few increases at the start of the chain and then decrease near the middle.
Next comes the wings — the most distinctive feature of your crochet dragonfly. For each wing, you’ll make a separate piece using chain stitches followed by double crochets. Shape them with gentle curves by alternating between tall and short stitches. Once you have four wings, sew or crochet them onto the body.
Adding details can make your dragonfly truly stand out. You can use embroidery thread or thin metallic yarn to outline the wings, giving them a delicate, realistic finish. Be sure to weave in all loose ends carefully so your project looks neat and polished.
If you’d like to hang your dragonfly as an ornament, leave a small yarn loop on top of the head before fastening off. This turns your creation into a charming decoration for bags, windows, or nurseries.
The Crochet Dragonfly Tutorial is also a fantastic way to practice color changes. Try alternating colors for the body and wings or use ombré yarn for a soft, natural effect. Experimentation is part of the fun, and no two dragonflies need to look the same.
Finally, always block your finished piece. Lightly mist it with water, pin it into shape, and let it dry. This step will make your dragonfly look crisp and professional — the perfect finishing touch for your handmade art.
Once your dragonfly is complete, there are countless ways to use it creatively. One of the best things about the Crochet Dragonfly Tutorial is that it produces a small, versatile piece that fits almost anywhere.
You can attach your dragonfly to a hat, scarf, or bag as a stylish accessory. It adds a personal and artistic touch to any handmade item. Many crafters also use them in home décor projects — for example, sewn onto curtains, table runners, or cushions for a whimsical accent.
Another fun idea is to turn your crochet dragonfly into a brooch or pin. Simply sew or glue a small safety pin on the back, and you’ll have a wearable piece of art. These make thoughtful gifts for anyone who appreciates handcrafted details.
If you enjoy decorating for different seasons, you can use pastel colors for spring or metallic shades for the holiday season. The Crochet Dragonfly Tutorial allows you to adapt the pattern to any theme or occasion, which makes it a great year-round project.
You can even use multiple dragonflies to create a garland or wall hanging. String them together with transparent thread for a floating, airy effect that looks magical under natural light.
Finally, consider incorporating dragonflies into larger crochet projects such as blankets or baby clothes. Sew them onto afghan squares or use them as motifs within your designs. The options are truly limitless when it comes to using your crochet dragonfly creations.
Every crocheter, whether beginner or experienced, can benefit from a few insider tips when following the Crochet Dragonfly Tutorial. Avoiding common mistakes will make your project smoother and more enjoyable.
First, always check your tension. Uneven tension can cause one wing to appear larger than the other. Practice maintaining consistent pressure on the yarn, especially during the wings section.
Second, use a stitch marker if you’re prone to losing count. Since dragonflies are symmetrical, accuracy in stitch count ensures both sides match perfectly.
Another valuable tip is to experiment with different yarn textures. Shiny or gradient yarns can make the wings look ethereal, while matte yarns give a more natural, rustic look.
Don’t skip the blocking process! Many crocheters overlook this final step, but it greatly improves the shape and appearance of your finished dragonfly.
If you find the wings curling too much, try using a slightly larger hook or looser tension for that section. Small adjustments can make a big difference in how the finished dragonfly looks.
Lastly, keep your workspace well-lit and organized. Crocheting intricate shapes like dragonfly wings requires focus, and good lighting helps you see each stitch clearly. A calm environment ensures that your Crochet Dragonfly Tutorial experience is both relaxing and productive.
1. Is the Crochet Dragonfly Tutorial suitable for absolute beginners?
Yes! The pattern is beginner-friendly. It uses basic stitches like chain, single crochet, and double crochet, making it an excellent project for those new to crochet.
2. How long does it take to complete one crochet dragonfly?
Depending on your skill level, it typically takes between 30 minutes to 1 hour to make a single dragonfly.
3. What type of yarn is best for this project?
Cotton or lightweight acrylic yarns are ideal because they provide structure and definition, which help highlight the wings and body details.
4. Can I use this tutorial to make larger or smaller dragonflies?
Absolutely! You can adjust the size simply by changing the yarn thickness and hook size.
5. How can I make the dragonfly wings sparkle?
Use metallic or glitter yarn for the wings, or lightly brush them with fabric shimmer paint after crocheting.
6. Is it possible to sew the dragonfly onto clothing?
Yes. You can easily attach it to garments or accessories with a few stitches or fabric glue for a secure hold.
7. Can I sell the dragonflies I make from this tutorial?
Definitely. Handmade crochet dragonflies make wonderful products for craft fairs, online shops, or personalized gifts.
The Crochet Dragonfly Tutorial is a creative and rewarding project that combines simplicity with elegance. From understanding basic stitches to designing beautiful wings and exploring countless ways to use your finished creation, this guide has provided a complete pathway for crafters of all skill levels. By following the techniques and tips shared here, you can create stunning dragonflies that capture both beauty and craftsmanship.
Now that you’ve learned how to make your own crochet dragonfly, we’d love to hear your thoughts! Share your experiences, suggestions, or personal variations of the pattern in the comments.
Your feedback helps inspire others in the crochet community to spread their wings and explore new creative horizons.


