
Crocheted house-shaped cookie for Christmas tree

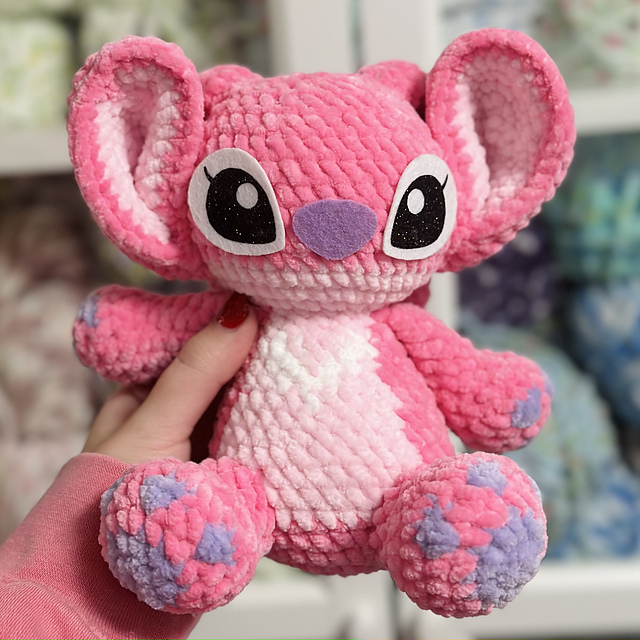
For fans of Lilo and Stitch, creating your own Angel from Lilo and Stitch – Free Pattern is a delightful way to bring this beloved character to life.
This charming amigurumi project combines creativity with hands-on crafting, allowing both beginners and experienced crafters to enjoy making a small plush that perfectly captures Angel’s personality. Whether you want a unique collectible or a handmade gift, this free pattern makes it possible.
The Angel from Lilo and Stitch – Free Pattern is easy to follow and offers flexibility in choosing materials, colors, and finishes.
By combining basic crochet techniques with careful attention to detail, you can create a plush that is both adorable and durable. This project is perfect for anyone looking to add a personal touch to their collection of handmade toys.
Crafting your own Angel from Lilo and Stitch also allows for endless personalization. You can adjust the size, choose different yarn textures, and even experiment with embroidery or accessories to make your plush truly unique. This free pattern encourages creativity while giving a satisfying sense of accomplishment once completed.
To start your Angel from Lilo and Stitch – Free Pattern, you will need a few essential materials. Gathering everything before you begin ensures a smooth crafting process.
The main materials include yarn in the colors pink, white, and light purple, a crochet hook suitable for your chosen yarn, and a yarn needle for assembling the pieces. These materials create a soft, cuddly texture that is ideal for amigurumi projects.
Stuffing is another important material, usually polyester fiberfill. Proper stuffing ensures your plush keeps its shape and feels soft yet firm. Avoid overstuffing, as it may distort the shape or make stitching more difficult.
You may also need safety eyes or embroidery thread to create Angel’s expressive features. These small details bring the character to life and make the plush more recognizable and charming.
Scissors, stitch markers, and a measuring tape will help maintain accuracy. Careful measurement and marking of rounds or stitches make the assembly process smoother and ensure a professional finish.
Finally, having a printed or digital copy of the free pattern is essential. Following the pattern step by step guarantees consistency and accuracy, even for those new to crochet amigurumi.
Begin your Angel from Lilo and Stitch – Free Pattern by crocheting the body. Typically, this starts with a magic ring and continues in rounds to build the shape evenly. Using a tight stitch helps prevent stuffing from showing through the yarn.
Next, create the head and facial features. Attach safety eyes or embroider them for a personalized touch. Adding details like Angel’s signature wings or heart-shaped patterns makes the plush instantly recognizable.
Crochet the arms and legs separately and then carefully sew them to the body. Reinforcing the stitching ensures durability, especially if the plush will be handled frequently.
Add the wings by crocheting small, curved shapes and attaching them securely to the back. These wings are a defining feature of Angel and add dimension and personality to your plush.
Once all pieces are attached, carefully stuff the body and limbs. Shape them as you go to ensure your plush looks balanced and proportionate.
Finally, review all stitches and seams. Reinforce any areas that seem weak or loose to make sure your Angel from Lilo and Stitch stays intact and maintains its adorable form.
One of the most fun aspects of the Angel from Lilo and Stitch – Free Pattern is personalization. You can adjust the size to create mini or jumbo versions depending on your needs.
Experiment with yarn types and textures. Soft, fluffy yarn creates a cuddly plush, while cotton yarn gives a smoother finish. Mixing yarn textures can make your plush more visually interesting.
Adding embroidery details such as eyelashes, heart patterns, or small accessories makes the plush more expressive. These details add character and uniqueness to each creation.
Consider making matching or themed accessories. A small blanket, outfit, or even a keychain version can complement your plush and make the project even more versatile.
Color variations are also possible. While Angel is traditionally pink, subtle changes in shade can give your plush a fresh, creative look.
Finally, gifting your handmade Angel from Lilo and Stitch can make it even more special. Handmade plushes show thoughtfulness and effort, making them perfect for birthdays, holidays, or collector displays.
Even simple amigurumi projects like the Angel from Lilo and Stitch – Free Pattern have common pitfalls. Awareness of these mistakes can save time and frustration.
One common error is stitching too loosely. Loose stitches allow stuffing to show through, which can affect the plush’s appearance and durability.
Another mistake is uneven stuffing. Inconsistent stuffing may cause the plush to look lopsided or misshaped. Distribute fiberfill evenly for the best result.
Attaching limbs and wings incorrectly can distort proportions. Always measure placement carefully before sewing to ensure symmetry.
Skipping small details like embroidery or finishing stitches may result in a less polished look. Attention to these details elevates the final product.
Rushing through rounds or skipping stitch markers may lead to uneven shapes or skipped stitches. Take your time to maintain precision and accuracy.
Finally, not checking safety features, like securely attaching eyes or small embellishments, can be unsafe for children. Always ensure pieces are firmly attached for durability and safety.
Q1: Is this pattern suitable for beginners?
Yes, the Angel from Lilo and Stitch – Free Pattern provides clear instructions and is suitable for beginners familiar with basic crochet techniques.
Q2: What materials should I use?
Yarn in pink, white, and light purple, a crochet hook, stuffing, and safety eyes or embroidery thread are recommended. Optional embellishments can personalize your plush.
Q3: How long does it take to complete?
The project typically takes 3–5 hours depending on skill level and size. Beginners may take longer, while experienced crafters can complete it faster.
Q4: Can I make different sizes?
Yes, adjusting yarn weight, hook size, or stitch count allows you to create mini, standard, or large versions of Angel.
Q5: Is it safe for children?
Yes, but avoid small detachable embellishments for very young children. Embroidered eyes and details are safer alternatives.
Q6: Can this plush be gifted or sold?
Absolutely. Handmade Angel from Lilo and Stitch plushes make thoughtful gifts and can be sold, but always credit the original pattern as free.
The Angel from Lilo and Stitch – Free Pattern is a fun, creative, and rewarding project for anyone who loves amigurumi and Disney characters. By following the step-by-step instructions and using quality materials, you can create a plush that is both adorable and durable. Personalization options, including size, color, and embellishments, allow each crafter to express their creativity.
Making your own Angel from Lilo and Stitch plush provides a sense of accomplishment and a beautiful handmade item that can be cherished or gifted. By paying attention to common mistakes and customizing details, you can achieve a professional-looking result that stands out.
We encourage you to try this free pattern, share your creations, and provide feedback. Your insights and creative ideas help inspire the crafting community and bring joy to fellow fans of Lilo and Stitch.


