
Crocheted house-shaped cookie for Christmas tree

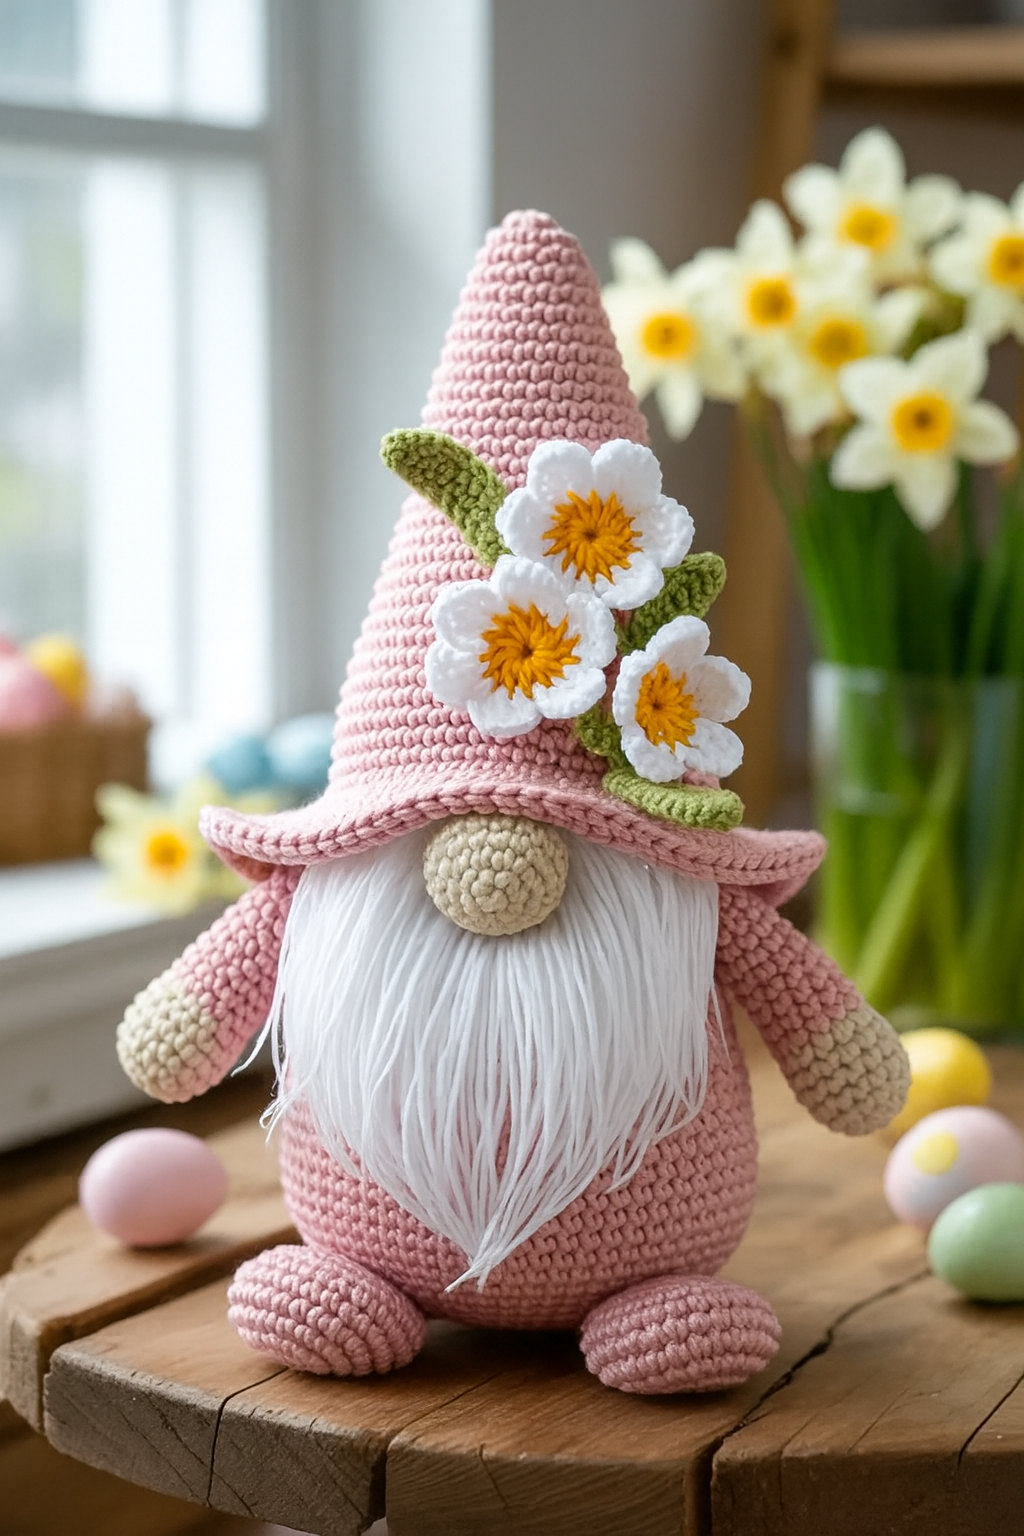
If you love crafting and seasonal decorations, creating an amigurumi spring gnome with a flower hat is a delightful project. This FREE crochet pattern allows you to bring a charming, handmade gnome into your home, perfect for springtime displays or as a heartfelt gift. With this DIY crochet gnome, you can personalize colors, styles, and even accessories, making each creation uniquely yours. The process is fun, relaxing, and rewarding, whether you’re an experienced crocheter or just beginning your journey into amigurumi.
An amigurumi spring gnome is more than just a cute decoration—it’s a symbol of creativity and craftsmanship. By following this crochet tutorial, you’ll learn not only the stitches and assembly but also techniques to add personality to your gnome. The flower hat adds a seasonal touch, reflecting the vibrant energy of spring while providing a whimsical charm. Making a gnome like this can also be an excellent opportunity to practice and improve your crochet skills.
The best part about this FREE crochet pattern is that it’s accessible to all skill levels. With clear instructions and step-by-step guidance, even beginners can successfully create their own DIY crochet gnome. The combination of simple techniques and adorable results makes this project satisfying and enjoyable. By the end, you’ll have a delightful springtime companion to display, gift, or even use as part of your seasonal décor.
The first step in creating your amigurumi spring gnome is selecting the right materials. Quality yarn is essential for a polished finish, and using soft, durable fibers ensures your gnome will last for years. Cotton and acrylic yarns are popular choices for DIY crochet gnomes, offering both vibrant colors and easy handling.
A key part of this crochet tutorial is matching the yarn to the flower hat and other gnome details. Bright, spring-inspired colors work beautifully, while neutral tones can create a more classic look. Choosing complementary shades helps the gnome’s features stand out, especially the adorable flower hat.
Hooks are equally important. The correct crochet hook size ensures tight, even stitches, which is crucial for stuffing and shaping your amigurumi spring gnome. Smaller hooks create tighter stitches, keeping the stuffing from showing through, which makes your finished piece look professional.
Additional materials include safety eyes, stuffing, and optional embellishments like beads or embroidery thread. These small details enhance your FREE crochet pattern and allow for further personalization. Including these finishing touches can make your DIY crochet gnome feel truly unique.
The texture of the yarn also affects the gnome’s appearance. Smooth yarns give a clean, polished look, while fuzzy or textured yarns add whimsical charm. Consider the style you want for your gnome and choose your materials accordingly to make the flower hat pop.
Finally, plan for durability. Reinforcing stitches in key areas, like the hat or base, ensures that your amigurumi spring gnome remains intact even with regular handling. This attention to detail is part of what makes completing a crochet tutorial so satisfying.
A clear, well-structured FREE crochet pattern is essential for creating a successful amigurumi spring gnome. Patterns serve as a roadmap, guiding you through each stitch, row, and assembly step. Following a detailed crochet tutorial ensures consistent results and helps prevent mistakes.
Start by reviewing all pattern components, including the body, hat, nose, beard, and flower details. Understanding how each part fits together before starting makes the DIY crochet gnome easier to assemble and results in a balanced, polished final product.
Patterns often include abbreviations and symbols. Familiarizing yourself with these is crucial for following the flower hat instructions accurately. Take time to decode any unfamiliar terms—this knowledge improves your crochet skills and ensures your gnome looks just like the pattern’s image.
Some amigurumi spring gnome patterns offer optional modifications, like different flower shapes or hat styles. Following the base instructions first is recommended before adding any personal touches. This ensures your FREE crochet pattern retains its structure while allowing creative flair.
Digital patterns are convenient for resizing or printing multiple copies. They allow you to easily adjust your gnome’s dimensions, making a larger or smaller DIY crochet gnome depending on your preference. Understanding these pattern features is a key part of a successful crochet tutorial.
Finally, always check for any special stitch techniques indicated in the pattern. Mastering these ensures that the flower hat and other details are neat and secure, giving your amigurumi spring gnome a professional finish that you’ll be proud to display.
Begin your amigurumi spring gnome by crocheting the body. Using the recommended yarn and hook, follow the FREE crochet pattern instructions for the base shape. Accurate stitch counts and tension are critical for achieving a consistent look.
Next, create the hat, which is often the centerpiece of the gnome. The flower hat adds charm and whimsy, and following the crochet tutorial ensures that petals, stripes, or other details are proportionate and securely attached. This step allows your creativity to shine through, as you can mix colors or add embroidery to make each gnome unique.
The nose and beard come next. Stuff these components carefully and attach them as directed. Ensuring that they are symmetrical enhances the gnome’s overall appearance. These finishing touches make the DIY crochet gnome look expressive and delightful.
Assemble the hat onto the body, following the pattern guidelines. Use careful stitching to secure it firmly, but maintain a playful shape so the flower hat appears natural and whimsical. This is a key feature that highlights the spring theme.
Finally, add any optional accessories or embellishments, like flowers, buttons, or tiny props. These small details elevate your amigurumi spring gnome from a simple project to a memorable handmade decoration. A careful follow-through of the crochet tutorial ensures that each element stays securely attached.
Check your finished piece for loose threads or uneven stitches. Tidying these areas guarantees a polished final product and makes your DIY crochet gnome a joy to gift or display. With all steps completed, your spring gnome is ready to bring cheer to your home.
One of the best aspects of making an amigurumi spring gnome is customization. The FREE crochet pattern provides a foundation, but you can personalize colors, accessories, and even facial expressions. This allows each gnome to reflect your creativity.
Experiment with different yarn textures for the flower hat. Fuzzy or sparkly yarns add fun, while smooth cotton offers a refined look. Combining textures gives depth and visual interest to your DIY crochet gnome.
Consider seasonal themes. Adding tiny crochet flowers, leaves, or even miniature props can enhance your spring display. Your crochet tutorial can guide these modifications, making the gnome suitable for tablescapes, shelves, or gift packaging.
Size variations are another way to customize. Adjusting the pattern for a larger or smaller gnome allows you to create sets or multiples for home décor or gifting. Following the FREE crochet pattern guidelines ensures that these modifications retain balance and proportion.
Display placement matters. A flower hat gnome looks charming on windowsills, mantels, or even as part of a centerpiece. Consider coordinating colors with other spring decorations for a cohesive, vibrant display.
Finally, consider gifting options. Handmade DIY crochet gnomes are thoughtful presents, especially when paired with a matching spring-themed arrangement. Personalization through color, hat style, or accessories adds a heartfelt touch that recipients will love.
Q1: Can beginners make this amigurumi spring gnome?
Yes! The FREE crochet pattern is designed for all skill levels. Following the crochet tutorial step by step ensures a successful gnome even for beginners.
Q2: What yarn is best for the flower hat?
Cotton or acrylic yarn in vibrant spring colors works best. These materials hold shape and allow details to pop on your DIY crochet gnome.
Q3: How do I make the gnome stand upright?
Stuff the base firmly and use reinforced stitches. Some prefer adding a small flat disc or weighted material inside for stability.
Q4: Can I change the size of the gnome?
Yes. Adjust hook size or yarn weight to create larger or smaller versions while following the FREE crochet pattern instructions.
Q5: Are there tips for attaching the flower hat securely?
Use even, tight stitches and double-check alignment. Optional embroidery or reinforcement helps the hat stay in place.
Q6: Can I make multiple gnomes as a set?
Absolutely! Varying colors, hat designs, and accessories allows you to create a charming collection of amigurumi spring gnomes.
Creating an amigurumi spring gnome with a flower hat using this FREE crochet pattern is a fun and fulfilling project. By carefully selecting materials, following the crochet tutorial, and personalizing details, you can craft a DIY crochet gnome that’s both adorable and unique. From stuffing the body to designing the flower hat, each step brings joy and creativity to the process.
We’ve explored choosing materials, understanding the pattern, step-by-step instructions, and customization tips for display or gifting.
Now it’s your turn to create your spring gnome masterpiece. Share your honest opinions, experiences, and suggestions—we’d love to see how your amigurumi spring gnome turned out!


