
Crocheted house-shaped cookie for Christmas tree

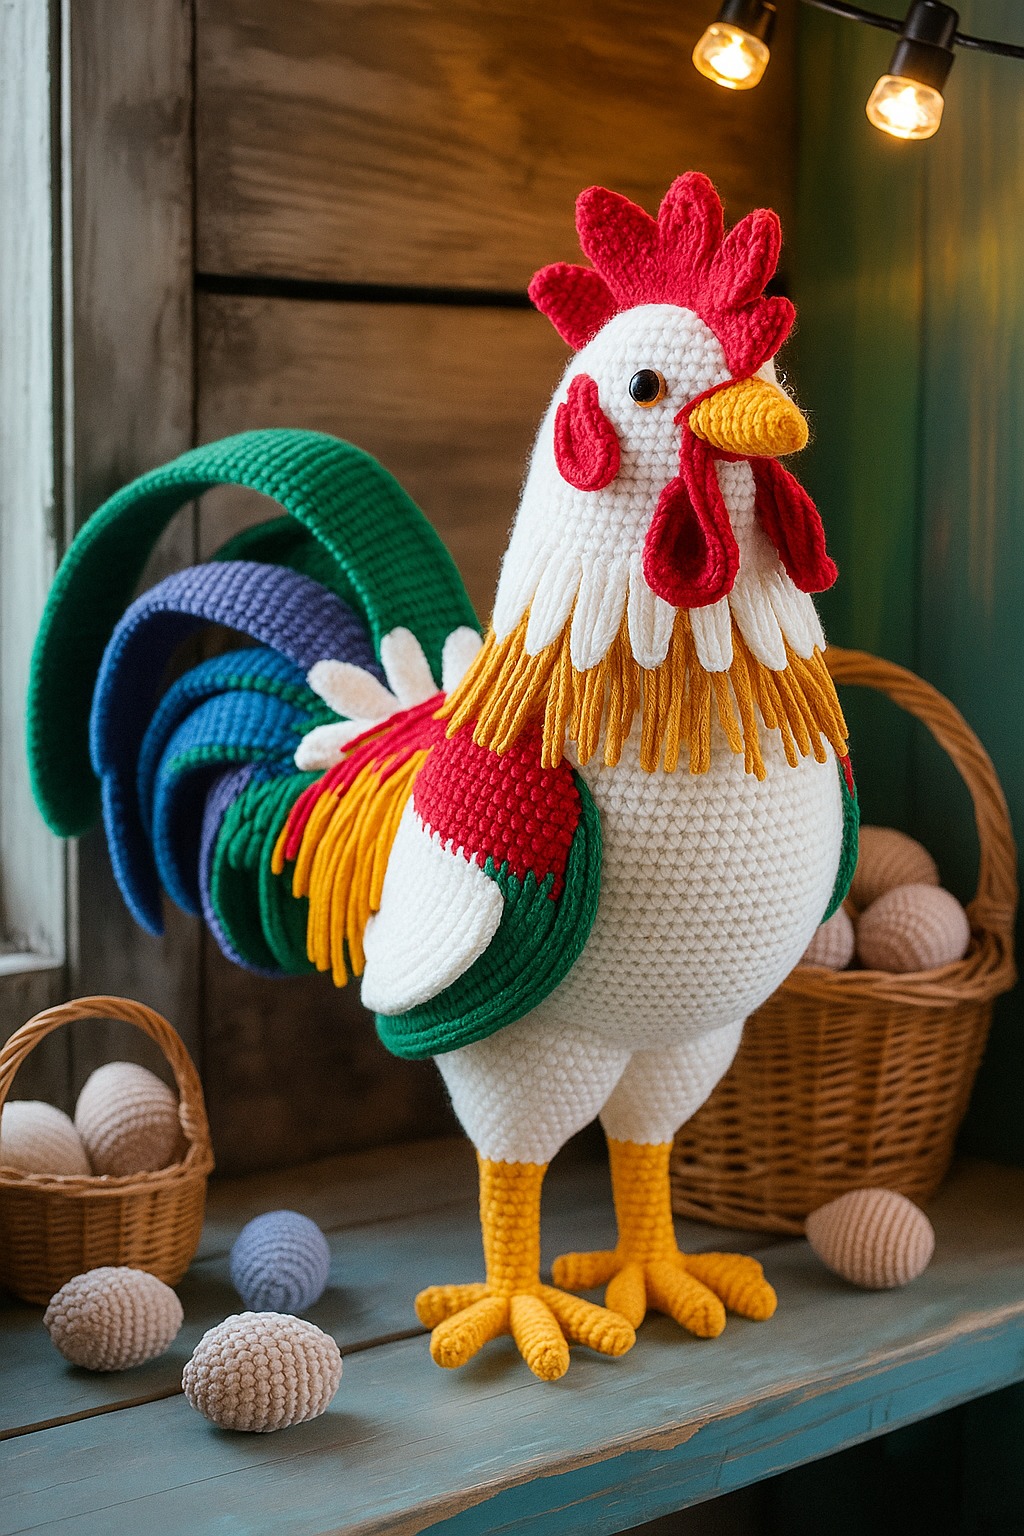
Creating an Amigurumi Rooster – FREE Crochet Pattern is an exciting way to explore the world of crochet while making a charming decorative piece.
Whether you are a beginner or an experienced crocheter, this project offers a delightful challenge. Roosters are known for their vibrant colors and proud stance, making them perfect subjects for amigurumi crafts.
With this guide, you will learn step-by-step how to create your own crochet rooster that can brighten any space in your home or become a heartfelt handmade gift.
Crocheting an Amigurumi Rooster – FREE Crochet Pattern is not just a fun activity; it is also a relaxing and therapeutic hobby. Many people find that the repetitive motions of crocheting help reduce stress and improve focus.
Moreover, creating something with your own hands adds a sense of accomplishment and pride. This pattern is designed to be accessible, with clear instructions that make it easy to follow, even if you have limited experience with amigurumi techniques.
This FREE crochet pattern provides all the necessary details, from materials and stitches to step-by-step assembly instructions. By following this guide, you will understand how to shape the rooster’s body, wings, comb, and tail. The finished piece will be a colorful and textured amigurumi rooster that showcases your creativity. You can customize it by choosing different yarn colors and adding personal touches to make it unique.
To begin your Amigurumi Rooster – FREE Crochet Pattern, you need to gather all the necessary materials. Quality materials are essential to ensure your finished rooster looks professional and feels sturdy. This project requires basic crochet supplies, which you may already have in your craft kit.
You will need yarn in various colors for the body, comb, wattle, and tail. Acrylic yarn is recommended for beginners because it is affordable, easy to work with, and comes in a wide range of colors. Additionally, a suitable crochet hook size is essential to maintain the correct tension and shape.
Stuffing is another crucial material. Polyester fiberfill is commonly used for amigurumi projects because it is soft, lightweight, and washable. Safety eyes or small beads can be used for the rooster’s eyes, giving it a lively and expressive look. Other materials include a yarn needle for sewing pieces together and stitch markers to help keep track of rounds.
Using the right materials will make your Amigurumi Rooster – FREE Crochet Pattern easier to follow and produce a beautiful final product. Attention to detail at this stage ensures that your rooster will be both durable and visually appealing.
Crochet techniques used in this project include single crochet, increasing, and decreasing stitches. Mastery of these basic stitches is necessary to form the various shapes of the rooster’s body, wings, and tail. You don’t need to be an expert, but practicing these stitches beforehand will make the process smoother.
The materials you choose also affect the texture and flexibility of your amigurumi rooster. For example, a firmer yarn gives the figure structure, while softer yarn can make it more huggable. Considering these factors allows you to create a rooster that meets your personal preferences and the intended use of the amigurumi piece.
Finally, keeping all materials organized before starting will save time and prevent frustration. Having everything ready ensures you can focus on the creative process and enjoy every step of making your Amigurumi Rooster – FREE Crochet Pattern.
Following a clear set of instructions is key to successfully completing your Amigurumi Rooster – FREE Crochet Pattern. This section outlines how to crochet each part of the rooster, from the body to the tail feathers, ensuring a cohesive and well-shaped figure.
Begin with the rooster’s body, working in continuous rounds to create a smooth, seamless shape. Increasing and decreasing stitches in the right places will give the body its characteristic plump appearance. Consistent stitch tension is important to maintain an even and professional look.
Next, crochet the wings separately. The wings are small but add significant charm to the overall design. Carefully attach them to the sides of the body using a yarn needle and matching thread. Proper placement ensures that your rooster appears balanced and lifelike.
The comb and wattle are made using simple stitches but contribute greatly to the rooster’s expressive face. Bright colors are recommended to make these features stand out. Securely attach them to the head to prevent loosening during handling.
The tail is an optional but highly decorative part of the Amigurumi Rooster – FREE Crochet Pattern. You can make it as simple or elaborate as you like, depending on your skill level and the look you want to achieve. Crocheting individual feathers and sewing them together creates a striking and textured effect.
Finally, assemble all parts carefully, ensuring the body, wings, tail, comb, and wattle are aligned. Adding safety eyes or embroidered details completes the rooster’s facial expression. Finishing touches like a slight bend in the tail or shaping the wings add personality and realism to your creation.
Customization is one of the most enjoyable aspects of following an Amigurumi Rooster – FREE Crochet Pattern. By experimenting with colors, yarn types, and stitch techniques, you can make a rooster that is entirely your own. Personal touches make handmade items even more special, whether for gifting or display.
Choosing yarn in non-traditional colors can give your rooster a modern or whimsical appearance. While classic reds, yellows, and oranges are beautiful, experimenting with pastels or multi-colored yarn can create a unique and eye-catching design.
You can also adjust the size of the rooster by changing the yarn weight and hook size. Thicker yarn and a larger hook produce a bigger, more plush figure, while thinner yarn results in a delicate, miniature amigurumi rooster. Both options are visually appealing and offer different creative possibilities.
Adding accessories is another way to personalize your amigurumi rooster. A tiny scarf, hat, or even miniature flowers can enhance its charm. Small embellishments can be crocheted or sewn on and give your project an extra layer of creativity and fun.
Experimenting with different stitch patterns for parts like the tail or wings adds texture and interest. Combining basic stitches with more advanced techniques like bobble stitches or popcorn stitches can make your rooster stand out as a decorative piece.
Finally, documenting your customization process allows you to recreate your favorite versions in the future. Taking notes on yarn colors, stitch counts, and assembly tips ensures that each new Amigurumi Rooster – FREE Crochet Pattern you make can be just as successful and personalized.
When making your Amigurumi Rooster – FREE Crochet Pattern, beginners often encounter certain challenges. Understanding common mistakes can save time and frustration, ensuring a smooth and enjoyable crafting experience.
One frequent mistake is uneven tension, which can distort the shape of the body or tail. Practicing consistent stitches and using stitch markers can help maintain uniformity throughout the project.
Another common error is misplacing wings or tail feathers. Carefully measuring and checking placement before sewing ensures a balanced and visually appealing final product.
Overstuffing or understuffing the body can affect the rooster’s appearance. Proper stuffing maintains shape while keeping the amigurumi soft and cuddly. Experiment with different amounts to achieve the perfect firmness.
Skipping stitch counts or rounds can lead to irregular shapes, especially in the head and body. Following the pattern carefully and marking each completed round prevents mistakes and ensures accuracy.
Finally, using inappropriate yarn or hook sizes can hinder the project’s success. Choosing materials suited to the pattern guarantees that your amigurumi rooster will look professional and maintain its structure over time.
Q1: Can beginners make this Amigurumi Rooster?
A1: Yes, this FREE crochet pattern is beginner-friendly, with clear instructions and basic stitches. Practicing single crochet, increases, and decreases beforehand helps.
Q2: What yarn is best for this project?
A2: Acrylic yarn is recommended because it is affordable, easy to work with, and comes in many colors. Cotton yarn also works well for a firmer texture.
Q3: How long does it take to complete?
A3: Depending on experience, it may take 4–8 hours. Beginners might need more time, while experienced crocheters can finish faster.
Q4: Can I customize the colors?
A4: Absolutely! You can choose any colors for the body, tail, comb, and wattle to make your amigurumi rooster unique.
Q5: How do I safely attach small parts like the comb?
A5: Use a yarn needle and secure stitches tightly. For safety, you can also sew parts from the inside to prevent loosening.
Q6: Can I make the rooster bigger or smaller?
A6: Yes, adjusting yarn weight and hook size changes the size. Thicker yarn makes a larger rooster, while thinner yarn creates a smaller version.
In this guide, you learned how to create an Amigurumi Rooster – FREE Crochet Pattern, from selecting materials to step-by-step assembly. You discovered tips for customization, common mistakes to avoid, and ways to make your rooster unique. Crocheting this delightful amigurumi piece allows you to express creativity, reduce stress, and enjoy the satisfaction of handmade craftsmanship.
We hope this guide inspires you to create your own amigurumi rooster. Share your experience, leave honest feedback, and offer suggestions to help others improve their crochet journey. Your input makes the crafting community stronger and more supportive.


