
Crocheted house-shaped cookie for Christmas tree

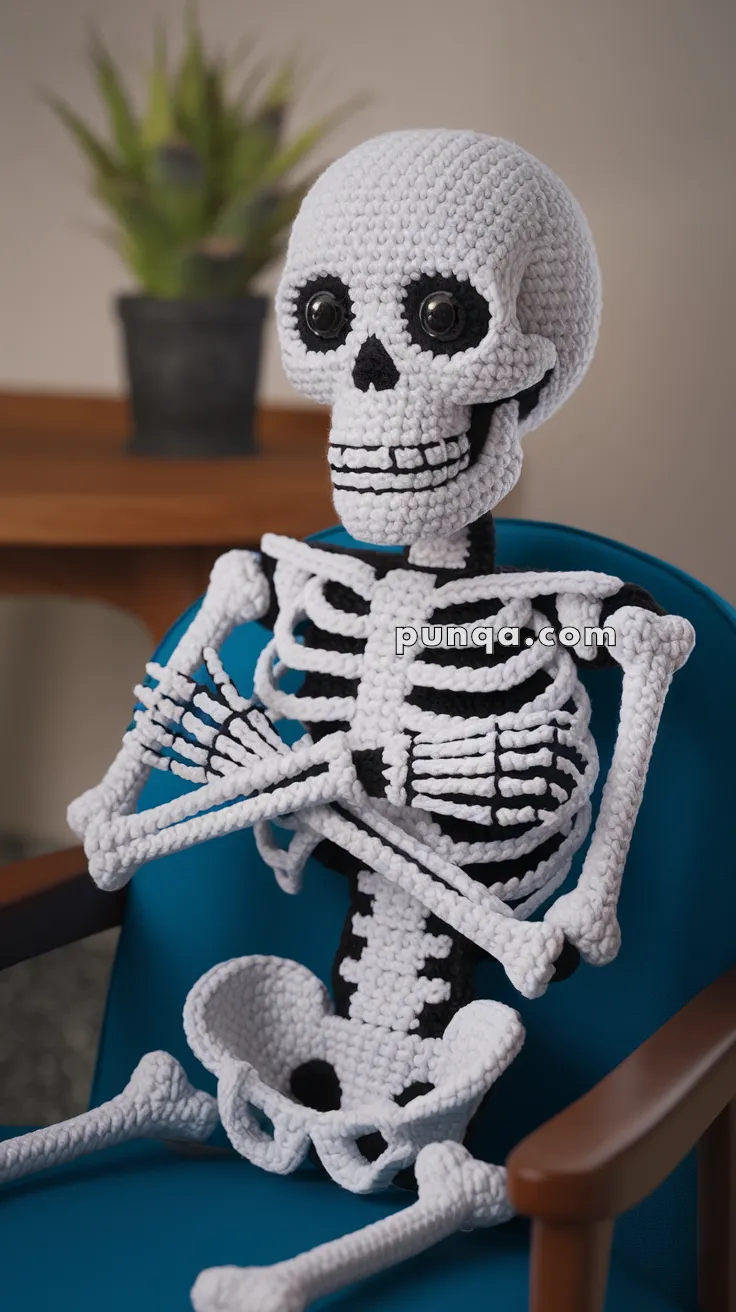
Creating an Amigurumi Bone-Chilling Skeleton – FREE Crochet Pattern is a delightful way to explore the world of DIY crochet while making a spooky yet charming handmade project.
This pattern is perfect for beginners and experienced crafters alike, allowing you to bring your own handmade crochet skeleton to life.
The appeal of amigurumi lies in its combination of creativity, skill, and patience, resulting in a unique item you can proudly display or gift. With Halloween approaching, a bone-chilling skeleton made from yarn can add a personalized, cozy, and festive touch to your decorations.
One of the major benefits of following an Amigurumi Bone-Chilling Skeleton – FREE Crochet Pattern is the opportunity to learn or refine your crochet skills.
From understanding different stitch types to mastering assembly techniques, this project can expand your crafting expertise. Additionally, creating a crochet skeleton allows you to practice patience, precision, and attention to detail—all essential qualities in the world of amigurumi. Whether you plan to hang it as a decoration or include it in a larger display, the results are always satisfying and fun.
Furthermore, this free crochet pattern gives you the freedom to customize your amigurumi skeleton. You can experiment with colors, accessories, or even size adjustments to make the project truly your own. Many crafters enjoy adding personal touches, such as tiny hats, scarves, or unique facial expressions, enhancing the charm and individuality of their handmade creation. With clear instructions and step-by-step guidance, this Amigurumi Bone-Chilling Skeleton – FREE Crochet Pattern makes it easy for anyone to enjoy the process, regardless of skill level.
When beginning your Amigurumi Bone-Chilling Skeleton – FREE Crochet Pattern, it’s crucial to gather all necessary materials. Typical supplies include high-quality yarn, a suitable crochet hook, a yarn needle, and stuffing. Selecting the right materials ensures your handmade crochet skeleton is durable and retains its shape over time. The choice of yarn color can also affect the final aesthetic; classic white or cream yarn works best for a traditional skeleton look, while pastel or neon shades create a more whimsical effect.
Understanding basic amigurumi techniques is the next step. Familiarity with single crochet, slip stitch, and magic ring methods allows you to create consistent and neat stitches. Following the free crochet pattern, you will start by crafting the skeleton’s skull, followed by the rib cage, arms, legs, and other components. Each piece should be carefully shaped to maintain a proportional and visually appealing skeleton figure.
Another important aspect is assembly and finishing. Using a yarn needle, carefully sew each part together following the pattern’s instructions. Ensure joints are securely attached to prevent any loose parts. Additionally, lightly stuffing each component gives the amigurumi skeleton a defined shape without distorting the stitches. Proper finishing touches, like adding tiny crochet bones or expressive eyes, make your skeleton more lifelike and enhance its charm.
Working with a free crochet pattern encourages experimentation. You might try creating multiple skeletons of different sizes or integrating them into larger Halloween displays. Some crafters also enjoy pairing their amigurumi skeleton with other themed figures, like pumpkins or ghosts, for a complete festive scene. Each project contributes to improving your crochet skills while allowing you to express your creativity in fun and innovative ways.
Lastly, patience is key. Completing an Amigurumi Bone-Chilling Skeleton – FREE Crochet Pattern takes time and dedication. By taking breaks and working methodically, you ensure each part is carefully crafted and assembled. The end result is a beautiful, handmade skeleton that showcases your talent and brings joy to anyone who sees it.
Mastering amigurumi techniques is essential when creating your bone-chilling skeleton. Start with a magic ring, which forms the foundation for the skull and other round parts. This technique prevents holes at the starting point and creates a neat appearance. Consistency in stitch tension ensures all pieces look uniform and professional, which is crucial when assembling a complete crochet skeleton.
Single crochet stitches form the bulk of amigurumi work. They are compact and strong, ideal for maintaining the skeleton’s shape. Counting stitches accurately during each round helps avoid uneven shapes, which can affect assembly. Experienced crafters often recommend marking rounds to keep track of progress, especially for more complex components like arms or ribs.
Stuffing is another critical aspect. Using polyester fiberfill or similar materials ensures the amigurumi skeleton maintains a sturdy structure without becoming too rigid. Adding the right amount of stuffing prevents sagging or deformities. Smaller bones like hands or feet require minimal stuffing to preserve delicate details.
Assembly involves careful stitching of individual parts. The skull connects to the torso, while limbs attach to the sides. Using pins or clips to temporarily hold pieces in place can make sewing easier and more precise. Attention to detail ensures the final figure has balanced proportions and a polished look.
Safety is also important. For children or pets, secure all loose parts and avoid small embellishments that could be swallowed. Following these safety measures while crafting allows your free crochet skeleton to be both decorative and safe.
Finishing touches enhance the overall aesthetic. Adding embroidered eyes, subtle blushes, or unique facial expressions gives personality to your amigurumi skeleton. Each creative choice makes your handmade project truly unique and memorable.
Personalizing your Amigurumi Bone-Chilling Skeleton – FREE Crochet Pattern allows your creativity to shine. You can choose yarn colors, textures, and even add accessories to create a skeleton that fits your style. Experimenting with different sizes also gives the option to make a collection of skeletons for display.
Accessories like miniature hats, scarves, or tiny crochet props enhance the whimsical charm of your handmade skeleton. These small details show attention to creativity and provide a fun twist on a traditional figure. Seasonal or themed variations add even more excitement for holidays or gifts.
Modifying limb lengths or proportions can create unique poses. Some crafters prefer long, lanky skeletons, while others aim for shorter, cuter designs. Adjusting the pattern carefully ensures your modifications maintain structural integrity and visual appeal.
Adding embellishments is another way to customize. Crochet flowers, buttons, or stitched patterns on bones give a creative flair. Combining textures and colors transforms your free crochet pattern skeleton into a one-of-a-kind artistic piece.
Pairing your skeleton with other amigurumi creations creates a cohesive display. Incorporating small pumpkins, bats, or ghosts in a Halloween arrangement enhances the overall theme. This approach allows you to explore more complex crochet designs while maintaining focus on your main project.
Finally, consider gifting your customized skeleton. A handmade amigurumi skeleton is a thoughtful, personal present that showcases skill and creativity. Friends and family appreciate the effort put into these personalized, carefully crafted gifts.
Even experienced crafters can encounter issues when making an Amigurumi Bone-Chilling Skeleton – FREE Crochet Pattern. One common mistake is inconsistent stitch tension, which can distort shapes. Maintaining even tension is critical for a professional-looking result. Practicing stitches beforehand helps avoid this issue.
Skipping steps in the pattern may seem tempting but can lead to misaligned limbs or a misshapen torso. Following instructions closely ensures each component fits together correctly. Reviewing steps before starting a section prevents mistakes.
Overstuffing or understuffing parts is another frequent problem. Too much stuffing makes it hard to sew pieces together, while too little causes sagging. Adding moderate amounts gradually provides the right balance for a stable structure.
Another mistake is ignoring finishing touches. Small details like eyes, joints, or facial expressions significantly impact the skeleton’s final appearance. Taking time for these enhancements improves overall quality.
Improper assembly can also compromise durability. Secure stitches and reinforced joints are essential to prevent parts from detaching. Using appropriate tools, like yarn needles, ensures sturdiness.
Lastly, rushing the project reduces quality. Crafting an amigurumi skeleton requires patience and attention to detail. Working methodically produces a more polished and satisfying result.
Once your Amigurumi Bone-Chilling Skeleton – FREE Crochet Pattern is complete, displaying it creatively adds charm to your space. Place it on shelves, hang it from hooks, or include it in themed decorations. Your handmade crochet skeleton can be a centerpiece in seasonal décor or part of a larger collection.
Care is simple but important. Avoid washing in a machine; instead, gently hand wash and air dry to maintain the shape and yarn texture. Light dusting or occasional vacuuming keeps it clean. Proper storage ensures your skeleton lasts for years.
Consider seasonal variations. Add small holiday decorations or props to your crochet skeleton to match different occasions. This keeps the display fresh and engaging throughout the year.
Positioning your skeleton among other amigurumi or handmade decorations creates a cohesive and attractive arrangement. Combining colors, sizes, and textures enhances visual appeal.
If gifting, package it carefully. Use tissue paper or a small box to protect delicate limbs during transport. Recipients will appreciate both the creativity and thoughtful presentation.
Finally, enjoy the craftsmanship. Admire the effort and skill invested in creating a detailed, handmade skeleton. Each project contributes to honing your crochet expertise and cultivating pride in your artistic abilities.
Q1: Is this pattern suitable for beginners?
Yes! The Amigurumi Bone-Chilling Skeleton – FREE Crochet Pattern includes clear instructions and basic stitches, making it beginner-friendly.
Q2: Can I customize the skeleton’s size?
Absolutely. You can adjust yarn thickness, hook size, or stitch count to create larger or smaller skeletons.
Q3: What type of yarn is best?
Use high-quality acrylic or cotton yarn. These provide durability and maintain the skeleton’s shape.
Q4: How long does it take to complete?
Depending on experience, it may take 5–10 hours. Beginners might need slightly longer to complete all parts.
Q5: Can children help with this project?
Yes, under supervision. Avoid small detachable parts to ensure safety for young crafters.
Q6: How do I care for my finished skeleton?
Hand wash gently and air dry. Avoid machine washing to preserve shape and texture.
The Amigurumi Bone-Chilling Skeleton – FREE Crochet Pattern is a rewarding project that combines creativity, skill, and patience. From learning essential amigurumi techniques to customizing your skeleton with colors and accessories, this project allows both beginners and experienced crafters to enjoy the process. Following the steps carefully ensures a durable, charming, and unique handmade crochet skeleton that can be displayed or gifted with pride.
Now that you’ve learned how to make your own skeleton, share your experience! Leave your honest opinion and suggestions to inspire others in the world of DIY crochet. Every creation is a chance to improve, experiment, and celebrate your handmade artistry.


