
Crocheted house-shaped cookie for Christmas tree

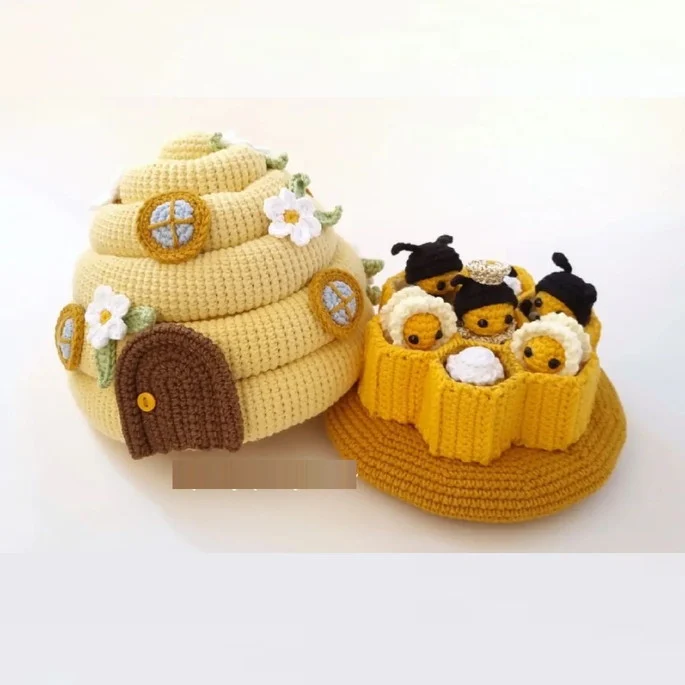
If you’re looking for a fun and creative project, the Amigurumi Beehive Pattern is perfect for beginners and experienced crocheters alike. This pattern allows you to craft a charming little beehive that can be used as home decor, a gift, or even as part of a larger amigurumi set.
Amigurumi has gained immense popularity because it combines creativity, fine motor skills, and relaxation in one enjoyable hobby. With this free pattern, you can create your very own cozy beehive that will delight anyone who sees it.
The Amigurumi Beehive Pattern is not just cute—it’s also highly customizable. You can choose your favorite yarn colors, adjust the size, and even add tiny crochet bees to make it more realistic.
Many crafters enjoy using this project as a way to experiment with different stitches and techniques, improving their skills while producing something adorable.
This pattern is especially recommended for those who want a small, manageable project that doesn’t require hours of work but still produces a satisfying final product.
One of the main benefits of following this Amigurumi Beehive Pattern is the flexibility it offers. You can easily adapt it for gifts, classroom projects, or personal collections. The PDF tutorial included provides step-by-step instructions, complete with images and tips to help you avoid common mistakes. Whether you are making your first amigurumi or you have years of crochet experience, this beehive pattern is approachable, enjoyable, and rewarding.
When starting the Amigurumi Beehive Pattern, it’s essential to understand the basic structure of the beehive. Typically, the beehive consists of stacked rings or layers, gradually decreasing in diameter toward the top. This shape mimics a natural hive and gives your crochet project a professional and polished appearance. By mastering the foundational techniques, you’ll find that creating variations or adding details becomes much easier.
The beehive pattern often begins with a magic ring, which is crucial for achieving a tight and seamless starting point. From there, you will work in rounds, gradually increasing stitches to create the base of the hive. As you progress, maintaining a consistent stitch count ensures that the layers stack neatly, creating the iconic beehive shape.
Choosing the right yarn and hook size is another critical step when following the Amigurumi Beehive Pattern. Typically, a medium-weight yarn works best, combined with a slightly smaller hook than recommended for the yarn. This helps the stitches remain tight, preventing stuffing from showing through. The choice of colors can also impact the final look, with yellow and brown shades giving a classic beehive appearance.
Once the basic structure is complete, adding details such as entrance holes or decorative stripes enhances the overall aesthetic. You can also crochet small bees using simple amigurumi techniques and attach them to the hive for an interactive and lively effect. These finishing touches make your project look professional and give it a charming personality.
Proper finishing is essential to ensure your beehive holds its shape and lasts for a long time. Stuffing the hive evenly, securing loose ends, and blocking the finished piece if necessary can make a huge difference in the final appearance. These small but critical steps elevate your Amigurumi Beehive Pattern from a simple project to a beautifully crafted item.
The joy of completing this amigurumi project goes beyond the final product. It’s an opportunity to practice patience, attention to detail, and creativity. Every stitch contributes to the overall charm of the Amigurumi Beehive Pattern, making it a rewarding experience for any crochet enthusiast.
To successfully complete the Amigurumi Beehive Pattern, you’ll need a few basic materials. The most important are the yarn, crochet hook, stuffing, and safety eyes if you choose to make your bees. Selecting high-quality yarn ensures a smooth finish and makes the project more enjoyable to work on. Cotton yarn is often preferred for its durability and ease of handling.
The crochet hook should match the size recommended for your chosen yarn, though slightly smaller hooks are often better for amigurumi projects. This allows the stitches to remain tight, which is especially important for stuffed items like the beehive. A smaller hook prevents gaps that could allow the stuffing to peek through.
Stuffing is another essential component of the Amigurumi Beehive Pattern. Polyester fiberfill is widely used because it is soft, lightweight, and easy to shape. You’ll want to stuff evenly, ensuring that each layer maintains the hive’s structure without bulging or collapsing. Proper stuffing enhances the three-dimensional look of your beehive.
Optional items can include stitch markers, a yarn needle, and small scissors. Stitch markers are helpful for keeping track of rounds, while a yarn needle allows you to weave in ends neatly. Small scissors are essential for cutting yarn without fraying the fibers, which helps maintain a professional appearance.
Color choices can also affect the overall look of your Amigurumi Beehive Pattern. Traditional beehive colors like golden yellow, honey brown, and natural beige provide a realistic effect, but you can always experiment with bright, playful shades for a more whimsical feel. Adding contrasting colors for stripes or bee details enhances visual interest.
Lastly, patience and attention to detail are key “materials” in any amigurumi project. Taking the time to follow the instructions carefully, count your stitches, and adjust as needed ensures that your beehive comes out looking polished and professional.
The Amigurumi Beehive Pattern begins with a foundation, usually a magic ring. From there, you will increase stitches gradually to create a circular base. This step is crucial because it establishes the hive’s stability and shape. By maintaining an even stitch count, your beehive will stack correctly as you build upwards.
Once the base is complete, the next step is to build the body of the hive. You’ll continue crocheting in rounds, decreasing or maintaining stitch counts depending on the layer. This part of the pattern allows you to practice tension control and consistency in your stitches, which are critical skills in amigurumi.
Adding the top of the hive requires careful attention to shaping. Decreasing stitches gradually ensures a rounded, natural appearance. This step may require minor adjustments to achieve the perfect dome shape, giving your Amigurumi Beehive Pattern a polished finish.
After completing the main structure, you can add entrance holes or decorative stripes. These details make your beehive more visually appealing and give it character. Use contrasting yarn or embroidery techniques to highlight these features effectively.
Crocheting small bees is an optional but delightful addition. Using simple amigurumi techniques, you can create tiny bees and attach them to the hive with yarn or thread. This step adds movement and liveliness to your project, enhancing the overall charm of your Amigurumi Beehive Pattern.
Finally, secure all ends, stuff the hive evenly, and adjust any areas that need shaping. Completing these finishing touches ensures your beehive holds its form and looks professional. Proper finishing is the key to turning a simple project into a treasured amigurumi piece.
Creating an Amigurumi Beehive Pattern can be a smooth and enjoyable experience if you follow a few simple tips. First, always count your stitches carefully. Even a small mistake can affect the shape of your hive, so staying organized is crucial. Using stitch markers can help keep track of rounds and increases.
Second, maintain consistent tension. Uneven tension can result in bulges or gaps in the hive, detracting from the final look. Practicing consistent tension is especially important for beginners, as it helps develop a neat and professional finish.
Third, take your time with stuffing. Even distribution of fiberfill ensures the hive maintains its shape without sagging. Avoid overstuffing, as this can distort the shape and make stitching the final rounds more difficult.
Fourth, don’t rush finishing touches. Weaving in ends carefully, securing loose stitches, and blocking if necessary can elevate your Amigurumi Beehive Pattern from a simple craft to a polished masterpiece.
Fifth, experiment with colors and patterns. Stripes, decorative stitches, or whimsical color choices can make your beehive unique. Creativity is one of the joys of amigurumi, allowing you to put a personal stamp on every project.
Lastly, enjoy the process. Amigurumi is meant to be fun, relaxing, and rewarding. Celebrate small milestones, like completing the base or finishing your first tiny bee. Each step contributes to the overall satisfaction of finishing your Amigurumi Beehive Pattern.
Q: Is this pattern suitable for beginners?
A: Yes, the Amigurumi Beehive Pattern is beginner-friendly. With clear instructions and a PDF tutorial, even those new to crochet can follow along successfully.
Q: What materials do I need?
A: You’ll need medium-weight yarn, a crochet hook, stuffing, a yarn needle, and optionally, stitch markers. Color choices can be traditional or playful.
Q: How long does it take to complete?
A: Depending on skill level, completing the beehive can take anywhere from a few hours to a day. Small details like bees may add extra time.
Q: Can I customize the size?
A: Absolutely! By adjusting yarn weight and hook size, you can create larger or smaller versions of the Amigurumi Beehive Pattern.
Q: Are the bees included in the pattern?
A: Many versions include optional small bees, but you can also crochet your own using simple amigurumi techniques.
Q: Can I sell the finished product?
A: Yes, finished items made from this pattern can generally be sold, but it’s important to respect copyright if the pattern author has restrictions.
The Amigurumi Beehive Pattern is a delightful, creative project that combines relaxation, skill-building, and charm. From understanding the structure to choosing materials, following the step-by-step instructions, and applying finishing touches, every stage is rewarding. The pattern is perfect for beginners and experienced crocheters alike and offers endless opportunities for customization.
We hope this guide has helped you understand how to create your very own Amigurumi Beehive Pattern. Don’t forget to experiment with colors, add tiny bees, and enjoy the process.
Please leave your honest opinion and suggestions about this pattern—we’d love to hear how your beehive turned out and any tips you discovered along the way!


