
Hunter's Star Quilt Block - Quick & Easy Tutorial

Creating a Golden Garland – Quilt Pattern is a delightful way to express creativity and craft a beautiful piece for your home. Whether you are a seasoned quilter or a beginner, this quilt pattern provides a structured yet flexible approach to making an elegant quilt.
The combination of traditional quilting techniques with a fresh, golden design ensures that your final creation is both visually stunning and functional.
By following a step-by-step approach, you can create a masterpiece that reflects your personal style while embracing the timeless art of quilting.
Quilting has long been cherished as both a practical and artistic endeavor. The Golden Garland quilt brings together the warmth of handcrafted fabric and the intricate charm of a carefully designed quilt pattern.
With the right materials, guidance, and patience, anyone can achieve a quilt that looks professionally crafted. This project is perfect for creating a family heirloom, a decorative piece, or even a thoughtful handmade gift. Moreover, quilting offers a meditative and rewarding experience that strengthens your sewing skills over time.
For those interested in DIY projects, the Golden Garland – Quilt Pattern is especially appealing because it combines accessibility with creativity. Beginners will appreciate the clear steps, while experienced quilters can experiment with fabrics and color palettes to make the quilt truly their own. With this guide, you’ll learn the techniques, terminology, and tips necessary to bring your quilt to life. By the end, you will have a warm, inviting quilt that captures both elegance and personality.
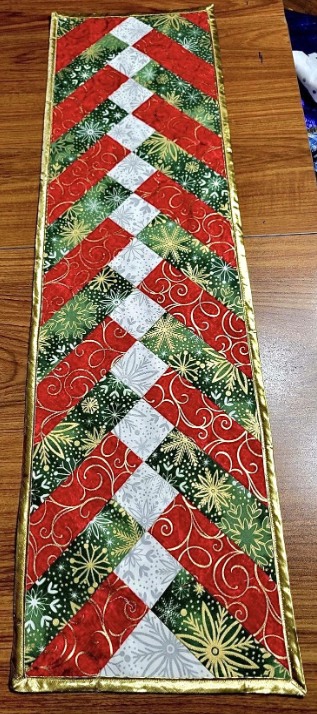
The Golden Garland quilt is renowned for its intricate yet approachable design. At its core, this quilt pattern features repeating motifs that resemble interwoven garlands, which provide a sense of movement and sophistication. Understanding the layout and structure is crucial before starting your project. Each section of the quilt is carefully planned to ensure symmetry and balance, making it visually appealing when completed.
When working with a DIY quilt, fabric selection is essential. Typically, this quilt pattern incorporates a mix of warm golden tones complemented by neutral shades. The contrast between light and dark fabrics helps the garland motif stand out, emphasizing the intricate details of the pattern. Experienced quilters might experiment with metallic threads or subtle embroidery to add texture and richness to the design.
Learning the terminology used in quilting is also important. Terms like “block,” “sashing,” “batting,” and “binding” frequently appear in the instructions for the Golden Garland quilt. Understanding these terms ensures that your sewing experience is smooth and your final quilt meets your expectations. Many quilters find that reviewing these basics before beginning the project saves time and reduces frustration during the construction process.
A key feature of the Golden Garland quilt is its adaptability. While the original pattern may call for a specific size, you can adjust the number of blocks or rows to create a quilt that fits your needs. Whether you want a small lap quilt or a full-size bedspread, the design principles remain the same. Customizing the quilt size allows quilters to tailor the project for personal use or gifting purposes.
Another consideration is the choice of quilting technique. The Golden Garland quilt pattern can be executed with hand quilting, machine quilting, or a combination of both. Hand quilting adds a personal touch and a sense of craftsmanship, while machine quilting offers speed and uniformity. Your choice depends on your comfort level, available tools, and desired finish.
Finally, keeping the workspace organized is critical. Sorting fabrics, cutting pieces precisely, and labeling sections of the quilt can make the process more manageable. Many quilters recommend creating a layout board or using design software to visualize the Golden Garland quilt before stitching. This step helps ensure that the final product matches your creative vision.
Creating a Golden Garland – Quilt Pattern requires gathering the right materials and tools. Quality fabrics, threads, and sewing equipment are essential for achieving a professional-looking result. Typically, quilters select cotton fabrics due to their durability, ease of use, and wide availability in diverse colors and patterns. A combination of gold, cream, and complementary shades brings the garland design to life.
Thread selection is equally important. Using a strong, color-matched thread ensures your quilt holds together well while maintaining aesthetic appeal. Many quilters opt for 100% cotton thread for consistency with the fabric, while some may choose polyester threads for added strength. Matching thread to the dominant fabrics enhances the quilt’s cohesive look.
In addition to fabrics and thread, several tools are essential. A rotary cutter, cutting mat, and quilting ruler help achieve precise cuts for each block. Scissors, pins, and sewing needles are also necessary for assembly. For machine quilters, a reliable sewing machine with quilting capabilities significantly speeds up the process. Beginners should ensure they have all tools ready before starting to avoid interruptions.
Batting is another key component. The Golden Garland quilt pattern typically uses cotton or polyester batting to provide warmth and structure. The thickness of the batting affects the quilt’s final feel, so quilters should choose based on preference. Layering the quilt sandwich—top fabric, batting, and backing fabric—is an essential step before stitching the layers together.
Backing fabric is often selected to complement the quilt top. A simple, solid fabric can highlight the garland motif, while a patterned backing adds extra visual interest. Consider using a lightweight fabric for easier handling and smoother quilting. Preparing the backing properly ensures a polished, professional finish for the completed DIY quilt.
Finally, marking tools like fabric chalk or disappearing ink pens assist in aligning designs and stitching accurately. These tools help guide quilting lines, ensuring symmetry and precision. Proper preparation with materials and tools sets the foundation for a successful Golden Garland quilt project.
Making the Golden Garland – Quilt Pattern begins with careful preparation. First, cut all fabric pieces according to the pattern specifications. Precision is critical, as even slight discrepancies can affect the alignment of the garland motifs. Using a rotary cutter and quilting ruler ensures consistent sizing and clean edges.
Next, assemble individual blocks. Each block represents a segment of the garland motif and must be sewn together accurately. Begin by stitching smaller units, then join them to form the larger block. Press seams carefully to maintain flatness and enhance the quilt’s appearance. This step-by-step approach ensures structural integrity and a visually pleasing design.
After blocks are assembled, arrange them according to the Golden Garland quilt layout. Many quilters lay the blocks on a design wall or floor to visualize the final quilt. Adjust placements as needed to balance color and pattern distribution. This step allows for creative decision-making while adhering to the pattern’s principles.
Once satisfied with the layout, join the blocks together to create the quilt top. Consistent seam allowances and careful stitching maintain uniformity. Take time to double-check measurements and alignments, as these details significantly impact the finished quilt’s quality. Precision here reflects in the quilt’s final presentation.
After completing the quilt top, prepare the quilt sandwich. Layer the backing fabric, batting, and quilt top, ensuring smoothness and alignment. Pin or baste the layers to prevent shifting during quilting. This preparation ensures the stitching process is seamless and avoids puckering or uneven surfaces.
Finally, quilt the layers together following the pattern’s design. Whether using hand or machine quilting, maintain consistent stitch length and follow the garland motifs to enhance the design. Once quilting is complete, add binding to the quilt edges to finish. Properly executed, this step finalizes the Golden Garland – Quilt Pattern into a stunning, ready-to-display quilt.
Enhancing your Golden Garland quilt involves attention to detail and creativity. One tip is to experiment with fabric textures and patterns. Combining solids, prints, and subtle textures can create depth and visual interest, making the quilt more dynamic and unique.
Color selection is another crucial factor. While the traditional Golden Garland – Quilt Pattern emphasizes gold tones, introducing complementary shades like cream, ivory, or soft pastels can highlight the garland design. Thoughtful color coordination enhances the quilt’s aesthetic appeal and ensures it stands out as a centerpiece.
Adding embellishments can further elevate the quilt. Quilters sometimes incorporate embroidery, appliqué, or decorative stitching to accentuate specific sections of the garland motif. These details offer personalization while showcasing sewing skills, creating a truly one-of-a-kind DIY quilt.
Maintaining proper quilting technique is vital. Consistent stitch length, smooth curves, and precise alignment reflect craftsmanship. Even minor deviations can affect the overall look. Practicing on scrap fabric before working on the quilt can improve technique and build confidence.
Caring for the quilt during and after completion is equally important. Wash fabrics before starting to prevent shrinking, and press seams carefully to maintain flatness. Once finished, proper washing and storage ensure longevity, preserving the Golden Garland quilt for years.
Lastly, document your process. Taking notes, photos, or videos helps track progress, replicate techniques, and share your experience with others. Documenting also allows for reflection and improvement in future quilting projects, making each quilt a learning journey.
Q1: Is the Golden Garland quilt suitable for beginners?
A1: Yes, while it involves multiple blocks and precise stitching, beginners can successfully complete the quilt by following step-by-step instructions and practicing basic techniques.
Q2: What fabrics work best for this quilt?
A2: Cotton fabrics are ideal due to durability, ease of use, and wide variety. Choosing complementary colors with gold tones enhances the garland motif.
Q3: Can I adjust the quilt size?
A3: Absolutely. The pattern is flexible. You can add or remove blocks to create a lap quilt, throw, or full bed quilt according to your needs.
Q4: Should I hand quilt or machine quilt?
A4: Both methods work. Hand quilting adds a personal touch, while machine quilting is faster and ensures uniform stitches. Your choice depends on preference and available tools.
Q5: Where can I find the free quilt pattern?
A5: The article provides a complete guide to creating your own quilt following the Golden Garland design, which functions as a free quilt pattern for DIY use.
Q6: How do I prevent fabric shifting while quilting?
A6: Use pins, basting spray, or hand basting to secure the quilt layers. This ensures smooth stitching and prevents misalignment.
The Golden Garland – Quilt Pattern offers a perfect blend of artistry, functionality, and DIY satisfaction. By understanding the pattern, selecting quality materials, and following a structured step-by-step approach, anyone can create a quilt that is both beautiful and durable. This project enhances your sewing skills, encourages creativity, and results in a timeless piece that can be cherished for generations.
We would love to hear your thoughts on this project! Share your experience, suggestions, and any tips you discovered while making your own Golden Garland quilt. Your insights could inspire and guide other quilting enthusiasts in their creative journey.


