
Hunter's Star Quilt Block - Quick & Easy Tutorial

If you are looking for a unique and creative quilting project, the All Hallows – Quilt Block Pattern is an excellent choice. This pattern combines the charm of classic quilt designs with a touch of Halloween-inspired artistry, making it perfect for seasonal décor or year-round quilting enthusiasts.
Whether you are an experienced quilter or a beginner eager to try something new, learning how to make a quilt block like the All Hallows design can be both rewarding and fun.
In this article, we will explore every detail of the All Hallows quilt block pattern, including step-by-step guidance, tips for choosing fabrics, and ideas for using your completed quilt blocks.
One of the most appealing aspects of the All Hallows – Quilt Block Pattern is its versatility. You can use it to create a small table topper, a wall hanging, or even a full-sized quilt.
The design is structured but flexible, allowing you to experiment with colors, textures, and layouts. By following a clear quilt block tutorial, you can bring your creative vision to life while mastering essential quilting skills. Plus, this pattern encourages careful attention to detail, which is key for achieving precise piecing and clean lines in your finished quilt.
Learning how to make a quilt block with the All Hallows pattern is not only about crafting—it’s also about understanding the principles of design and composition. Each piece of fabric in the block contributes to the overall pattern, so thoughtful choices in color and contrast can make your quilt truly stand out. Additionally, completing a quilt block like this offers a sense of accomplishment and can be a relaxing, meditative process. By following this guide, you will gain confidence in your sewing abilities and enjoy the satisfaction of creating something beautiful and functional.
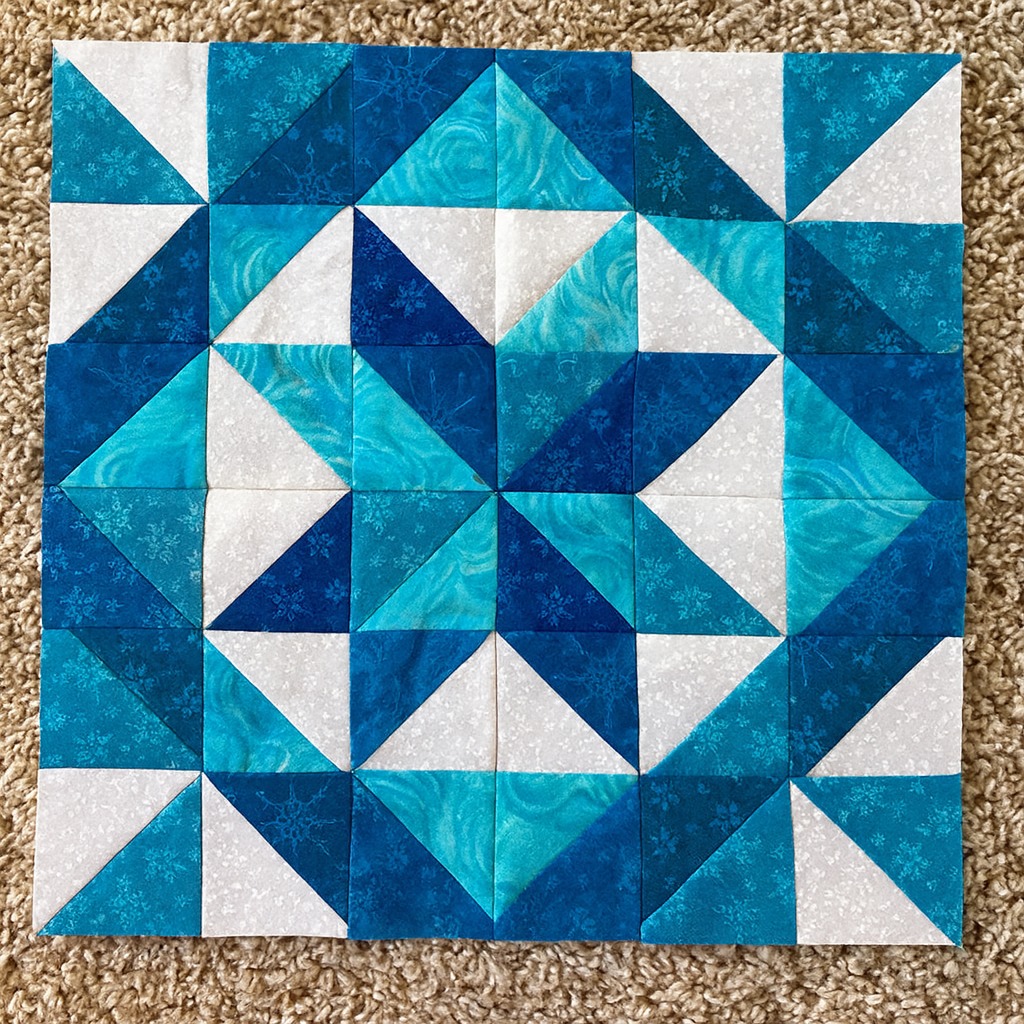
The first step in mastering the All Hallows quilt block pattern is understanding its structure. This quilt block typically features geometric shapes arranged in a symmetrical layout, combining triangles, squares, and rectangles. The design is reminiscent of traditional patchwork blocks but incorporates unique angles and color combinations to evoke a festive or spooky theme, making it ideal for Halloween-inspired quilts.
Fabric selection plays a crucial role in bringing the pattern to life. Choosing contrasting colors will help the shapes stand out, while coordinating fabrics create a harmonious overall appearance. When planning your DIY quilt block, consider using fabrics with subtle patterns, solids, or even textured materials to add depth. Experimenting with color placement can drastically change the feel of your quilt, from bold and dramatic to soft and subtle.
Another important aspect of the quilt block tutorial is accurate cutting. Precision is essential when working with multiple shapes in one block. Using a rotary cutter, cutting mat, and clear ruler will help ensure each piece is uniform. Even small deviations can affect the symmetry of the final quilt block, so take your time and double-check measurements before cutting each piece of fabric.
Piecing the block together requires patience and attention to detail. Start by assembling the smaller units, such as triangles or squares, and then sew them together to form the larger block. Pressing seams as you go helps maintain a flat, professional-looking finish. Following the step-by-step instructions of the All Hallows pattern will give you confidence and improve your quilting skills over time.
Many quilters enjoy adding embellishments or personal touches to the block. Embroidery, appliqué, or decorative stitching can enhance the visual appeal and make your All Hallows quilt block truly unique. While optional, these additions allow you to showcase your creativity and make the finished quilt a one-of-a-kind piece that reflects your personal style.
Finally, understanding the traditional quilting techniques used in the All Hallows quilt block pattern can inspire future projects. Once you are comfortable with this block, you can adapt it for larger quilts, combine it with other patterns, or create a themed collection. The skills you develop while completing this block are transferable to countless other quilting endeavors.
Creating the All Hallows quilt block pattern starts with gathering your materials. You will need fabric in your chosen colors, a rotary cutter, cutting mat, quilting ruler, thread, sewing machine, and iron. Optional tools include pins, seam ripper, and marking tools for precise alignment. Having all materials ready ensures a smooth quilting process.
Begin by cutting your fabric according to the pattern dimensions. Pay attention to each triangle, square, and rectangle measurement. Accurate cutting ensures your pieces fit together perfectly, which is critical for the geometric design of the DIY quilt block. Labeling your pieces can also prevent confusion during assembly.
Next, lay out the pieces in the order specified by the pattern. Visualizing the block before sewing helps you understand the placement of colors and shapes. This planning step is key in achieving the aesthetic balance desired in the All Hallows quilt block.
Sew the smaller units together first. For example, triangles may be paired to create larger triangles or squares. Press seams with an iron after each step to keep your pieces flat. This attention to detail ensures your quilt block will be neat and professional-looking.
Once the smaller units are complete, assemble them to form the entire block. Use pins or clips to hold pieces in place while sewing. Double-check alignment to avoid skewed seams. Consistency in seam allowance and careful stitching are essential for a clean finish in any quilting pattern.
Finally, press the completed block again and trim any excess fabric. Admire your work, as this All Hallows quilt block pattern is now ready to be incorporated into a larger quilt project or displayed as a standalone piece. Completing this block builds confidence and reinforces fundamental quilting techniques.
Choosing the right fabrics and colors is crucial when working with the All Hallows – Quilt Block Pattern. Bold, contrasting colors can make geometric shapes pop, while softer shades create a subtle, harmonious effect. Think about the mood you want your quilt to convey when selecting fabrics.
Fabric textures also play a significant role. Cotton is the most common choice for quilting due to its durability and ease of use, but mixing in fabrics with slight textures can add depth to your DIY quilt block. Avoid fabrics that stretch excessively, as this can distort the block’s shape.
Consider incorporating themed prints if you want a seasonal quilt. Halloween motifs, autumn leaves, or harvest designs can enhance the overall aesthetic of the All Hallows quilt block. Just ensure the patterns are not too busy, which may distract from the geometric design.
Test different fabric combinations before cutting by creating a small mock-up or using scraps. This allows you to visualize the final effect without committing your main fabric. Experimenting can lead to unexpected, beautiful results in your quilt block tutorial.
Balance is key in color placement. Placing light fabrics next to dark fabrics creates contrast and emphasizes the block’s shapes. Symmetry and repetition within the block maintain visual appeal and make the pattern more cohesive.
Lastly, think long-term. If your All Hallows quilt block will be part of a larger quilt, consider how it will coordinate with other blocks. Planning ahead ensures your quilt looks harmonious and professionally designed when complete.
Once your All Hallows quilt block pattern is complete, there are countless ways to use it. You can create a small table runner, wall hanging, or pillow cover to add charm to your home décor. The block also works well as a centerpiece in a larger quilt.
Combine multiple blocks for a full-sized quilt. Using different color schemes for each block adds variety while maintaining a consistent theme. The geometric design allows for creative layouts, such as diagonal or checkerboard arrangements.
The block can also inspire other sewing projects. For example, you can adapt the design into fabric tote bags, placemats, or even festive clothing accessories. The versatility of the DIY quilt block encourages endless creativity.
Consider gifting your quilt block projects. Handmade quilted items are thoughtful, personalized gifts for friends and family. A single block can be framed or mounted for a unique decorative piece.
Incorporate embellishments for added flair. Buttons, embroidery, or appliqué can personalize the block further and showcase your sewing skills. These enhancements make the All Hallows quilt block a distinctive, memorable creation.
Finally, display your completed blocks on social media or quilting forums. Sharing your work allows you to connect with other quilting enthusiasts, gain feedback, and inspire others to try the All Hallows quilt block pattern for themselves.
Q1: Is the All Hallows quilt block pattern suitable for beginners?
Yes, while it includes multiple geometric shapes, the step-by-step quilt block tutorial makes it manageable for beginners willing to practice precise cutting and sewing techniques.
Q2: What fabrics are best for this quilt block?
Cotton fabrics are ideal due to their durability and ease of use. Mixing prints and solids can add depth, but avoid fabrics that stretch or fray easily.
Q3: Can I use this pattern for seasonal quilts only?
Not at all! While it has a festive Halloween-inspired design, the All Hallows quilt block pattern is versatile and can be adapted for year-round quilts by choosing different fabrics and colors.
Q4: How do I ensure my quilt block is accurate?
Accurate cutting, consistent seam allowances, and careful pressing are key. Laying out pieces before sewing and using pins helps maintain alignment.
Q5: Can I combine this block with other patterns?
Absolutely! The geometric design allows for creative combinations with other quilt blocks. Planning the layout ensures a cohesive final quilt.
Q6: Are embellishments recommended?
Optional, but highly encouraged. Embroidery, appliqué, or decorative stitching can enhance the visual appeal and make your DIY quilt block unique.
The All Hallows – Quilt Block Pattern is a beautiful and versatile project for quilters of all skill levels. By learning how to make a quilt block, carefully choosing fabrics, and following a detailed tutorial, you can create a stunning piece that showcases your creativity. This pattern offers endless possibilities, from small home décor projects to full-sized quilts, and allows room for personal touches and embellishments.
We hope this guide has inspired you to try the All Hallows quilt block pattern yourself. Don’t forget to experiment with colors, textures, and layouts to make your quilt truly your own.
Please leave a sincere opinion and any suggestions on how this guide could be improved or what additional projects you’d like to see—your feedback helps create even better quilting content for everyone.


