
Crocheted house-shaped cookie for Christmas tree

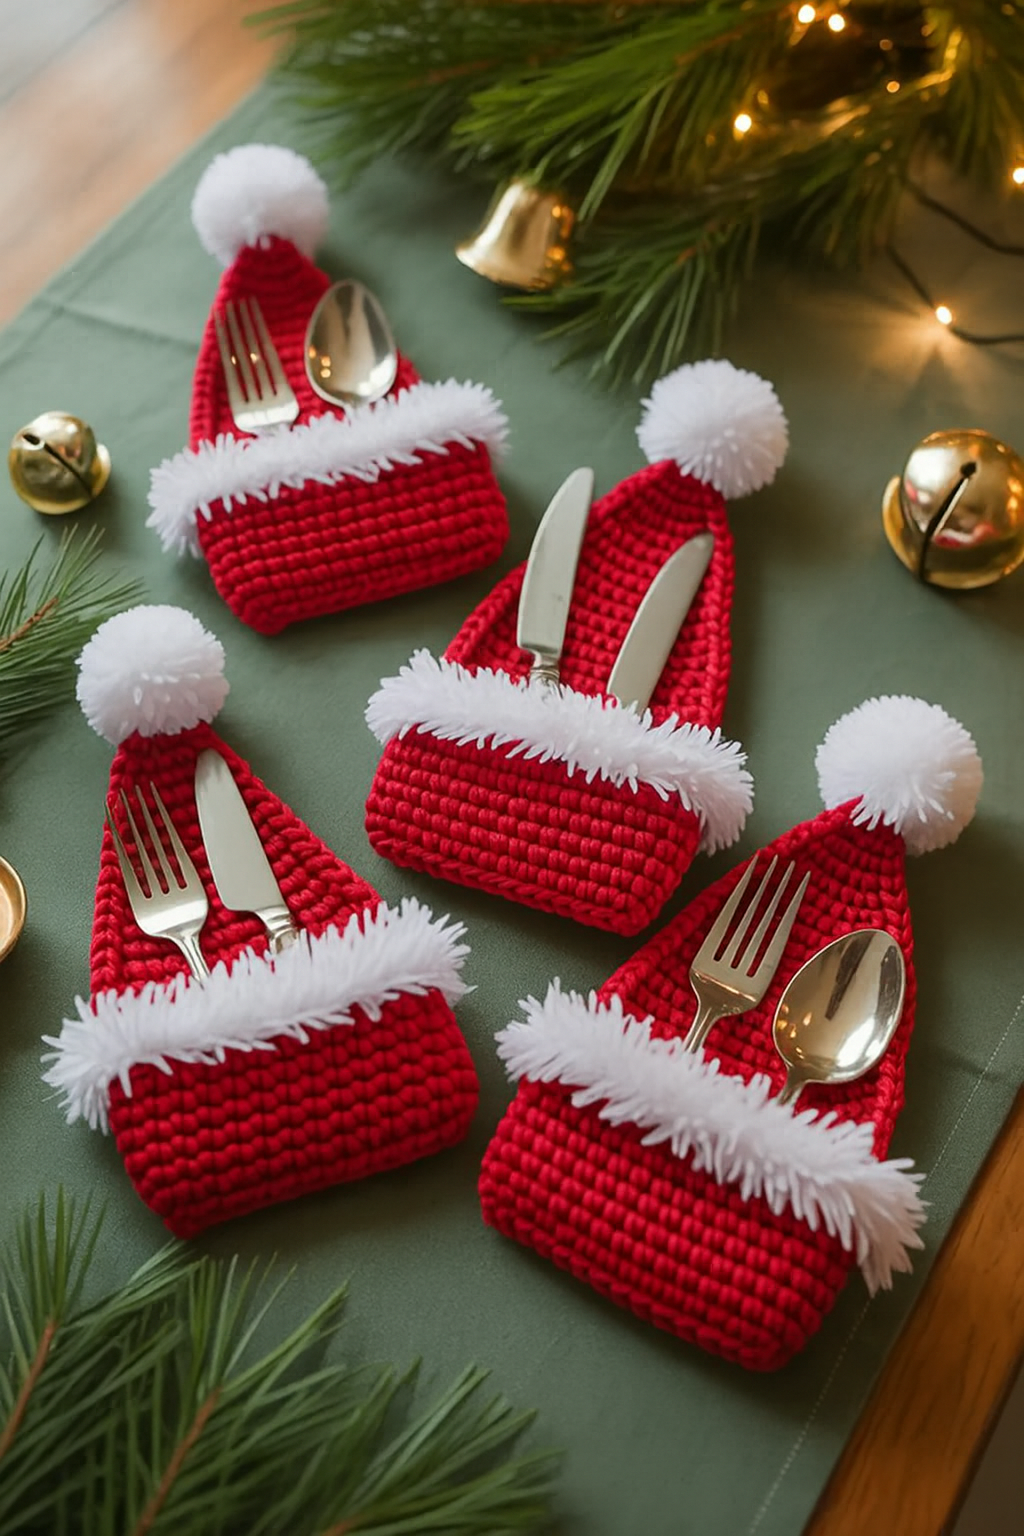
If you’re looking to add a festive touch to your holiday table, the Santa Hat Cutlery Holder – FREE Crochet Pattern is the perfect DIY project.
This charming decoration not only brings a cozy Christmas vibe to your dining space, but it’s also a fun and creative way to personalize your table settings.
Whether you’re an experienced crocheter or just starting out, this free crochet pattern makes it easy to craft adorable Santa hat holders for your cutlery.
Crocheting your own Santa hat cutlery holder allows you to explore your creativity while making something practical. You can choose from a variety of yarn colors, embellishments, and sizes to fit your table perfectly.
Beyond its decorative appeal, this project also provides an opportunity to refine your crochet for beginners skills, offering a satisfying mix of crafting and functionality.
What makes this DIY Christmas table decoration so appealing is how simple it is to customize. You can add small bells, sequins, or tiny bows to make each holder unique. With this free crochet pattern, you can produce a complete set that elevates your holiday meal presentation. Let’s dive into the details of creating your very own Santa hat cutlery holder.
Creating the Santa hat cutlery holder – FREE Crochet Pattern starts with gathering the right materials. Using high-quality yarn and the correct crochet hook ensures that your holders look professional and last for years. The most common yarns for this project are acrylic or cotton blends in red, white, and green, which capture the traditional Christmas colors perfectly.
To begin, you’ll need a standard crochet hook, usually in sizes G or H depending on your yarn choice. Scissors, stitch markers, and a yarn needle are essential for finishing touches and weaving in ends neatly. Some crafters also like to include small decorative items, like pom-poms or tiny jingle bells, to make the holiday table decor even more festive.
It’s important to note that the amount of yarn depends on how many holders you plan to make. Typically, one skein of red yarn and a smaller amount of white yarn are sufficient for a set of four to six holders. This makes it an affordable yet highly effective DIY Christmas table decoration.
Using quality materials ensures your holders are sturdy enough to hold cutlery without sagging. Cotton yarn, for example, has excellent structure and is easy to wash, which is ideal if you plan to use the holders for multiple holiday seasons. The choice of materials can also affect the overall look, so pick yarns that complement your table setting.
Remember that attention to detail matters. Selecting matching embellishments and coordinating your yarn colors can make a significant difference in the final appearance. Even beginners can achieve professional results with this free crochet pattern by carefully preparing their materials and workspace.
Finally, always have extra yarn on hand. Mistakes happen, and it’s much easier to correct errors if you have enough material. Once your supplies are ready, you’re set to start crocheting your own Santa hat cutlery holder, turning your table into a festive masterpiece.
Following the Santa Hat Cutlery Holder – FREE Crochet Pattern is easier than you might think. Begin by making a small magic ring with your red yarn, which will form the tip of the hat. Then, use single crochet stitches to expand the ring, gradually increasing until it reaches the desired diameter for the hat’s opening.
Once the main body of the hat is complete, you can start shaping it into the classic cone design. This involves carefully decreasing stitches as you move upward, creating the iconic Santa hat silhouette. Paying attention to stitch counts ensures your holder maintains a consistent shape and can comfortably hold cutlery.
Adding the white trim is a crucial step. Use a contrasting white yarn to crochet a simple band around the base of the hat. This gives the Santa hat cutlery holder its traditional holiday look. For beginners, it’s helpful to count stitches and maintain even tension to achieve a neat finish.
Next, add any decorative elements such as a pom-pom at the tip of the hat. This small detail instantly transforms your holder into a festive ornament. You can experiment with different sizes and textures of pom-poms to personalize your DIY Christmas table decoration.
Finishing the cutlery holder involves weaving in all loose ends and ensuring the hat stands upright. Some crafters lightly stiffen their holders using a fabric stiffener to give them more structure, especially if the yarn is very soft. This step is optional but adds durability.
Finally, test your holders with actual cutlery to confirm they fit snugly. Adjustments can be made by slightly stretching or reshaping the hat. Once satisfied, you’ve completed a beautiful and functional Santa hat cutlery holder ready to impress your holiday guests.
When working on your Santa Hat Cutlery Holder – FREE Crochet Pattern, there are several tips that can help you achieve professional results. First, always maintain consistent tension in your stitches. Uneven tension can lead to misshapen hats that don’t hold cutlery properly.
Using stitch markers is another helpful trick. They allow you to track your rounds and ensure your increases and decreases are accurately placed. This is particularly important for beginners who are still mastering basic crochet techniques.
Blocking your finished pieces can also improve their appearance. By gently shaping the hats and allowing them to dry, you can create a more polished and symmetrical look for your holiday table decor.
Experimenting with yarn textures and colors can give each Santa hat cutlery holder a unique personality. Consider using metallic yarns or adding subtle glitter to make your table setting even more festive.
Don’t rush the process. Taking your time ensures your stitches are neat, and the overall structure of the hat is maintained. Even beginners can create impressive results by working patiently and following the free crochet pattern carefully.
Finally, enjoy the process! Crochet is not only a practical skill but also a relaxing and rewarding activity. Each completed DIY Christmas table decoration is a testament to your creativity and effort, making your holiday season even more special.
Your Santa Hat Cutlery Holder – FREE Crochet Pattern can be more than just a practical tool; it’s also a versatile decoration. You can line a dining table with matching holders for a coordinated holiday theme, instantly transforming the space into a festive wonderland.
These holders can also be given as handmade gifts to friends and family. Pair them with a small set of cutlery or napkins for a thoughtful, personalized present that showcases your creativity.
In addition, they can be used in combination with other DIY Christmas table decorations, such as crocheted napkin rings or festive centerpieces. Coordinating these elements creates a cohesive and visually appealing table setting.
Some crafters even use the hats as small party favors or place card holders. Simply attach a name tag to each holder, and you’ve added a unique touch to your holiday gathering.
Another creative idea is to make holders in different colors or sizes to match various themes or table setups. For example, mini hats can hold small spoons or dessert forks, while larger ones accommodate full cutlery sets.
Lastly, consider using these holders for holiday craft fairs or charity events. They’re simple to make in bulk, appealing to buyers, and perfect for showcasing your crocheting skills while spreading festive cheer.
Q1: Is this Santa hat cutlery holder suitable for beginners?
Yes! The Santa Hat Cutlery Holder – FREE Crochet Pattern is beginner-friendly. It uses basic crochet stitches and includes step-by-step instructions, making it accessible even for those new to crochet.
Q2: What type of yarn works best?
Acrylic or cotton yarn in red and white is ideal. Cotton provides structure, while acrylic is easy to handle and comes in festive colors.
Q3: Can I customize the holder?
Absolutely! You can change colors, add pom-poms, bells, or sequins to match your personal style or table decor theme.
Q4: How long does it take to make one holder?
Depending on your skill level, it can take anywhere from 30 minutes to an hour per holder. Beginners might take longer, but the process is enjoyable and rewarding.
Q5: Can the holders be washed?
Yes. Cotton holders can typically be hand-washed, while acrylic yarn is often machine-washable. Always check the yarn label for care instructions.
Q6: How do I make the holder stand upright?
Maintaining consistent stitch tension and optionally using a light fabric stiffener helps the hat hold its shape and stand upright.
Creating your own Santa Hat Cutlery Holder – FREE Crochet Pattern is a fun, festive, and practical way to enhance your holiday table. From selecting materials to adding decorative touches, each step allows you to exercise creativity while producing something functional. This project is suitable for both beginners and experienced crocheters, making it an ideal DIY Christmas table decoration.
By following this guide, you can make multiple holders to create a cohesive and charming holiday table setup. Don’t forget to experiment with colors, textures, and embellishments to make each holder uniquely yours.
We’d love to hear your thoughts! Share your honest opinion and suggestions on the project. How did your Santa hat cutlery holder turn out? Any tips or personal twists you’d like to share for fellow crafters?


