
Hunter's Star Quilt Block - Quick & Easy Tutorial

Learning how to create beautiful and functional coasters with this patchwork coasters sewing tutorial is a rewarding and relaxing project for anyone who loves fabric crafts.
These DIY fabric coasters not only protect your furniture from spills and heat but also add a touch of handmade charm to your home décor.
Whether you’re new to sewing or an experienced quilter looking for a quick creative break, this project is an ideal sewing project for beginners that delivers professional-looking results in just a few hours.
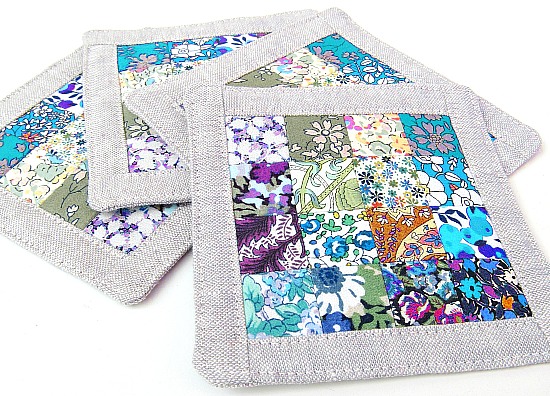
Patchwork coasters are a wonderful way to use up fabric scraps left from other projects. Instead of letting those lovely pieces go to waste, you can combine them to create colorful, patterned quilted coasters that express your personal style. Each coaster becomes a tiny canvas for creativity—mixing colors, prints, and textures to create a set that’s both practical and artistic.
The great thing about following a handmade coaster pattern is that you can customize every detail: size, fabric type, and design layout. You can coordinate them with your kitchen or dining room décor, make seasonal sets for holidays, or even create small gifts for friends and family. This patchwork coasters sewing tutorial will walk you through every step, from choosing fabrics to adding the final stitches, ensuring a smooth and enjoyable crafting experience.
Before starting your patchwork coasters sewing tutorial, gather the right fabrics and tools. Cotton fabric is the best choice for DIY fabric coasters because it’s absorbent, durable, and easy to sew. Consider using quilting cottons in complementary patterns—florals, stripes, plaids, or solids that coordinate well together. You can even include a mix of prints for a fun, modern patchwork style.
To make your quilted coasters thick and protective, you’ll need batting or interfacing between the layers. Cotton batting is ideal for heat resistance, while fusible interfacing adds stiffness and structure. For a more eco-friendly version, you can even repurpose old fabric or towels as the inner layer.
You’ll also need basic sewing tools: a sewing machine, scissors or a rotary cutter, a cutting mat, pins or clips, an iron, and matching thread. These essentials help you complete the handmade coaster pattern accurately and efficiently.
Pre-wash and iron your fabrics before cutting. This prevents shrinkage and ensures that the finished DIY fabric coasters will hold their shape after washing. Ironing also makes it easier to cut precise pieces and achieve clean seams.
When choosing color combinations, think about the mood you want your coasters to evoke. Warm tones like red, orange, and yellow give a cozy feel, while blues and greens create a calming atmosphere. Using contrasting patterns helps highlight the patchwork design.
Finally, organize your workspace. Arrange your fabrics, tools, and pattern pieces neatly before starting. A clean and organized area makes the process smoother and more enjoyable as you follow the patchwork coasters sewing tutorial.
The creative part of this patchwork coasters sewing tutorial begins with cutting your fabrics. Start by cutting small squares—typically 2½ inches each—from your selected fabrics. You’ll need enough pieces to create a square about 4½ inches once sewn together, depending on your preferred coaster size.
Arrange the squares in a pattern that pleases your eye. You can create random arrangements for a scrappy look or follow a symmetrical design. This step allows you to visualize the final quilted coasters layout before stitching.
Sew the fabric squares together in rows using a ¼-inch seam allowance. Press each seam flat after stitching—first in one direction, then alternate on the next row to reduce bulk. Consistent seams ensure that your DIY fabric coasters lie flat and look professionally finished.
After completing the rows, join them together to form the coaster top. Press all seams flat again and trim the edges to square up the piece. A neat, accurate top makes assembling the handmade coaster pattern much easier later on.
Next, prepare the batting and backing. Cut each to the same size as the patchwork top. Layer the three pieces: backing fabric (right side down), batting in the middle, and patchwork top (right side up). This “quilt sandwich” forms the base of your sewing project for beginners.
Finally, secure the layers with pins or clips to prevent shifting. You’re now ready to begin quilting the layers together, turning your fabric pieces into beautiful, functional quilted coasters.
Quilting adds both beauty and stability to your DIY fabric coasters. You can quilt by hand or use a sewing machine—either method works beautifully. Straight-line quilting is the easiest option, making it perfect for a sewing project for beginners. Simply sew evenly spaced lines across the coaster top, either horizontally, vertically, or diagonally.
If you’re feeling creative, experiment with free-motion quilting or decorative stitches. These techniques add texture and personality to your patchwork coasters sewing tutorial results. Just remember to keep the stitches even and consistent.
After quilting, trim any excess batting or backing fabric to ensure clean, straight edges. A rotary cutter helps achieve crisp edges that align perfectly. This step gives your handmade coaster pattern a professional finish.
Next comes the binding. You can create your own binding strips from leftover fabric or use store-bought bias tape. Fold the binding around the coaster edges and sew it in place, tucking the ends neatly. This border not only secures the layers but also adds a polished touch to your quilted coasters.
Once the binding is attached, give the coaster a final press with an iron. Ironing flattens the seams and brings out the crisp patchwork lines. Your DIY fabric coasters will now look beautifully finished and ready to use.
Finally, repeat the process for each coaster in your set. Making multiple coasters allows you to experiment with different patterns and colors, turning this sewing project for beginners into a fun and rewarding series of creations.
One of the best parts of following a patchwork coasters sewing tutorial is the ability to personalize your creations. Try mixing various fabrics to match different seasons—bright florals for spring, cozy plaids for autumn, or festive prints for holidays. Customizing your DIY fabric coasters makes them unique and enjoyable to use year-round.
You can also add embellishments to your coasters. Decorative stitching, embroidery, or small appliqué shapes can give your handmade coaster pattern an extra special touch. If you enjoy hand-stitching, try adding simple motifs like hearts or leaves to complement the patchwork.
For a more rustic look, leave the coaster edges raw and frayed slightly after sewing. This technique, often called “rag quilting,” gives your quilted coasters a cozy, farmhouse style. It’s easy to achieve and requires minimal finishing.
These DIY fabric coasters also make fantastic handmade gifts. Tie a set together with ribbon or twine, and add a tag for a thoughtful personal touch. They’re perfect for birthdays, holidays, or housewarming presents—everyone appreciates a beautiful and useful handmade gift.
If you have leftover scraps from larger projects, turn them into coaster sets to reduce fabric waste. Sustainable crafting is both environmentally friendly and deeply satisfying. This patchwork coasters sewing tutorial is a great way to practice mindful creativity.
Lastly, consider photographing your finished quilted coasters to share your creativity online or keep a record of your progress. Documenting your sewing journey inspires others and helps you see how your skills evolve with each project.
1. What size should patchwork coasters be?
Most coasters are between 4 and 5 inches square, but you can adjust the size to your preference or cup size.
2. Can I make these coasters without a sewing machine?
Yes! Hand-stitching works well for this project, especially since the pieces are small. It just takes a bit more time and patience.
3. What’s the best batting for coasters?
Cotton batting is the most popular choice because it absorbs moisture and provides heat resistance for hot mugs.
4. How do I wash my quilted coasters?
Machine wash on a gentle cycle with mild detergent. Air dry or use a low-heat setting in the dryer to prevent shrinkage.
5. Can I sell my handmade coasters?
Absolutely! Handmade coasters are popular at craft fairs and online shops. Just be sure to photograph them clearly and describe the materials used.
This patchwork coasters sewing tutorial shows that creating beautiful, functional DIY fabric coasters is simple and enjoyable for crafters of all levels. From cutting and piecing fabric scraps to quilting and finishing, every step adds charm and personality to your project. Whether you’re making them for yourself or as gifts, these quilted coasters are sure to impress and inspire.
We hope this guide helps you start your own creative journey. Share your thoughts, experiences, and suggestions below—we’d love to hear how your handmade coaster pattern turned out and what fabrics or designs you chose!


