
Hunter's Star Quilt Block - Quick & Easy Tutorial

Dresden Plates Make a Whimsical Bicycle – Quilt Pattern is an enchanting and imaginative project that brings together traditional quilting with a creative modern twist.
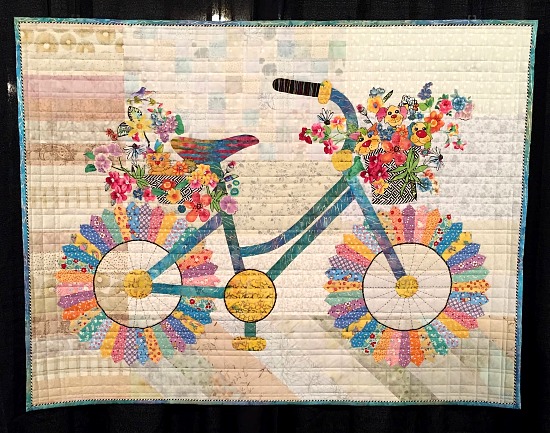
The iconic Dresden plate block, often used for floral or circular designs, is reimagined here as the playful wheels of a bicycle. This charming concept transforms a classic quilting motif into a fun, storybook-like piece of textile art.
Whether you’re an experienced quilter or a beginner looking for an exciting challenge, this pattern offers a delightful way to blend color, movement, and nostalgia into your next quilt.
The beauty of Dresden Plates Make a Whimsical Bicycle – Quilt Pattern lies in its balance between structure and creativity. While the Dresden plate is a well-known pattern, using it as the basis for a whimsical bicycle adds an unexpected element that immediately catches the eye.
This design is perfect for wall hangings, baby quilts, or even as a focal point on a larger quilt project. It’s a pattern that celebrates the joy of cycling and the artistry of quilting, all in one piece.
Creating this quilt pattern is also a wonderful opportunity to experiment with vibrant fabrics and textures. You can choose playful prints, vintage-inspired florals, or bold solids to make your bicycle come to life. As you piece together the spokes of the Dresden plates and assemble the bicycle frame, you’ll find that every stitch adds personality to your design. This project is not only a creative outlet but also a heartwarming way to express your love for handmade artistry and whimsical design.
Before starting your Dresden Plates Make a Whimsical Bicycle – Quilt Pattern, it’s essential to gather the right materials and prepare your fabrics carefully. Quilting success starts with good planning and high-quality supplies.
You’ll need cotton quilting fabric in a variety of colors. Choose two main fabrics for the Dresden plates (these will become your bicycle wheels), and additional fabrics for the frame, background, and embellishments. Cotton is ideal because it’s durable, easy to sew, and presses well.
For tools, you’ll need a rotary cutter, self-healing cutting mat, quilting ruler, pins or clips, and a sewing machine. A Dresden plate template is crucial for cutting the fan-shaped pieces accurately. Many quilters also use a fabric glue stick or fusible webbing to hold pieces in place before stitching.
Don’t forget thread that complements your fabric, batting for the quilt sandwich, and backing fabric to finish your project. If you plan to hang your finished quilt, prepare a hanging sleeve and rod pocket as well.
Once your materials are ready, wash and press your fabrics to prevent shrinking later. Then, organize your fabric by color and pattern — this step helps you visualize how your whimsical bicycle will come together.
Now that you’re ready, let’s start making your Dresden Plates Make a Whimsical Bicycle – Quilt Pattern. This section will guide you step by step through the process.
Step 1: Cut the Dresden Blades
Use your template to cut equal-sized fan blades from your chosen fabrics. You’ll need 20 blades per Dresden plate for a full circle. Mix patterns and colors for a cheerful, whimsical look.
Step 2: Sew the Blades Together
Fold each blade in half lengthwise, right sides together, and sew across the top. Turn it right side out and press to create a pointed petal shape. Then, join all the blades edge to edge to form your circular Dresden plate. Press the seams flat.
Step 3: Create the Wheel Centers
Cut small fabric circles for the centers of each Dresden plate. Fuse or appliqué them in place, then stitch around the edges to secure. These circles will become the centers of your “bicycle wheels.”
Step 4: Arrange the Bicycle Frame
On your background fabric, lightly sketch a bicycle frame using a washable fabric marker. Use fabric strips, bias tape, or appliqué techniques to form the handlebars, seat, and frame.
Step 5: Attach the Dresden Wheels
Position your completed Dresden plates as the front and rear wheels. Pin or glue them in place, then sew carefully around their edges with a decorative stitch.
Step 6: Add Decorative Details
This is where your creativity shines! Add flowers in the basket, embroidered spokes, or even a little bird perched on the seat. These small details make your quilt truly whimsical and personal.
Step 7: Quilt and Bind
Once your design is complete, layer your top fabric, batting, and backing. Quilt through all layers, following the lines of your bicycle or adding free-motion swirls for a dynamic look. Finish by trimming and binding the edges.
The Dresden Plates Make a Whimsical Bicycle – Quilt Pattern can be customized in countless ways to reflect your artistic style.
One fun approach is to use vintage fabrics. Old floral prints or retro patterns add nostalgia and charm, evoking a storybook aesthetic.
For a more modern look, choose solid colors or geometric prints that contrast sharply with your background. This gives the quilt a minimalist, contemporary feel.
You can also experiment with scale — create oversized Dresden plates for dramatic wheels or mini plates for a delicate, subtle design.
To add depth, consider layering fabrics. Use tulle, lace, or textured materials on the bicycle basket or flowers for a 3D effect.
If you’re feeling playful, personalize your bicycle! Add a small name label, initials on the frame, or even appliqué a pet sitting in the basket.
Finally, think about backgrounds. A light blue sky with quilted clouds, a cobblestone path, or abstract color blocking can all enhance the overall storytelling of your quilt. The possibilities are endless, and that’s what makes this pattern so enchanting.
To make your Dresden Plates Make a Whimsical Bicycle – Quilt Pattern look professional, keep these expert quilting tips in mind.
Always press your seams flat after each step. Neat seams make your Dresden plates smooth and perfectly shaped.
When joining the blades, use a consistent seam allowance — typically ¼ inch — to maintain even circles.
For clean appliqué edges, use fusible webbing or turn under the raw edges before stitching. This keeps your quilt durable and prevents fraying.
Choose thread colors that either blend in for a subtle look or contrast for a decorative touch. Quilting thread weight can also affect the final texture.
Test your stitch settings on a fabric scrap before quilting the final piece. Adjust tension and stitch length to suit your design.
Finally, take your time with placement. The balance of the bicycle on the quilt top determines how whimsical and visually pleasing the final piece will be. Step back occasionally to assess the composition before stitching everything down.
Q1: Is this pattern suitable for beginners?
A: Yes! While it involves several steps, the Dresden Plates Make a Whimsical Bicycle – Quilt Pattern is beginner-friendly, especially if you’re familiar with basic piecing and appliqué.
Q2: Do I need a Dresden plate template?
A: It’s highly recommended. Templates help ensure accuracy, giving your wheels even and symmetrical shapes.
Q3: What fabrics work best for this quilt?
A: 100% cotton quilting fabrics are ideal. They’re easy to handle, durable, and available in endless prints and colors.
Q4: Can I make this design smaller for wall art?
A: Absolutely! Scale down the Dresden plates and bicycle frame for a charming mini quilt or wall hanging.
Q5: How can I make my quilt more whimsical?
A: Add colorful fabrics, hand embroidery, and small appliqué details like flowers, birds, or ribbons. These elements enhance the storybook charm.
Q6: How should I quilt the final piece?
A: You can outline the bicycle parts for a clean look or use free-motion quilting to add movement and texture to the background.
In this guide to Dresden Plates Make a Whimsical Bicycle – Quilt Pattern, you’ve discovered how to transform a classic Dresden plate into a joyful, imaginative design. Combining traditional quilting methods with creative flair, this project results in a playful piece that captures the spirit of fun and craftsmanship. It’s perfect for adding a touch of whimsy to your décor or gifting to someone who appreciates handmade art.
Now that you know the steps, techniques, and variations, it’s time to create your own version of this charming quilt. Experiment with colors, fabrics, and embellishments, and make it truly your own. Don’t forget to share your honest thoughts and suggestions — your creativity could inspire others to hop on their sewing machines and bring their whimsical bicycle quilts to life! 🚲🧵


