
Hunter's Star Quilt Block - Quick & Easy Tutorial

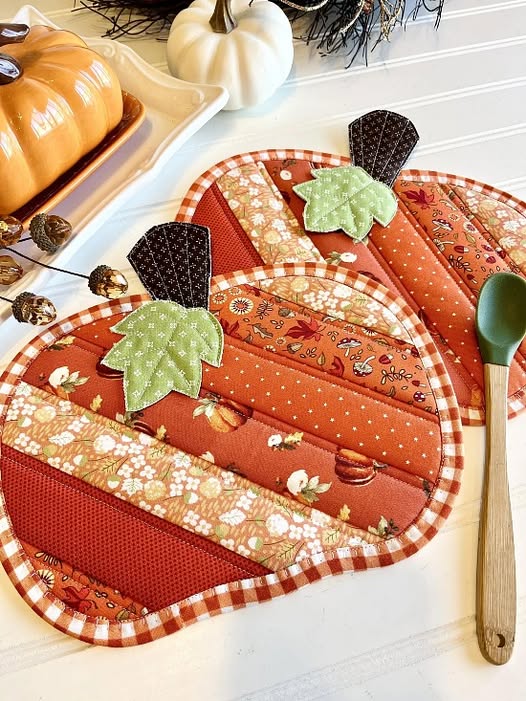
Creating a Halloween Pumpkin Patchwork Pot Holder is one of the most enjoyable seasonal crafts you can make to decorate your kitchen while adding a cozy handmade touch.
The Halloween Pumpkin Patchwork Pot Holder combines the charm of patchwork quilting with the festive spirit of Halloween, bringing together bright autumn fabrics, spooky yet cute pumpkin motifs, and the practicality of a kitchen accessory.
Whether you are a beginner quilter or an experienced sewer, this project offers a perfect opportunity to use your fabric scraps creatively and make something both decorative and useful.
Halloween is all about cozy vibes, creativity, and handmade charm. Adding a pumpkin patchwork design to your kitchen décor instantly captures that festive atmosphere.
Imagine hosting a Halloween dinner and showing off your homemade Halloween Pumpkin Patchwork Pot Holder—it becomes not just a kitchen tool but also a conversation piece. It’s the little details like this that make your space warm, inviting, and full of character during the spooky season.
Another reason this craft is so popular is because it’s versatile. You can choose your color palette—traditional oranges and blacks, modern whites and grays, or even pastel pumpkins for a more whimsical aesthetic. With a mix of textures, patterns, and stitching techniques, you’ll end up with a truly personalized piece. Plus, patchwork sewing is a sustainable hobby that encourages the reuse of fabric scraps. This makes the Halloween Pumpkin Patchwork Pot Holder both eco-friendly and cost-effective—a perfect blend of creativity and practicality.
When making a Halloween Pumpkin Patchwork Pot Holder, fabric choice is crucial. You want fabrics that are both visually appealing and durable enough to handle heat. Cotton fabric is the most common choice since it is breathable, easy to sew, and heat-resistant. For extra safety, you can add a layer of heat-resistant batting, such as Insul-Bright, between your fabric layers to protect your hands from hot dishes.
Select a variety of fabrics in Halloween-themed colors such as orange, black, brown, cream, and deep green. You can also experiment with prints—think pumpkins, bats, leaves, and spider webs. Mixing solids with small prints gives your patchwork more depth and visual balance. Don’t shy away from metallic accents; a touch of gold or silver thread can make your design pop under warm kitchen lighting.
If you’re aiming for a modern farmhouse look, consider muted tones and linen-like textures. These fabrics give your Halloween Pumpkin Patchwork Pot Holder a rustic charm that pairs well with wooden or neutral kitchen décor. Alternatively, if you love bold colors, go for bright oranges, blacks, and purples to make your piece stand out as a festive accent.
Always pre-wash your fabrics before cutting. This prevents shrinking later on and ensures your seams stay tight after multiple washes. After washing, iron your fabrics flat—smooth surfaces make precise cutting easier, especially for small patchwork pieces.
For a cohesive look, pick a coordinating thread that complements your fabric palette. If your design uses multiple bright fabrics, neutral thread colors like gray or beige will blend seamlessly. However, if you want your stitches to stand out, choose contrasting threads to add definition to your seams and quilting lines.
Finally, prepare your backing fabric and binding. The backing is the reverse side of your pot holder, so pick something simple but sturdy. The binding frames your patchwork beautifully, and you can either match it with one of the patchwork colors or use a darker shade for contrast.
Start by cutting your fabric pieces into small squares or strips depending on your design. Many crafters prefer using 2½-inch squares, but you can adjust the size based on the final dimensions you want for your pot holder. Arrange the pieces on a flat surface until you’re satisfied with the layout—this helps visualize your pumpkin design before sewing.
Next, sew your squares together using a ¼-inch seam allowance. Press the seams open as you go to keep the surface flat. Continue assembling your rows and columns until the pumpkin pattern begins to take shape. At this stage, precision matters—aligning corners properly ensures a neat and professional result.
Once your top patchwork piece is complete, it’s time to layer the materials. Place the backing fabric face down, add the heat-resistant batting in the middle, and position your patchwork top right side up. Pin or clip the layers together to keep them from shifting during quilting.
For the quilting, you can choose from various techniques. Straight-line quilting is simple and clean, while free-motion quilting adds a touch of artistry. You might outline the pumpkin shape with stitching or create a grid pattern to highlight your patchwork sections. The goal is to secure all layers while enhancing the visual texture.
After quilting, trim the edges evenly to square up your pot holder. Then, attach the binding by sewing it around the perimeter. You can use bias tape or make your own binding strips from matching fabric. Fold the binding over the edges and topstitch neatly for a polished finish.
Add a small fabric loop to one corner so you can hang your pot holder conveniently in the kitchen. Once done, give it a final press with an iron—and your handmade Halloween Pumpkin Patchwork Pot Holder is ready to use or gift!
The best part about making a Halloween Pumpkin Patchwork Pot Holder is experimenting with design variations. Instead of traditional orange pumpkins, try making white pumpkins for a chic minimalist theme. You can even use purple and green fabrics for a witchy vibe that suits Halloween perfectly.
Add appliqué details such as stitched pumpkin faces, leaves, or vines to give your pot holder extra character. Embroidery is another great way to personalize your piece—consider adding your initials, the year, or a fun Halloween quote.
If you enjoy hand quilting, use visible thread in contrasting colors to create decorative stitches. These small details make your project unique and showcase your craftsmanship. You could also embellish your pot holder with buttons or felt cutouts shaped like bats or ghosts for a playful touch.
Try mixing different textures too. Combine quilting cotton with felt or corduroy to give the patchwork more dimension. Layered textures make your pot holder look more sophisticated while maintaining its handmade charm.
Another creative idea is to make a set of Halloween pot holders, each with a different pumpkin design. You can gift them as a set or use them as part of your kitchen’s seasonal display. Coordinating them with matching table runners or placemats creates a beautifully cohesive look.
Finally, consider sustainability—repurpose old fabric scraps or clothing items. It’s an eco-friendly way to craft while reducing waste, and it adds sentimental value if you use fabrics with special memories.
To keep your Halloween Pumpkin Patchwork Pot Holder looking fresh and vibrant year after year, proper care is essential. Always wash it in cold water on a gentle cycle to preserve the fabric colors. Avoid bleach and harsh detergents that can fade the vibrant Halloween tones.
After washing, reshape the pot holder while damp and let it air dry. If needed, press it with a warm iron—but avoid direct heat on any metallic fabrics or embellishments. Storing it flat or hanging it by its loop helps maintain its shape.
When displaying your pot holder, hang it in a visible spot such as a kitchen hook, cabinet handle, or oven door. It doubles as both a decoration and a practical kitchen item. During Halloween, consider pairing it with matching kitchen towels or placemats to complete your festive look.
If you have multiple designs, rotate them throughout the season. This keeps your kitchen décor dynamic while preventing excessive wear on a single piece. It’s a fun way to celebrate creativity every year.
For long-term storage, place your pot holder in a fabric bag or box to protect it from dust and moisture. Avoid plastic containers, as they can trap humidity and damage the fabric over time.
Finally, if you ever notice worn spots or fraying, simply repair them with small stitches. Patchwork items are forgiving—small imperfections often add to their handmade beauty and story.
1. What materials do I need to make a Halloween Pumpkin Patchwork Pot Holder?
You’ll need cotton fabrics in Halloween colors, heat-resistant batting, thread, scissors, a rotary cutter, pins, a sewing machine, and an iron.
2. Can I make this project without a sewing machine?
Yes, you can hand-sew your patchwork, though it will take longer. Use small, even stitches for neat results.
3. Is the pot holder safe to use with hot pans?
Yes, as long as you include heat-resistant batting like Insul-Bright. Avoid using synthetic fabrics that can melt.
4. How big should a pot holder be?
A typical pot holder measures about 8×8 inches, but you can adjust the size to your preference.
5. Can I personalize the pot holder?
Absolutely! Add embroidery, appliqué, or fabric paint to customize your design.
6. Is this a good beginner sewing project?
Yes, the Halloween Pumpkin Patchwork Pot Holder is ideal for beginners because it involves basic cutting, piecing, and quilting techniques.
The Halloween Pumpkin Patchwork Pot Holder is more than just a kitchen accessory—it’s a creative expression of the season. From choosing fabrics to assembling your patchwork and adding finishing touches, this project combines functionality with artistry. It’s sustainable, fun, and perfect for all skill levels.
Whether you’re crafting for yourself or making a thoughtful handmade gift, your Halloween Pumpkin Patchwork Pot Holder will add warmth and charm to any kitchen this fall.
If you enjoyed this tutorial, leave your honest opinion and suggestions below—I’d love to hear how your project turned out and what creative twists you added! 🎃


