
Crocheted house-shaped cookie for Christmas tree

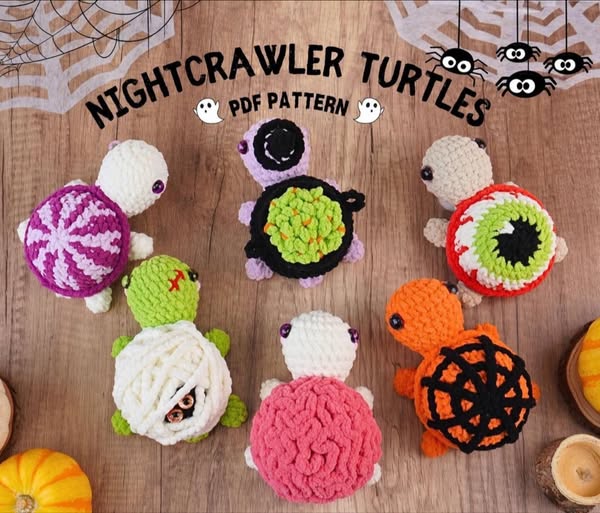
If you’re looking for a festive and adorable project for October, this Halloween Turtle No Sew Crochet Pattern is the perfect way to bring spooky charm into your handmade crafts.
Combining the cuteness of a turtle with fun Halloween themes like pumpkins, witches, and candy corn colors, this project is quick, simple, and completely free from sewing.
Whether you’re an experienced crocheter or a total beginner, you’ll love how easy it is to bring this little turtle to life.
The beauty of a no sew crochet pattern is that everything is worked in one piece or seamlessly joined as you go, so you can skip the frustration of stitching body parts together at the end.
This makes it beginner-friendly and time-saving while still resulting in an adorable and professional-looking amigurumi. You can make a whole family of Halloween turtles, each with unique color schemes or tiny themed accessories like hats or pumpkins on their shells.
What makes the Halloween Turtle No Sew Crochet Pattern stand out is how versatile it is. You can create your turtle in classic green tones with orange and black shells, or go all out with pastel “cute spooky” colors for a softer Halloween look. Add a few finishing details—like embroidered eyes, blush cheeks, or a little felt bat wing—to give it your personal twist. Whether it’s for decoration, gifting, or simply to celebrate the spooky season in style, this pattern is guaranteed to make you smile every time you see your tiny turtle.
Before starting your Halloween Turtle No Sew Crochet Pattern, gather all the materials so your work flows smoothly. The right tools and yarn choices make a big difference in how your final piece looks.
Start with worsted-weight yarn or cotton yarn, depending on your preference. Acrylic yarns work great for amigurumi because they hold shape and color well. For a Halloween theme, pick colors like pumpkin orange, deep black, ghostly white, or candy corn yellow. If you want a classic turtle vibe with a seasonal twist, use dark green for the body and orange for the shell.
You’ll also need a 3.0 mm or 3.5 mm crochet hook, a stitch marker, fiberfill stuffing, and a yarn needle for weaving ends (but remember, no sewing required!). A small pair of scissors and some safety eyes (6mm or 8mm) will complete your toolkit.
If you prefer embroidered eyes, black yarn or embroidery thread works perfectly. Optional decorations include mini bows, felt shapes, or Halloween-themed buttons to glue on the shell. Adding a touch of metallic or sparkly yarn can also bring your Halloween turtle to life under party lights.
Finally, make sure you have good lighting and a comfortable spot to crochet—it’s a relaxing and creative process, so enjoy every stitch of your Halloween Turtle No Sew Crochet Pattern journey.
To begin, start by crocheting the head and body in one piece. This is what makes the no sew crochet pattern so convenient—there’s no need to attach separate pieces later. Begin with a magic ring using your base color, usually green or orange, and work in continuous rounds. Increase gradually to shape the head, then continue straight to form the neck and upper shell area.
Once you reach the body section, switch to your Halloween accent color—orange, black, or purple are all fun choices. Continue increasing to create a rounded shell. When you’ve reached the desired width, start decreasing to close the shape, leaving an opening for the stuffing. Gently add fiberfill, making sure it’s firm but not too tight, to keep your turtle plump and cuddly.
The legs and tail are typically crocheted directly onto the body, using the same yarn or contrasting color for a playful touch. You can make short, stubby legs for a cute look or longer ones if you want your turtle to have more character. The small tail can be made in just a few stitches. Since this is a no sew pattern, everything connects directly through stitches, making it neat and fast.
For the face, place the safety eyes between rounds 7 and 8 (depending on size). Add a little embroidered smile or small felt cheeks for extra cuteness. You can also crochet a tiny witch hat or pumpkin accessory and attach it directly while crocheting the top rounds—keeping everything seamless.
Once finished, weave in any loose ends neatly and adjust the stuffing. Your Halloween Turtle No Sew Crochet Pattern is complete! You’ll instantly fall in love with how cute and spooky your little turtle looks.
The best part about this Halloween Turtle No Sew Crochet Pattern is how many ways you can customize it. You can design several turtles, each representing different Halloween characters or themes. For instance, make a Pumpkin Turtle with a bright orange shell and green leaves on top. Or create a Witch Turtle by using black and purple yarns, adding a tiny crocheted hat.
If you want to go for something funny, try a Candy Corn Turtle, with stripes of white, orange, and yellow across its shell. You can even create a Ghost Turtle using all-white yarn and a cute black embroidered face. The possibilities are endless, and each variation adds a special personality to your turtle collection.
You can also mix textures by using velvet or chenille yarns for a softer and fluffier turtle. Adding glitter yarn for the shell gives it a magical Halloween sparkle. Small details like embroidered stars, moons, or spiderweb patterns on the shell can elevate your design even more.
Don’t forget the accessories! Mini crocheted pumpkins, candy pieces, or broomsticks can make your turtles look even more festive. These can be attached with glue or crocheted directly into the body if you prefer a completely no-sew finish.
For gifting, wrap your Halloween turtle in a small treat bag or place it inside a pumpkin basket. It makes a wonderful handmade present for friends, kids, or anyone who loves Halloween and crochet. Each Halloween Turtle No Sew Crochet Pattern creation tells its own story—sweet, spooky, and full of handmade charm.
Once your turtle is finished, take a few moments to perfect the final touches. Use your fingers to gently shape the head and shell, making sure the stuffing is evenly distributed. A small brush or your nails can help fluff up the yarn if needed.
If you used safety eyes, ensure they’re securely fastened. For embroidered faces, check the stitching for consistency and symmetry—it’s the little details that make your turtle’s personality shine. You can also lightly spray your project with fabric stiffener if you want it to hold shape better, especially if displayed upright.
Your Halloween Turtle No Sew Crochet Pattern creation will look adorable anywhere—on your mantel, desk, or even as part of your Halloween centerpiece. Add fake spider webs, mini pumpkins, and LED candles around it for a complete display.
If you want to make a collection, display turtles of different sizes together. Smaller ones can serve as keychains or party favors, while larger ones can become room decorations. You can even create themed sets like “Pumpkin Patch Turtles” or “Haunted Forest Turtles” to surprise your guests.
Lastly, take a few pictures of your finished work! Sharing your creation on social media or crochet groups is a great way to connect with other crafters. Handmade pieces like this not only bring joy but also inspire creativity in others—exactly what Halloween crafting is all about.
1. Is this pattern beginner-friendly?
Yes! The Halloween Turtle No Sew Crochet Pattern is perfect for beginners since it uses basic stitches and no sewing. Even if you’re new to amigurumi, you can easily follow along.
2. What stitches do I need to know?
You’ll mainly use single crochet, increase, and decrease stitches. These are the core techniques needed to shape the turtle.
3. Can I make the turtle in different sizes?
Absolutely. Simply adjust your yarn weight and hook size. Thicker yarn and a larger hook will make a bigger turtle, while thinner yarn will create a mini version.
4. How do I make it more Halloween-themed?
Use orange, black, and purple yarns. Add small details like a mini witch hat, pumpkin, or spiderweb embroidery to make it more festive.
5. Do I really not have to sew anything?
That’s right! All parts of this pattern are crocheted directly onto the body. You’ll only weave in your yarn ends when finished—no attaching limbs or heads separately.
6. Can I sell my finished turtles?
Yes, you can sell finished turtles made from this Halloween Turtle No Sew Crochet Pattern, as long as you credit the original design if required by the pattern’s creator. Handmade items like these are perfect for craft fairs or online shops during Halloween season.
The Halloween Turtle No Sew Crochet Pattern is a fun, quick, and heartwarming project that combines the spooky excitement of Halloween with the cozy creativity of crochet. It’s perfect for both beginners and seasoned crafters who love making themed amigurumi without the hassle of sewing parts together. From playful pumpkin designs to cute ghostly styles, your little turtles will add charm and handmade spirit to any Halloween setup.
Now that you know how to make your own, grab your yarn, pick your favorite colors, and start crocheting! And once your Halloween Turtle is finished, don’t forget to share your experience—leave your honest opinion and suggestions about how your spooky-cute turtle turned out. Your creativity might just inspire someone else’s next Halloween masterpiece!


