
Crocheted house-shaped cookie for Christmas tree

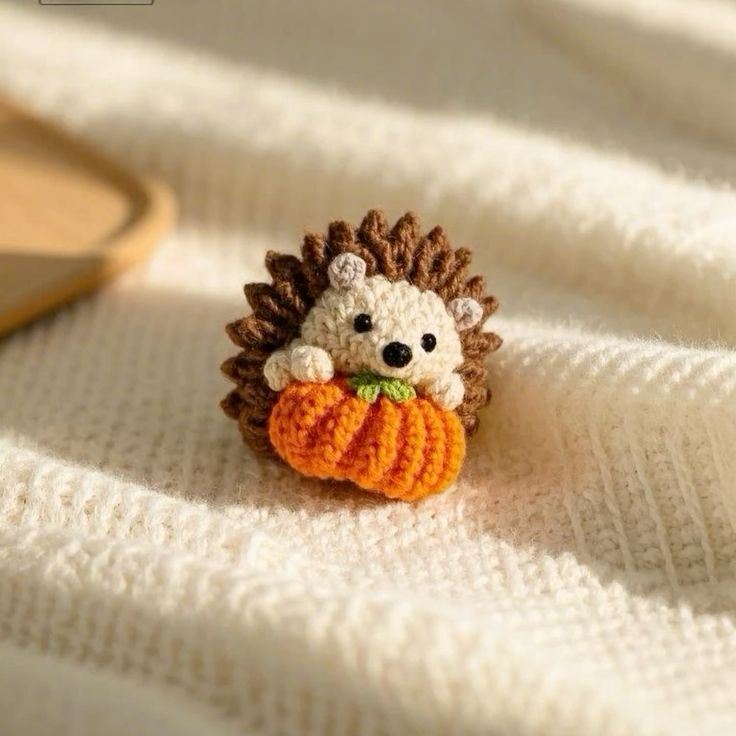
The Crochet Hedgehog with Pumpkin – Pattern is a delightful project that combines the charm of autumn with the cuteness of small woodland creatures.
This amigurumi pattern is perfect for adding a seasonal touch to your home decor, creating handmade gifts, or practicing your crochet skills.
By following this pattern, you can create an adorable hedgehog holding a miniature pumpkin, a whimsical piece that captures the warmth and coziness of fall.
Creating a Crochet Hedgehog with Pumpkin – Pattern is more than just making a toy—it’s a fun way to express creativity, patience, and attention to detail.
The small details, like the hedgehog’s spines, tiny paws, and expressive face, require focus, but the final result is incredibly rewarding. This pattern is suitable for crocheters who have mastered basic amigurumi techniques, but even advanced beginners can enjoy it with careful attention to the instructions.
This project also provides a perfect opportunity for holiday decorating or gifting. The Crochet Hedgehog with Pumpkin – Pattern can sit on a shelf, mantelpiece, or desk to bring charm and seasonal spirit to any room. With customizable yarn colors and optional embellishments, each hedgehog can be made unique, reflecting your personal style or the preferences of the gift recipient.
Choosing the right materials is essential for a successful Crochet Hedgehog with Pumpkin – Pattern. Start with soft but durable yarns such as worsted-weight acrylic or cotton blends. These provide structure for the hedgehog’s body while remaining easy to stitch and manipulate.
For the hedgehog’s spines, consider using a slightly textured or fuzzy yarn to create a realistic and tactile effect. The pumpkin can be crocheted using bright orange yarn for a classic look, while green yarn is ideal for the stem. Safety eyes or small black beads work well for the hedgehog’s eyes, giving it a lively expression.
Other essential materials include a crochet hook suitable for your yarn weight, a yarn needle for sewing parts together, stuffing for both the hedgehog and pumpkin, stitch markers, and scissors. Optional materials like embroidery floss or felt can add additional details to the face or pumpkin.
When selecting yarn colors, think about how the shades will complement each other. Soft browns and tans work beautifully for the hedgehog’s body, while contrasting oranges, greens, and yellows make the pumpkin pop. Pre-washing the yarn is recommended to prevent color bleeding and shrinkage.
It is also helpful to have a small bowl of polyfill or fiberfill for stuffing. Proper stuffing is crucial to achieving the rounded, three-dimensional shape of both the hedgehog and pumpkin. Overstuffing or understuffing can distort the final look, so consistency is key.
The Crochet Hedgehog with Pumpkin – Pattern uses basic amigurumi stitches along with a few techniques to create realistic details. You’ll primarily work with chain (ch), single crochet (sc), slip stitch (sl st), and increases/decreases. These simple stitches form the foundation of your hedgehog and pumpkin.
For the hedgehog’s body, work in continuous rounds to create a smooth, seamless shape. Use stitch markers to keep track of your rounds, which helps maintain even increases and decreases. The spines can be crocheted separately or integrated using loop stitches to create texture.
The pumpkin is usually crocheted in rounds, increasing and decreasing to form a plump, rounded shape. Adding vertical ridges with surface crochet or embroidery gives it a more realistic pumpkin appearance. Both elements—the hedgehog and pumpkin—are then carefully sewn together using a yarn needle.
Color changes are essential for this pattern, particularly for the hedgehog’s snout and the pumpkin’s stem. Learn clean color transition techniques to maintain a neat appearance. Weaving in yarn ends carefully ensures the amigurumi looks professional and polished.
Optional details such as embroidered nostrils, mouth, or claws can be added to enhance the character. Tiny embellishments, like a miniature scarf for the hedgehog or leaves on the pumpkin, give the finished piece extra charm and personality.
To assemble your Crochet Hedgehog with Pumpkin – Pattern, start by shaping the hedgehog’s body. Stuff it firmly but gently, ensuring that the shape remains round and symmetrical. Attach the safety eyes securely and stitch the nose and mouth if not crocheted separately.
Next, create the spines. If using loop stitches, insert the loops evenly across the back. If crocheting separately, attach the spines carefully to ensure they are evenly spaced and stable. The placement of spines greatly affects the hedgehog’s overall look, so take time to arrange them neatly.
The pumpkin is stuffed and shaped separately, then sewn onto the hedgehog’s paws or positioned under its arms for a cozy, holding effect. Ensure that the stitches securing the pumpkin are tight and hidden, giving a seamless, integrated look.
Double-check all parts before final finishing. Make sure that the hedgehog can sit upright without tipping over and that the pumpkin is secure. Adding small safety stitches or reinforcing areas that hold the weight of the pumpkin ensures durability.
Finally, give the finished piece a gentle shaping with your hands. Adjust the spines, smooth out the stuffing, and position the pumpkin so the composition looks balanced. Your Crochet Hedgehog with Pumpkin – Pattern is now ready for display or gifting.
The Crochet Hedgehog with Pumpkin – Pattern offers many possibilities for personalization. You can change yarn colors to create unique hedgehogs, like a dark brown body with cream spines or a whimsical pink pumpkin. Experiment with textures to make the spines bushy, soft, or slightly curly.
Adding tiny accessories, such as a scarf, a hat, or little acorns, enhances the seasonal charm and makes each hedgehog unique. You can also create a set of hedgehogs with different pumpkins, perfect for a fall-themed centerpiece or gift collection.
For a more playful variation, crochet a miniature pumpkin patch with several small pumpkins and multiple hedgehogs. This creates a full scene that can be used for home decoration or photography displays.
Embellishments like embroidered flowers, leaves, or tiny beads can make the pumpkin appear more realistic. You can even create themed designs, such as Halloween hedgehogs with black pumpkins or autumn festival colors, adding versatility to your Crochet Hedgehog with Pumpkin – Pattern.
Finally, adjusting the size of the hedgehog and pumpkin allows for dolls, keychains, or larger stuffed animal versions. These creative adjustments give you flexibility in crafting gifts, decorations, or personalized toys.
1. Is this pattern suitable for beginners?
It’s best for intermediate crocheters familiar with amigurumi techniques. Beginners can attempt it with patience and practice.
2. What yarn works best?
Worsted-weight acrylic or cotton blends are ideal for structure and softness. Use brown/tan for the hedgehog and orange/green for the pumpkin.
3. How do I attach the pumpkin securely?
Use a yarn needle and strong stitches, ensuring it’s firmly attached to the hedgehog’s paws or body.
4. Can I customize colors?
Yes, you can use any color combination for both the hedgehog and pumpkin, including fantasy colors.
5. What stuffing should I use?
Polyfill or fiberfill works well. Stuff firmly but not excessively to maintain shape.
6. Can I make smaller versions for keychains?
Yes, scale down the pattern using thinner yarn and a smaller crochet hook.
7. Is the finished hedgehog washable?
Hand wash in cold water and air dry for best results. Avoid machine washing to maintain shape.
The Crochet Hedgehog with Pumpkin – Pattern is a charming, versatile, and enjoyable project that captures the warmth of autumn. Its combination of cute design, creative possibilities, and seasonal appeal makes it perfect for gifting, decorating, or enhancing your crochet skills.
By following this guide, you can create a beautifully detailed hedgehog holding a pumpkin, experimenting with textures, colors, and embellishments to make each piece unique.
We encourage you to try this pattern, share your results, and leave your honest opinions and suggestions. Your feedback helps inspire creativity and keeps the joy of handmade crochet alive.


