
Crocheted house-shaped cookie for Christmas tree

The Crochet Pumpkin Coasters Patterns are a charming and practical way to celebrate the autumn season while adding a handmade touch to your home décor.
These coasters are not only functional for protecting tables from spills and heat but also bring the warm, festive colors of fall into your living space.
Featuring classic pumpkin shapes with textured details, these patterns are perfect for beginners and experienced crocheters who want a quick and satisfying seasonal project.
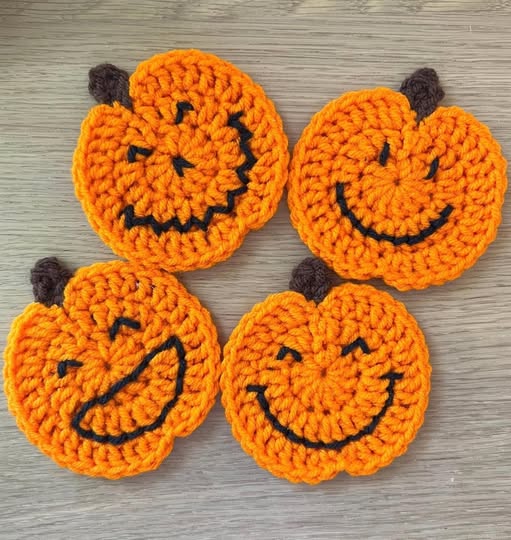
Starting with the Crochet Pumpkin Coasters Patterns, you can select vibrant autumnal yarns such as orange, green, and brown to replicate the natural colors of pumpkins.
These coasters work beautifully as a set, creating a cohesive autumn table setting or seasonal gift. Each stitch contributes to the depth and texture of the pumpkin, making the coasters visually appealing while maintaining durability.
These patterns are versatile—you can customize the size, shape, and color combinations to suit your needs. Whether you want mini coasters for espresso cups or larger ones for mugs and glasses, the Crochet Pumpkin Coasters Patterns can be adapted easily. In this tutorial, you’ll learn the essential materials, techniques, and steps to create your own festive coasters.
To begin your Crochet Pumpkin Coasters Patterns, gather the necessary materials and tools. Medium-weight cotton or acrylic yarn is recommended, as it provides durability and maintains its shape well under use. Typical colors include orange for the pumpkin, green for the stem, and optional brown for accents.
You’ll need a suitable crochet hook—usually between 3.5 mm and 5 mm depending on your yarn choice. Other essential tools include scissors, a yarn needle for weaving in ends, and stitch markers if needed. Optional embellishments such as embroidery thread or small buttons can enhance the coasters, adding personal flair.
Choosing high-quality yarn ensures your Crochet Pumpkin Coasters Patterns are long-lasting and maintain their appearance even after repeated washing. Pre-wash the yarn if desired to prevent color bleeding and shrinkage. Consider coordinating the yarn shades to create visually striking sets that evoke the richness of autumn.
Before starting the Crochet Pumpkin Coasters Patterns, it’s important to familiarize yourself with some basic crochet stitches and techniques. Common stitches include chain (ch), slip stitch (sl st), single crochet (sc), half double crochet (hdc), and double crochet (dc). These stitches form the foundation of the pumpkin shape and its textured sections.
Shaping the pumpkin involves using increases and decreases strategically, especially for the curved sides. Working in the round is a common approach, giving the coaster its circular, pumpkin-like structure.
Adding details such as the stem and ridges often involves simple techniques like surface slip stitching or crocheting small separate pieces to attach later. Practicing these techniques on small swatches can help you achieve consistent tension and clean results for your Crochet Pumpkin Coasters Patterns.
Begin your Crochet Pumpkin Coasters Patterns by creating a magic ring or chain circle to start the base of the pumpkin. Work in rounds, gradually increasing to form the flat circular coaster body. Maintaining consistent stitch tension is key to ensuring an even shape.
Once the base is complete, start creating the textured ridges of the pumpkin by using post stitches or alternating front and back post crochet techniques. These ridges give the pumpkin depth and realism. Continue until the pumpkin reaches the desired fullness.
Next, crochet a small green stem, either as a separate piece to sew on or directly attached to the top of the pumpkin. The stem can be simple or slightly textured with twisted stitches to add interest. Secure it firmly to ensure durability.
After assembling the coaster, weave in all ends carefully to create a neat finish. Check the shape and make minor adjustments if necessary to maintain the roundness and ridge definition.
For a set, repeat the process, mixing slight variations in size, shape, or color for added charm. This helps create a more dynamic and visually appealing collection of Crochet Pumpkin Coasters Patterns.
Finally, lightly block the coasters if needed to flatten and shape them for perfect presentation. Cotton yarn can be gently steamed or pinned into shape while damp to achieve a polished finish.
The Crochet Pumpkin Coasters Patterns can be customized in many ways. Experiment with colors such as yellow, deep orange, or even white to create different pumpkin varieties. Adding a brown or golden accent along the ridges adds dimension and realism.
Change the size of the coaster to accommodate different cups, mugs, or bowls. Mini pumpkins make adorable espresso coasters, while larger ones suit full-size mugs or bowls for autumnal table settings.
Additional embellishments such as embroidery, beads, or a small leaf attached to the stem can enhance the visual appeal. Personalization, such as adding initials or seasonal motifs, also makes these coasters excellent handmade gifts.
Experiment with yarn textures as well—cotton for smooth and sturdy coasters, or a blend with acrylic for softness and subtle sheen. Each variation allows you to create a unique set of Crochet Pumpkin Coasters Patterns that perfectly reflects your autumn décor style.
1. Are these coasters suitable for beginners?
Yes, the patterns are beginner-friendly, using basic stitches and easy-to-follow shaping techniques.
2. What yarn should I use?
Medium-weight cotton or acrylic yarn works best for durability and structure.
3. Can I wash the coasters?
Yes, hand wash or machine wash on a gentle cycle with cold water, then lay flat to dry.
4. How big should the coasters be?
Standard sizes range from 4 to 5 inches in diameter, but you can adjust depending on your cup or mug size.
5. Can I make a set with different pumpkin colors?
Absolutely, mixing orange, yellow, white, or even multicolor yarns creates a charming set.
6. How do I attach the stem securely?
Crochet the stem as a separate piece and sew it firmly to the center top, or crochet it directly onto the coaster.
7. Are these suitable as gifts?
Yes, handmade pumpkin coasters make perfect seasonal gifts for friends, family, or colleagues.
In addition to their beauty and functionality, the Crochet Pumpkin Coasters Patterns are perfect for sparking creativity and practicing crochet techniques. Making each piece allows you to explore color combinations, textures, and personalized details, making every coaster unique. These quick projects are also great for developing precision and patience, while providing immediate satisfaction. Moreover, they transform any ordinary table into a warm and festive space, perfectly capturing the cozy spirit of autumn.
The Crochet Pumpkin Coasters Patterns are a delightful way to celebrate the autumn season while creating functional and decorative pieces for your home. These coasters combine practicality with creativity, allowing you to enjoy a quick, satisfying crochet project.
By following this tutorial, you can craft coasters that are durable, festive, and customizable, adding warmth and charm to your table settings. Each stitch contributes to a beautiful, textured pumpkin design that reflects your attention to detail and love for handmade crafts.
We hope this guide inspires you to create your own Crochet Pumpkin Coasters Patterns this season. Share your experience, leave feedback, and offer suggestions for future variations—your insights help keep the joy of handmade crafting alive!


